Advertisement
Quick Links
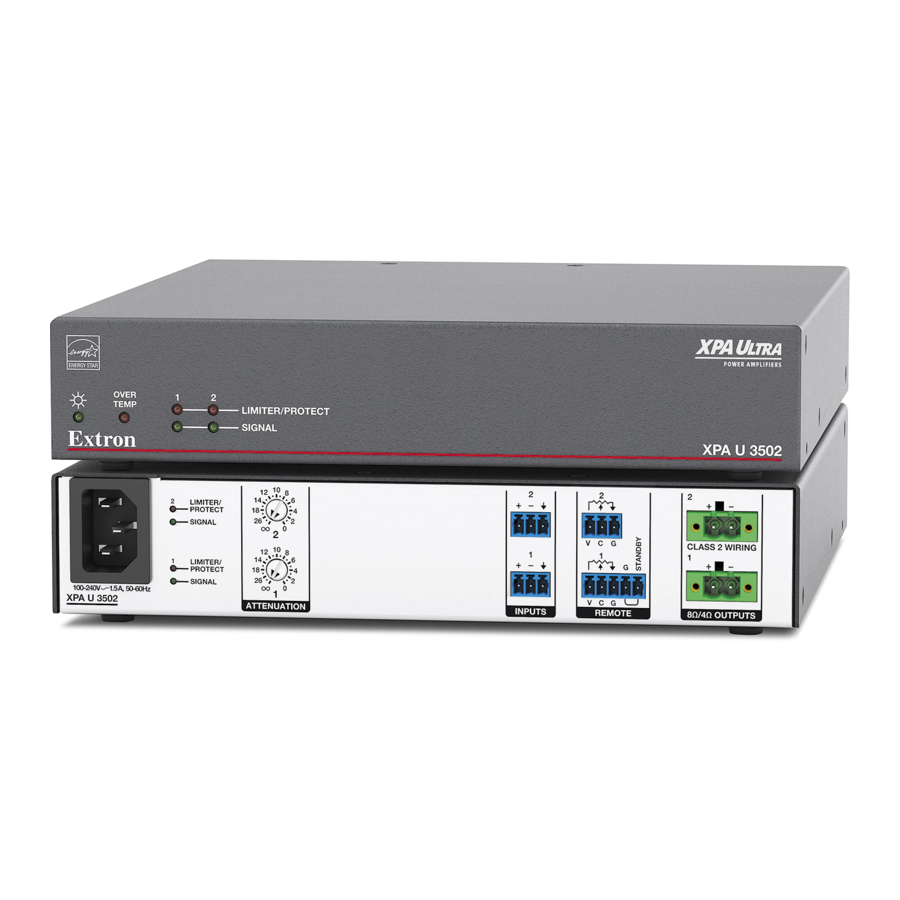
XPA U 3502 • Setup Guide
The Extron XPA U 3502 is a 2-channel audio power amplifier for use in low-impedance speaker systems.
The XPA U 3502 is 1U high, half rack width, and rack mountable. The amplifier has mounting holes for 9" and deeper rack shelves, and
is plenum-rated with an optional flex conduit adaptor. The unit is convection cooled.
This guide provides instructions for an experienced installer to set up and operate the XPA U 3502 power amplifier. For full installation,
configuration, and operation details, see the XPA U 3502 User Guide available at www.extron.com.
Installation Steps
Step 1 — Mounting
Turn off all of the equipment and disconnect it from the power source. Mount the amplifier as required; the unit can be securely
mounted in a variety of locations using optional Extron Mounting Brackets and accessories (see the
optional mounting accessories) or using the included 3-piece bracket system. The brackets do not come attached to the amplifier.
Below are two methods of rack mounting the amplifiers.
Rack Ear Mounting (Single Unit)
The XPA U 3502 ships with a set of rack ears, allowing the amplifier to be installed in a full rack-width space. Mount the amplifier with
rack ears as follows:
If the amplifier has its flat bottom rubber feet installed, remove them.
1.
Attach the rack ears to the sides with the four provided #6 machine screws (
2.
Insert the amplifier into the rack and align the holes in the rack ears with the holes on the rack.
3.
Secure the amplifier to the rack using the four provided 10-32 x 3/4" screws (
4.
1
OV
TE
ER
M P
1
2
LI M
IT ER
SI GN
/P RO
AL
TE
CT
Figure 1.
XPA U 3502 Rack Ear Mounting
Bridge Plate Rack Mounting (Side-by-Side)
The XPA U 3502 ships with a bridge plate connector to connect two amplifiers together and form a full rack-width unit. Mount and
connect two amplifiers as follows:
If the amplifier has its flat bottom rubber feet installed, remove them.
1.
Position two amplifiers upside down and next to each other as shown below.
2.
Use the bridge plate connector and the four provided #4 machine screws to connect the two units together (
3.
Attach the two short rack ears to the units with the four provided #6 machine screws (
4.
Insert the amplifier into the rack and align the holes in the rack ears with the holes on the rack.
5.
Secure the amplifier to the rack using the four provided 10-32 x 3/4" screws (
6.
).
1
).
2
2
OV
TE
ER
M P
1
2
LI M
IT ER
SI GN
/P RO
AL
TE
CT
2
).
3
Extron website
for compatible
).
1
).
1
Advertisement

Related Manuals for Extron electronics XPA U 3502


Summary of Contents for Extron electronics XPA U 3502
- Page 1 Below are two methods of rack mounting the amplifiers. Rack Ear Mounting (Single Unit) The XPA U 3502 ships with a set of rack ears, allowing the amplifier to be installed in a full rack-width space. Mount the amplifier with rack ears as follows: If the amplifier has its flat bottom rubber feet installed, remove them.
- Page 2 V e n or surpass +122 °F (+50 °C). See the image to the right for the p a c optimal way to arrange the XPA U 3502. No more than four stacks V e n V e n of amplifiers in a one-on-top-of-the-other arrangement should...
- Page 3 Set Amplifier Output Mode Step 2 — Rear Panel Configuration Follow the instructions below to learn how to configure the rear panel for the XPA U 3502. • Wire the source output to the Line Input 3.5mm captive screw port as shown below. Figure 3 shows both balanced and unbalanced inputs.
- Page 4 Adjust audio attenuation using the rear panel adjustment attenuators as seen to the right. ∞ See Rear Panel Features in the XPA U 3502 User Guide for more information. ∞ ATTENUATION ATTENTION: •...
Need help?
Do you have a question about the XPA U 3502 and is the answer not in the manual?
Questions and answers