Advertisement
Quick Links
Please Contact Moen First
For Installation Help, Missing or
Replacement Parts
(USA)
1-800-BUY-MOEN (1-800-289-6636)
Mon - Fri 8:00 AM to 7:00 PM, Eastern
Sat. 9:00 AM to 3:00 PM Eastern
WWW.MOEN.COM
(Canada)
1-800-465-6130
Mon - Fri 7:30 AM to 7:00 PM, Eastern
WWW.MOEN.CA
Por favor, contáctese primero con Moen
Para obtener ayuda de instalación, piezas
faltantes o de recambio
01-800-718-4345
Lunes a viernes de 8:00 a 20:00 hs.
(Costa Este)
Sáb. 8:00 a 18:30 hs. (Costa Este)
WWW.MOEN.MX
Veuillez d'abord contacter Moen
en cas de problèmes avec l'installation, ou pour
obtenir toute pièce manquante ou de rechange
1-800-465-6130
Du lundi au vendredi:
de 7 h 30 à 19 h, HE
WWW.MOEN.CA
HERRAMIENTAS ÚTILES
HELPFUL TOOLS
Para que el cambio de la llave sea fácil y
For safety and ease of faucet
seguro, Moen le recomienda usar estas
replacement, Moen recommends
the use of these helpful tools.
útiles herramientas.
#2 Phillips
Destornillador de estrella #2
Tournevis à tête cruciforme n 2
Installation Guide
Guía de Instalación
Guide d'installation
3 FUNCTION TRANSFER VALVE TRIM
INSTALLATION INSTRUCTIONS
Model T4112 SERIES
INSTRUCCIONES PARA LA INSTALACIÓN
DE LA TERMINACIÓN DE LA VÁLVULA
DESVIADORA DE 3 FUNCIONES
MODELO SERIE T4112
GARNITURE DE ROBINET COUPLEUR À 3 FONCTIONS
DIRECTIVES D'INSTALLATION
MODÉLE SÉRIE T4112
OUTILS UTILES
Par mesure de sécurité et pour
faciliter l'installation, Moen suggère
l'utilisation des outils suivants.
5/32"
4mm
INS1549B - 4/14
CAUTION — TIPS FOR REMOVAL OF OLD FAUCET: Always turn water supply OFF before
removing existing faucet or disassembling the valve. Open faucet handle to relieve water pressure
and ensure that complete water shut-off has been accomplished.
PRECAUCIÓN — CONSEJOS PARA CAMBIAR LA LLAVE MEZCLADORA: Siempre CIERRE la
toma de agua antes de quitar la llave existente o desmontar la válvula. Abra la llave para liberar
la presión, y asegúrese de que esté bien cerrada el agua.
ATTENTION — SUGGESTIONS POUR ENLEVER L'ANCIEN ROBINET : Toujours couper
l'alimentation en eau avant d' e nlever ou de démonter le robinet. Ouvrir le robinet pour libérer la
pression d' e au et pour s'assurer que l'alimentation en eau a bien été coupée.
Advertisement

Related Manuals for Moen T4112 Series


Summary of Contents for Moen T4112 Series
- Page 1 WWW.MOEN.COM (Canada) 1-800-465-6130 Mon - Fri 7:30 AM to 7:00 PM, Eastern WWW.MOEN.CA Por favor, contáctese primero con Moen Para obtener ayuda de instalación, piezas faltantes o de recambio 01-800-718-4345 Lunes a viernes de 8:00 a 20:00 hs. (Costa Este) Sáb.
-
Page 2: Parts List
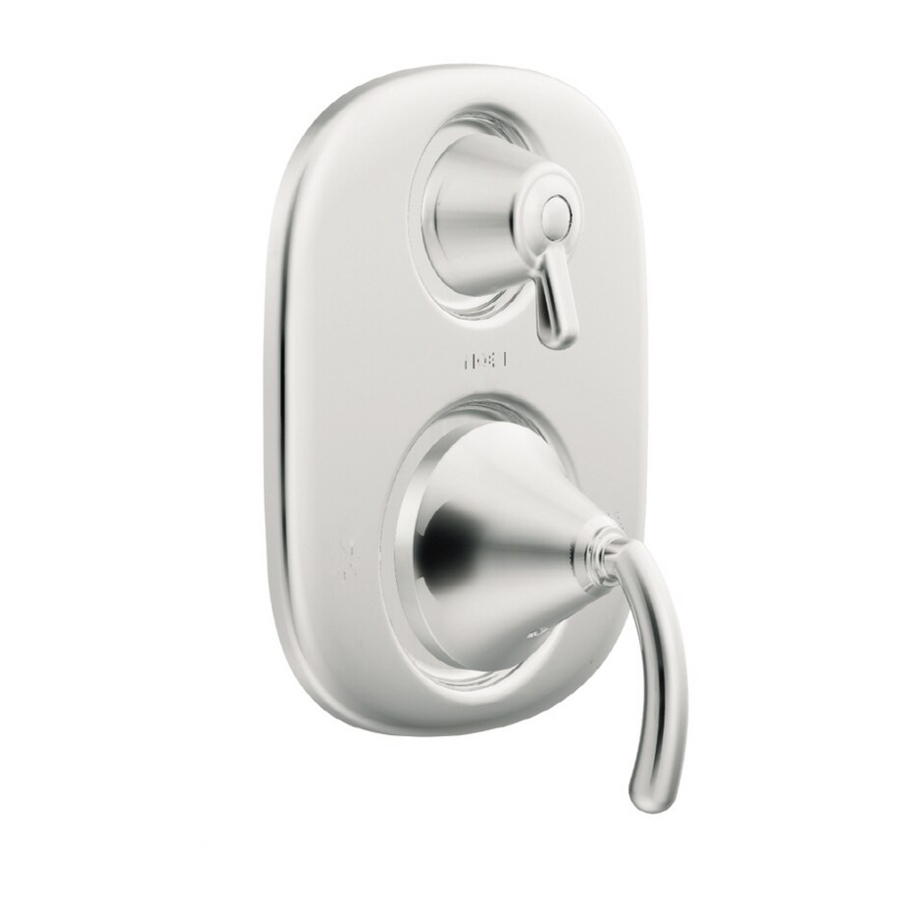
3/32” Parts List If the valve is supplied with Transfer Valve Handle Adapter Escutcheon Handle Adapter Screw (x2) stop tubes go to step Escutcheon Screws (x4) Handle If not go to step Adjustable Temperature Set Screw Limit Stop Tube Spacer M. - Page 3 INS1549B - 4/14 Remove existing stop tubes from Transfer Valve (A). Install Upper Stop Tube (E) and Adjustable Temperature Limit Stop Tube (D) to Transfer Valve Retire los tubos de tope existentes de la válvula de transferencia (A). (A) as shown. Enlever les tubes de limiteur existants du robinet coupleur (A).
- Page 4 3/32” 1. Install 4 Escutcheon Screws (C) to Escutcheon (B). 1. Re-install Stop Tube Nut (F). 2. Secure with Phillips screwdriver. 2. Re-install Screw (G). 3. Use 3/32" Hex Wrench to secure to Adjustable Temperature Limit Stop Tube. 1. Instale los 4 tornillos del chapetón (C) en el chapetón (B). 1.
- Page 5 INS1549B - 4/14 HOTTEST 120F CALOR MÁXIMO (48C) PLUS CHAUDE Push Handle Adapter (H) in as water should stop flowing. Turn Handle Adapter (H) towards hot side to test hot water temperature. Do not exceed 120° F. Empuje el adaptador del maneral (H) hacia adentro y el agua dejará de fluir. Gire el adaptador del maneral (H) hacia el lado caliente para probar la temperatura del agua caliente.
- Page 6 Option/Opcion/Option Option/Opcion/Option 3/32” 1. Use 3/32" Hex Wrench to loosen and adjust Screw (G). Pull Handle Adapter (H) off from Stop Tube. Set aside for re-install. 2. Slide Screw (G) downward to adjust hot water temperature. Tire del adaptador del maneral (H) sacándolo del tubo de tope. Reserve para volver a instalar. 1.
- Page 7 INS1549B - 4/14 Go to step Vaya a paso 3/32” Passer à l'étape 1. Install Handle (J) onto Handle Adapter (H). 2. Install Set Screw (K) into Handle (J). Secure with 3/32" Hex Wrench. 1. Instale el maneral (J) en el adaptador del maneral (H). 2.
- Page 8 Les produits Moen sont fabriqués selon les normes highest standards of quality and workmanship. Moen estrictas normas de calidad y mano de obra. Moen le les plus élevées de qualité et de main-d’œuvre. warrants to the original consumer purchaser for as garantiza al comprador original que durante el tiempo Moen garantit à...
Need help?
Do you have a question about the T4112 Series and is the answer not in the manual?
Questions and answers