Bosch Axxis WFL2090UC Operating And Installation Instructions
Front-loading washing machine
Hide thumbs
Also See for Axxis WFL2090UC:
- Instrucciones de funcionamiento (37 pages) ,
- Installation and connection (9 pages) ,
- Operating & installation instruction (37 pages)
Table of Contents
Advertisement
Advertisement
Table of Contents

Related Manuals for Bosch Axxis WFL2090UC


Summary of Contents for Bosch Axxis WFL2090UC
- Page 1 WFL 2090 Operating, Care and Installation Instructions...
- Page 3 Table of Contents Operating Instructions User Maintenance Instructions Installation Instructions KEEP THESE INSTRUCTIONS FOR FUTURE REFERENCE.
-
Page 4: Important Safety Instructions
DEFINITIONS WARNING WARNING CAUTION CAUTION IMPORTANT SAFETY INSTRUCTIONS WARNING... - Page 5 Notes: SAVE THESE INSTRUCTIONS...
-
Page 6: Disposal Information
Disposal Information Disposing of the packaging The shipping package has protected your new appliance on its way to your home. All packaging materials are non polluting and recyclable. Please contribute to a better environment by disposing of packaging materials in an environmentally conscious manner. -
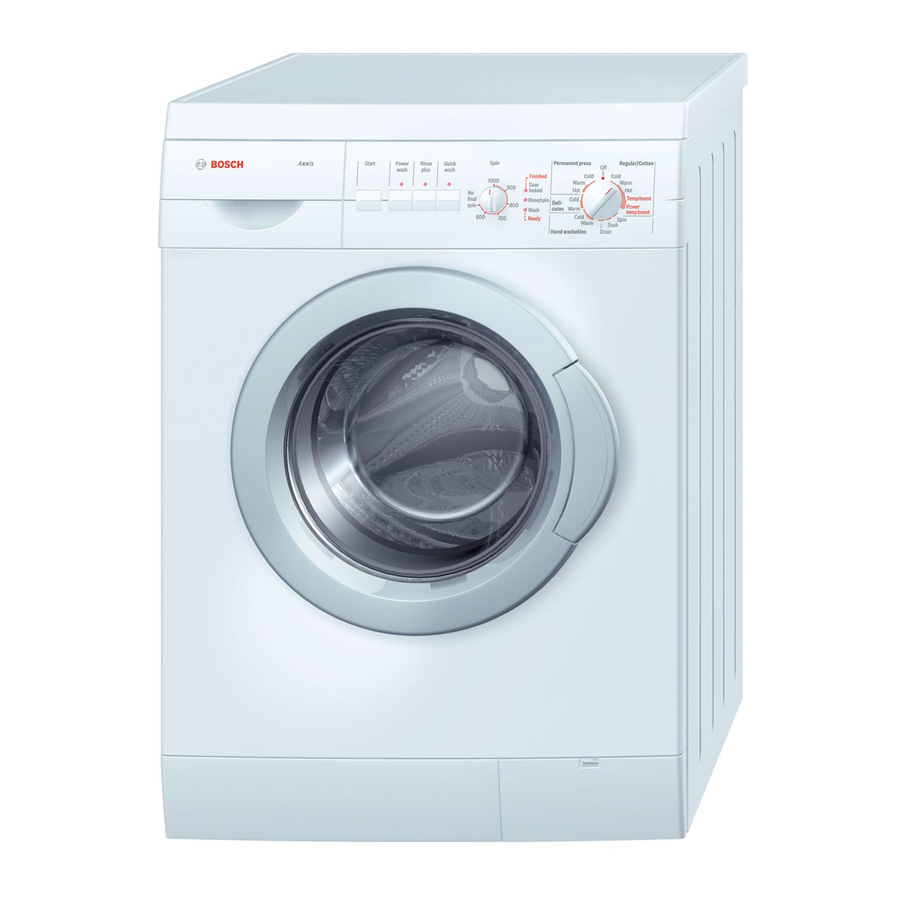
Page 7: Product View
Your New Washing Machine Filling with laundry detergent and/or additives Dispenser I: Detergent for soaking. Dispenser II: Detergent for wash, stain remover. Dispenser Cleaning product, e.g. fabric softener, fabric conditioner (do not fill above the lower edge of insert 1). Opening ... -
Page 8: Control Panel
Control panel 2. Control lights finished flashes when the door can be opened. door locked illuminates while the program is running. rinse/spin illuminates while the rinsing or spinning. wash illuminates when Start is pressed. ready flashes when program is selected. 3. -
Page 9: Delay Time
About Your Washing Machine Before Using For the First Time Using For the First Time boost ready Start wash i door locked wash rinse/spin finished Power temp. -
Page 10: Preparing, Sorting And Loading The Laundry
Preparing, Sorting and Loading the Laundry Preparing the laundry CAUTION debris (e.g. coins, paper clips, needles, nails) can damage items of clothing as well as parts of the washing machine (e.g. drum). q Empty all pockets of the clothing. q Brush out any sand from pockets and cuffs. q Close zippers and button up bed covers. - Page 11 Intensive dirt Typical stains Removing stains Sorting laundry according to care label specifi cations Fabric Types Ó Ô Ò Ì Temperatures Á Ê Â Ú...
-
Page 12: Loading The Laundry
Loading the laundry WARNING Avoid risk of explosion! Items of clothing that have been pretreated with solvent based cleaning agents, e.g. stain remover or dry cleaning chemical, could represent a potential explosion hazard in the contained area of the washing machine. Rinse these items thoroughly by hand before placing them into the machine. -
Page 13: Dispensing The Correct Amount Of Detergent
Laundry Detergents and Additives Dispensing the correct amount of detergent WARNING If you are using too little detergent: If you are using too much detergent: Filling laundry detergent and/ or additives... -
Page 14: Selecting Programs
Selecting Programs Basic programs Regular/Cotton Regular/Cotton Permanent Press Permanent Press Delicates Delicates Hand Washables Hand Washables Temperature Settings Power temp. boost Temp. boost warm cold Extra cycle program selector Spin Soak Drain final spin... -
Page 15: Additional Function On Spin Speed Selector
Spin speed selector Basic setting Spin speed selector pointing upward at 1000 rpm. In the Regular/Cotton program the fabrics will be spun at the maximum available spin speed. In the Permanent Press, Delicates and Hand Washables programs, a lower spin speed will automatically be used, regardless of the position of the spin speed selector - for more gentle washing of the laundry. - Page 16 Washing q Turn on the water taps. q Turn the program selector to the desired program. q Select the desired spin speed or no final spin. q Where required, press the option button(s) for additional function(s). q Press the Start button. The wash light comes on, and the program starts.
-
Page 17: Changing A Program
Soaking Soak ready Start wash Bleaching WARNING Decolorizing CAUTION Changing a program Soak Canceling an active program Spin ready Start wash Drain ready no final spin Start wash Spin... -
Page 18: When The Program Has Ended
When the Program has Ended The finished light is flashing. q Turn the program selector to Off, and, when required: q Select a program (Drain or Spin). q Press the Start button. The rinse/spin light comes on and the program starts. q At the end of the program , turn the program selector to Off. -
Page 19: User Maintenance Instructions
User Maintenance Instructions Cleaning and Care WARNING Avoid risk of electric shock! Always disconnect the appliance from the power supply before cleaning. Never clean the washing machine with a stream of water. WARNING Avoid risk of explosion! Never use solvents to clean the appliance. Cleaning the appliance housing and control panel As required:... -
Page 20: Cleaning The Drain Pump
q Push down the insert until it clicks into place. q Reinsert the detergent dispenser into place. Cleaning the drain pump This is necessary if the water cannot be drained completely. This could result if the pump is blocked by debris or accumulated lint. Draining the water Up to 20 litres/4.4 gal may be drained. - Page 21 q Attach and tighten the pump cap. q Attach and close the cover plate. To prevent unused detergent from flowing into the drain during the next wash cycle: q Pour 1 litre/1 ¾ pt of water into chamber II. q Select the Drain program.
-
Page 22: Cleaning Water Inlet Strainers
Cleaning water inlet strainers This is necessary if very little or no water flows into the washing machine. First release the water pressure in the supply hoses: q Turn off the water taps. q Turn the program selector to any program (except Spin or Drain). -
Page 23: Customer Service
Descaling the washing machine Customer Service CAUTION 1-800/944-2904... -
Page 24: Troubleshooting Of Minor Faults
Troubleshooting of Minor Faults WARNING Avoid risk of electric shock! Repairs must only be carried out by our Customer Service or an authorized technician. Fault Possible cause The loading door cannot be no final spin ready ready Start If repairs are necessary, and you cannot eliminate the fault yourself with the aid of the following table: q Turn the program selector to Off. - Page 25 Fault Possible cause Foam coming out of the detergent Too much detergent. dispenser. The laundry was not spun Large items of clothing became entangled and could not be distributed evenly in the drum. For safety reasons, the high speed final spin cycle was automatically cancelled.
-
Page 26: Installation, Connection And Transportation
Installation, Connection and Transportation Safety information CAUTION CAUTION Factory supplied equipment... - Page 27 On the rear of the appliance: Water drain hose. Power cord with plug. Elbow for attaching the drain hose, e.g. into a wash basin. C = cold water connection H = hot water connection The bag contains: Covers to be placed over the holes for the transport bolts (after removing them).
-
Page 28: Installation Area
Dimensions Installation area WARNING WARNING Pedestal Mounting... -
Page 29: Built-In Installation
Built in Installation appliance can be built in; that is, you can install the washing machine under counter in a kitchen cabinet opening. 570 mm minimum // 22 b 600 mm minimum // 23 " 850 mm minimum // 33 "... -
Page 30: Removing The Transport Bolts
Removing the transport bolts WARNING The transport bolts must be removed before using the appliance for the first time and must be retained for any future transport (e.g. when moving). Preparing Before removing the transport bolts: q Take the hose out of the holders. q Detach the elbow. -
Page 31: Hose And Cable Lengths
Hose and cable lengths Left hand connection approx. 43" (110cm) approx. 55"(140cm) approx. 35" (90 cm) Right hand connection approx. 59" (150 cm) approx. 39" (100 cm) approx. 35" (90 cm) Other hoses Water connection Water supply CAUTION CAUTION always... - Page 32 Connection options A Cold water connection and B Hot water connection (max. 140 °F /60 °C) or Cold water connection only with Y piece q After the connection: Turn on the water completely, and check whether connection points are watertight. CAUTION The connection points are under full water pressure.
-
Page 33: Electrical Connection
Drainage into a wash basin CAUTION The plug must not block the drain of the wash basin. q Secure the water drainage hose so that it does not slide out. q When the water is being drained, check whether the water flow is fast enough. Electrical connection GROUNDING INSTRUCTIONS This appliance must be grounded. -
Page 34: Transport, E.g. When Moving
WARNING To reduce the risk of fire or electrical shock, DO NOT use an extension cord or an adapter to connect the washer to the electrical power supply. In the event that a ground fault circuit breaker is to be used, only use types marked with the following symbol: Only this symbol can guarantee compliance with all current regulations. -
Page 35: Overview Of Programs
Overview of Programs Type of laundry max. Care Symbols Note Load Load up to: Colorfast and white cotton and linen cotton and linen Non colorfast cotton Non colorfast cotton and linen Colorfast permanent press press Non colorfast permanent press permanent press Õ... - Page 36 0806 en 9000200914...
Need help?
Do you have a question about the Axxis WFL2090UC and is the answer not in the manual?
Questions and answers