Table of Contents
Advertisement
Available languages
Available languages
Quick Links
Pince-testeur REF 975840/
EM-401A
VIM : 21990_20W17
FR/ Pince ampéremètrique digitale
GB/ Digital clamp meter - ES/ Pinza amperimétrica digital
IT/ Morsetto amperometrico digitale - PT/ Pinça amperimétrica digital
DE/ Digitale Stromzange - NL/ Digitale amperometrische klem
PL/ Cęgowy cyfrowy amperometryczny
RO/ Clește ampermetric digital - GR/ Ψηφιακή αμπεροτσιμπίδα
FR/ Notice d'utilisation - GB/ Instructions
ES/ Manual de uso - IT/ Istruzioni per l'uso
PT/ Manual de instruções - DE/ Gebrauchsanweisung
NL/ Instructies voor gebruik - PL/ Instrukcje użytkowania
RO/ Instrucțiuni de utilizare - GR/ οδηγίες χρήσης
Advertisement
Table of Contents

Related Manuals for tibelec 975840


Summary of Contents for tibelec 975840
- Page 1 Pince-testeur REF 975840/ EM-401A VIM : 21990_20W17 FR/ Pince ampéremètrique digitale GB/ Digital clamp meter - ES/ Pinza amperimétrica digital IT/ Morsetto amperometrico digitale - PT/ Pinça amperimétrica digital DE/ Digitale Stromzange - NL/ Digitale amperometrische klem PL/ Cęgowy cyfrowy amperometryczny RO/ Clește ampermetric digital - GR/ Ψηφιακή...
- Page 2 IMPORTANT : ces instructions sont pour votre sécurité. Lisez les attentivement avant utilisation et conservez-les pour une utilisation ultérieure. Avertissement : 1. Soyez particulièrement prudent en présence de tensions supérieures à 30VACrms ou 60VDC pour éviter des dommages ou électrocutions 2.
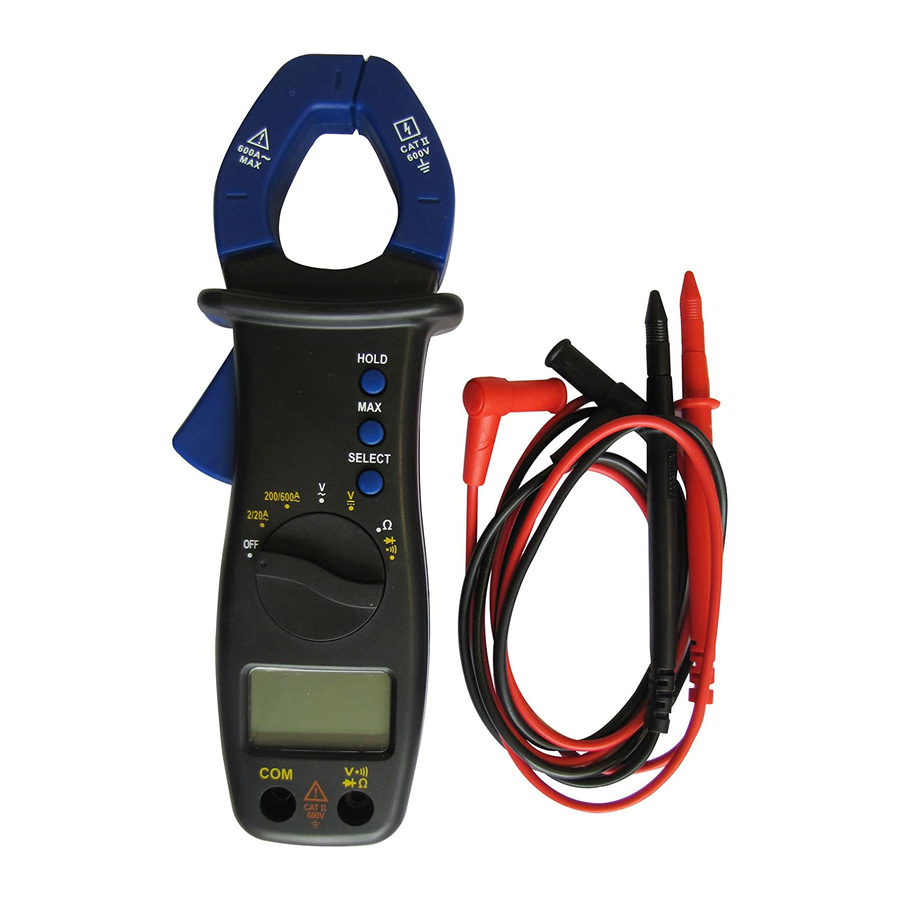
- Page 3 1. Sélecteur de fonctions 2. Affichage LCD 3. Jack COM cordon noir 4. Touche HOLD 5. Touche MAX 6. Touche SELECT 7. Jack V Ω cordon rouge • Commutateur de fonction : OFF, Ampéremètre alternatif 2/20A~ et 200/600A~, Voltmètre alternatif, Voltmètre continu, Ohmmètre, test de diodes et continuité avec buzzer.
- Page 4 Utilisation : Voltmètre Tension alternative AC de 0 à 600V Voltmètre Tension continue DC de 0 à 600V 230V Phase Neutre Ampéremètre ampoule Intensité alternative AC de 2 à 20A de 200 à 600A Résistance (Ohmmètre) Ω de 0 à 20MΩ Continuité...
- Page 5 Ω 1. Reliez la sonde noire à la borne COM et la sonde rouge à la borne 2. Mettez le sélecteur de fonction sur la position 3. Connectez les pointes test sur le circuit et lisez la valeur indiquée à l’écran quand elle est stabilisée.
-
Page 6: Remplacement Des Piles
Remplacement des piles Quand le symbole apparaît vous devez remplacer les piles par des nouvelles. 1. Mettez le sélecteur sur Off 2. Dévissez la vis à l’arrière de la pince 3. Ouvrez et remplacez les piles dans la zone correspondante par des piles de même type (2xLR03/AAA 1,5V). - Page 7 - Les dommages résultant d’acte de vandalisme, de la force majeure (incendie, foudre, tempête…), ou d’une surtension électrique. - Les frais de transport liés à l’envoi du produit vers la société TIBELEC - Les frais de transport liés au retour du produit vers le consommateur si l’avarie est liée à...
- Page 8 IMPORTANT: these instructions are for your safety. Read them carefully before use and keep them for future use. Warning : 1. Be particularly careful when using voltages above 30V AC (RMS) or 60V DC to avoid damage or electric shock. 2.
- Page 9 1. Function switch 2. LCD screen 3. Jack COM black test lead 4. HOLD key 5. MAX key 6. SELECT key 7. Jack V Ω red test lead • Function switch : OFF, Ammeter AC 2/20A~ and 200/600A~, Voltmeter AC, Voltmeter DC, Ohmmeter, Diode test and continuity with buzzer.
- Page 10 Utilisation : Voltmeter AC voltage from 0 to 600V Voltmeter DC voltage from 0 to 600V 230V Phase Neutre Ammeter ampoule Alternating current from 2 to 20A from 200 to 600A Resistance (Ohmmeter) Ω from 0 to 20MΩ Continuity with buzzer anode (+) cathode (-) Diode...
- Page 11 Ω 1. Connect the black probe to terminal COM and the red probe to terminal 2. Set the function switch to position 3. Connect the test plungers to the circuit and read the value displayed on screen once it has stabilised. Ω...
-
Page 12: Replacing The Batteries
Replacing the batteries : When the symbol appears, replace the batteries with new ones. - Turn the selector to Off - Loosen the screw on the back of the clamp - Open and replace the batteries in the corresponding area with batteries of the same type (3xLR03/AAA 1,5V) - Tighten again. - Page 13 TERMS OF MANUFACTURER’S WARRANTY Beyond the legally required guarantee, Tibelec guarantees replacement with an iden- tical or equivalent new product for a duration of 3 years within the European Union, on the condition that the product was used in accordance with the instructions for use.
- Page 14 IMPORTANTE: estas instrucciones son para su seguridad. Léalas cuidadosamente antes de utilizar el aparato y guárdelas para un futuro uso. Advertencia : 1. Tenga especial cuidado cuando utilice tensiones superiores a 30 V CA (RMS) o 60 V CC para evitar daños o descargas eléctricas. 2.
- Page 15 1. Conmutador de funciones 2. Pantalla LCD 3. Jack COM cable negro 4. Tecla HOLD 5. Tecla MAX 6. Tecla SELECT 7. Jack V Ω cable rojo • Conmutador de funciones : OFF, Amperímetro alterno 2/20A~ y 200/600A~, Voltímetro alterno, Voltímetro continuo, Ohmímetro, prueba de diodos y continui- dad con zumbador.
- Page 16 Uso : Voltímetro Tensión alterna AC de 0 a 600V Voltímetro Tension continua DC de 0 a 600V 230V Phase Neutre Amperímetro ampoule Intensidad alterna AC de 2 a 20A de 200 a 600A Resistancia (Ohmímetro) Ω de 0 a 20MΩ Continuidad con zumbador anode (+) cathode (-)
- Page 17 Ω 1. Conecte la sonda negra al terminal COM y la sonda roja al terminal 2. Ponga el interruptor de función en la posición 3. Conecte las sondas de prueba al circuito y, cuando se haya estabilizado, lea el valor indicado en la pantalla. Ω...
-
Page 18: Especificaciones Técnicas
Sustitución de las pilas Cuando aparece el símbolo , debe sustituir las pilas por otras nuevas. 1. Ponga el selector en Apagado 2. Desenrosque el tornillo de la parte posterior de la pinza 3. Abra y sustituya las pilas en el compartimiento pertinente por pilas del mismo tipo (3xLR03/AAA 1,5V) 4. - Page 19 CONDICIONES DE GARANTÍA DEL FABRICANTE Además de la garantía legal de conformidad, TIBELEC se compromete a cubrir, durante un periodo de 3 años en el territorio de la Unión Europea, la sustitución por un producto idéntico nuevo o equivalente siempre y cuando el producto haya sido usado respetando las indicaciones de uso del producto.
- Page 20 IMPORTANTE: queste istruzioni sono indicate per la vostra sicu- rezza. Leggerle attentamente prima dell’uso e conservarle per uso futuro. Avvertenza : 1. Prestare particolare attenzione quando si utilizzano tensioni superiori a 30 VCA (RMS) o 60 V CC per evitare danni o scosse elettriche. 2.
- Page 21 1. Interruttore delle funzioni 2. Display LCD 3. Spinotto COM cavi nero 4. Pulsante HOLD 5. Pulsante MAX 6. Pulsante SELECT 7. Spinotto V Ω cavi rosso • Interruttore delle funzioni : OFF, Amperometro alternato 2/20A~ et 200/600A~, Voltmetro alternativo, Voltmetro continuo, Ohmmetro, test diodi e continuità con cicalino.
-
Page 22: Uso Del Sistema
Uso del sistema : Voltmetro Tensione alternata CA da 0 a 600V Voltmetro Tensione continua CC da 0 a 600V 230V Phase Neutre Amperometro ampoule Intensità alternata AC da 2 a 20A da 200 a 600A Resistenza (Ohmmetro) Ω da 0 a 20MΩ Continuità... - Page 23 Ω 1. Collegare il sensore nero al morsetto COM e il sensore rosso al morsetto 2. Impostare l’interruttore di funzione in posizione 3. Collegare le punte di prova sul circuito e leggere il valore indicato sullo schermo una volta stabilizzato. Ω...
-
Page 24: Sostituzione Della Batteria
Sostituzione della batteria Quando appare il simbolo è necessario sostituire le batterie con batterie nuove. 1. Spostare il selettore su Off 2. Svitare la vite sul retro del morsetto 3. Aprire e sostituire le batterie nella zona corrispondente con batterie dello stesso tipo (3xLR03/AAA 1,5V) 4. - Page 25 CONDIZIONI DI GARANZIA COSTRUTTORE Oltre alla garanzia legale di conformità, TIBELEC s’impegna a garantire per 3 anni, in tutto il territorio dell’Unione Europea, la sostituzione del prodotto con uno identico nuovo o equivalente, a condizione che il prodotto da sostituire sia stato utilizzato rispettando le relative istruzioni.
- Page 26 IMPORTANTE: estas instruções são para sua segurança. Leia-as atentamente antes da utilização e conserve-as para utilizações posteriores. Aviso : 1. Seja particularmente cuidadoso na presença de tensões superiores 30 V CA média quadrática) ou 60 V CC para evitar danos ou eletrocussões. 2.
- Page 27 1. Comutador de funções 2. Ecrã LCD 3. Jack COM cabo preto 4. Botão HOLD 5. Botão MAX 6. Botão SELECT 7. Jack V Ω cabo vermelho • Comutador de funções : OFF, Amperímetro alternatif 2/20A~ et 200/600A~, Voltímetro alternado, Voltímetro contínuo, Ohmmeter, teste de díodo e continui- dade com buzzer.
- Page 28 Utilização : Voltímetro Tensão alternada AC de 0 a 600V Voltímetro Tensão contínua DC de 0 a 600V 230V Phase Neutre Amperímetro ampoule Intensidade alternada AC de 2 a 20A de 200 a 600A Resistência (Ohmmeter) Ω de 0 a 20MΩ Continuidade com buzzer anode (+) cathode (-)
- Page 29 Ω 1. Ligue a sonda preta ao terminal COM e a sonda vermelha ao terminal 2. Coloque o seletor de funções na posição 3. Ligue as pontas de prova ao circuito e leia o valor indicado no ecrã quando estiver estabilizado.
-
Page 30: Substituição Da Pilha
Substituição da pilha Quando o símbolo aparecer, substitua as pilhas por pilhas novas. 1. Coloque o seletor em Off 2. Retire o parafuso da parte de trás da pinça 3. Abra e substitua as pilhas no respetivo compartimento por pilhas do mesmo tipo (3xLR03/AAA 1,5V) 4. - Page 31 CONDIÇÕES DE GARANTIA DO FABRICANTE Para além da garantia legal de conformidade, a TIBELEC compromete-se a garantir, durante um período de 3 anos e no território da União Europeia, a substituição por um produto idêntico novo ou equivalente sob a condição de que o produto tenha sido utilizado segundo as respetivas instruções de utilização.
- Page 32 WICHTIG: Diese Anleitung dient Ihrer Sicherheit. Lesen Sie sie vor dem Gebrauch sorgfältig durch und bewahren Sie sie für einen späteren Gebrauch auf. Warnhinweis : 1. Seien Sie besonders vorsichtig bei Spannungen über 30 V Wechselstrom (RMS) oder 60 V Gleichstrom, um Schäden oder Stromschläge zu vermeiden. 2.
- Page 33 1. Funktionsschalter 2. LCD-Anzeige 3. Jack COM Messleitungen schwarz 4. Taste HOLD 5. Taste MAX 6. Taste SELECT 7. Jack V Ω Messleitungen rot • Funktionsschalter : OFF, Anhaltende Amperemeter 2/20A~ und 200/600A~, Voltmeter Wechselspannung, Voltmeter Gleichspannung, Ohmmeter, Diodentest und Kontinuität mit Summer. •...
- Page 34 Verwendung : Voltmeter Wechselspannung AC von 0 bis 600V Voltmeter Gleichspannung DC von 0 bis 600V 230V Phase Neutre Amperemeter ampoule Wechselnde Intensität AC von 2 bis 20A von 200 bis 600A Widerstand (Ohmmeter) Ω von 0 bis 20MΩ Kontinuität mit Summer anode (+) cathode (-) Diode...
- Page 35 1. Schließen Sie den schwarzen Fühler an die Klemme COM und den roten Fühler an die Ω Klemme 2. Stellen Sie den Funktionswahlschalter auf Position 3. Schließen Sie die Prüfspitzen an den Schaltkreis an und lesen Sie den auf dem Bildschirm angezeigten Wert ab, wenn er sich stabilisiert hat.
-
Page 36: Auswechseln Der Batterie
Auswechseln der Batterie Wenn das Symbol erscheint, müssen Sie die Batterien durch neue ersetzen. 1. Drehen Sie den Wahlschalter auf Aus 2. Lösen Sie die Schraube auf der Rückseite der Klemme 3. Öffnen Sie den jeweiligen Bereich und ersetzen Sie die Batterien durch Batterien gleichen Typs (3xLR03/AAA 1,5V) 4. - Page 37 - Schäden durch Vandalismus, höhere Gewalt (Brand, Blitzeinschlag, Sturm ...) und elektrische Überspannung. - Die Transportkosten im Zusammenhang mit dem Versand des Produkts an TIBELEC - Die Transportkosten im Zusammenhang mit der Rücksendung des Produkts an den Kunden, falls der Fehler auf eine nicht von dieser Garantie abgedeckte Ursache zurückzuführen ist.
- Page 38 BELANGRIJK: deze instructies worden gegeven voor uw veili- gheid. Lees ze zorgvuldig door vóór gebruik en bewaar ze voor toekomstig gebruik. Waarschuwing 1. Wees bijzonder voorzichtig in aanwezigheid van spanning boven 30V AC (RMS) of 60V DC, teneinde schade of elektrische schokken te voorkomen. 2.
- Page 39 1. Functieschakelaar 2. LCD-scherm 3. Jack COM Zwarte testsnoeren 4. Knop HOLD 5. Knop MAX 6. Knop SELECT 7. Jack V Ω Rode testsnoeren • Functieschakelaar : OFF, Ampèremeter wissel 2/20A~ et 200/600A~, Voltmeter wissel, Voltmeter gelijkstroom, Ohmmeter, Diodetest en Continuïteit met zoemer. •...
- Page 40 Gebruik : Voltmeter wisselspanning AC van 0 tot 600V Voltmeter Gelijkspanning DC van 0 tot 600V 230V Phase Neutre Ampèremeter ampoule Wisselende intensiteit AC van 2 tot 20A van 200 tot 600A Weerstand (Ohmmeter) Ω van 0 tot 20MΩ Continuïteit met zoemer anode (+) cathode (-) Diode...
- Page 41 Ω 1. Verbind de zwarte sensor met de klem COM en de rode sensor met de klem 2. Zet de functieschakelaar op stand 3. Sluit de meetpennen aan op het circuit en lees de waarde af die op het scherm wordt aangegeven als deze gestabiliseerd is.
-
Page 42: Vervangen Van De Batterij
Vervangen van de batterij Als het symbool verschijnt, moet u de batterijen vervangen. 1. Zet de schakelaar op Off 2. Schroef de schroef aan de achterkant van de klem los 3. Openen en vervang de batterijen in het daarvoor bestemde vak door soortgelijke batterijen (2xLR03/AAA 1,5V) 4. - Page 43 GARANTIEVOORWAARDEN FABRIKANT Behalve de wettelijke garantie op conformiteit verbindt TIBELEC zich, gedurende een periode van 3 jaar, tot het in de Europese Unie vervangen van het product door een nieuw identiek product of gelijkwaardig, op voorwaarde dat de gebruiksinstructies van het product zijn nageleefd.
- Page 44 WAŻNE: Te instrukcje służą Twojemu bezpieczeństwu. Przeczytaj je uważnie przed użyciem i zachowaj do wykor- zystania w przyszłości. Ostrzeżenie 1. Należy zachować szczególną ostrożność podczas stosowania napięć powyżej 30V AC (RMS) lub 60V DC, aby uniknąć obrażeń lub porażenia prądem. 2.
- Page 45 1. Przełącznik funkcji 2. Wyświetlacz LCD 3. Gniazdo Jack COM Czarne przewody pomiarowe 4. Przycisk HOLD 5. Przycisk MAX 6. Przycisk SELECT 7. Gniazdo Jack V Ω Czerwone przewody pomiarowe • Przełącznik funkcji : OFF, Amperomierz przemienna 2/20A~ i 200/600A~, Woltomierz przemienna, Woltomierz stała, Omomierz, Test diodowy i Ciągłość...
- Page 46 Korzystanie : Woltomierz Napięcie AC od 0 do 600V Woltomierz Napięcie DC od 0 do 600V 230V Phase Neutre Amperomierz ampoule Intensywność przemienna AC od 2 do 20A od 200 do 600A Ω Opór (Omomierz) od 0 do 20MΩ Ciągłość z sygnalizatorem akustycznym anode (+) cathode (-)
- Page 47 Ω 1. Podłącz czarny czujnik do zacisku COM a czerwony czujnik do zacisku 2. Ustaw przełącznik wyboru funkcji w pozycji 3. Podłącz styki testowe do obwodu i odczytaj wartość wskazaną na ekranie po ustabilizowaniu. Ω 1. Podłącz czarny czujnik do zacisku COM a czerwony czujnik do zacisku 2.
-
Page 48: Wymiana Baterii
Wymiana baterii Po pojawieniu się symbolu należy wymienić baterie na nowe. 1. Ustaw przełącznik wyboru na Wyłączony 2. Odkręć śrubę znajdującą się z tyłu zacisku 3. Otwórz i wymień baterie w odpowiednim miejscu na baterie tego samego typu (2xLR03/AAA 1,5V) 4. - Page 49 WARUNKI GWARANCJI PRODUCENTA Poza prawną gwarancją zgodności, TIBELEC gwarantuje wymianę na nowy identyczny produkt lub produkt równoważny przez okres 3 lat na terytorium Unii Europejskiej pod warunkiem, że produkt eksploatowano zgodnie z zaleceniami instrukcji obsługi produk- tu. Niniejsza gwarancja obejmuje również ewentualne koszty wysyłki produktu.
- Page 50 IMPORTANT: aceste instrucțiuni sunt pentru propria dvs. siguranță. Citiți-le cu atenție înainte de utilizare și păstrați-le pentru consul- tare ulterioară. Avertissement : 1. Fiți prudenți în special în prezența tensiunilor de peste 30 V c.a. (RMS) sau 60 V c.c., pentru a evita producerea de daune sau electrocutarea. 2.
- Page 51 1. Comutator de funcții 2. Affichage LCD 3. Jack COM cordon noir 4. Touche HOLD 5. Touche MAX 6. Touche SELECT 7. Jack V Ω cordon rouge • Comutator de funcții : OFF, Ampermetru alternativ 2/20A~ sau 200/600A~, Voltmetru alternativ, Voltmetru continuu, Ohmmetru, Testarea diodă sau continuitate cu buzzer.
- Page 52 Utilizare : Voltmetru Tensiune alternativă AC de la 0 la 600V Voltmetru Tensiune continuă DC de la 0 la 600V 230V Phase Neutre Ampermetru ampoule Intensitate alternativă AC de la 2 la 20A de la 200 la 600A Ω Rezistență (Ohmmetru) de la 0 la 20MΩ...
- Page 53 Ω 1. Conectați sonda neagră la borna COM și sonda roșie la borna 2. Puneți selectorul de funcție în poziția 3. Conectați vârfurile de testare la circuit și citiți valoarea indicată pe ecran după ce se stabilizează. Ω 1. Conectați sonda neagră la borna COM și sonda roșie la borna 2.
-
Page 54: Înlocuirea Bateriei
Înlocuirea bateriei Când apare simbolul , trebuie să înlocuiți bateriile cu unele noi. 1. Puneți selectorul pe Off 2. Deșurubați șurubul de pe spatele cleștelui 3. Deschideți și înlocuiți bateriile în zona corespunzătoare cu baterii de același tip (2xLR03/AAA 1,5V) 4. - Page 55 WARUNKI GWARANCJI PRODUCENTA Poza prawną gwarancją zgodności, TIBELEC gwarantuje wymianę na nowy identyczny produkt lub produkt równoważny przez okres 3 lat na terytorium Unii Europejskiej pod warunkiem, że produkt eksploatowano zgodnie z zaleceniami instrukcji obsługi produk- tu. Niniejsza gwarancja obejmuje również ewentualne koszty wysyłki produktu.
- Page 56 ΣΗΜΑΝΤΙΚΟ: Αυτές οι οδηγίες παρέχονται για την ασφάλειά σας. Διαβάστε τις με προσοχή πριν από τη χρήση και φυλάξτε τις για μελλοντική αναφορά. Προειδοποίηση : 1. Απαιτείται ιδιαίτερη προσοχή με τάσεις άνω των 30V AC (ενεργός τιμή) ή 60V DC προς αποφυγή βλάβης ή ηλεκτροπληξίας. 2.
- Page 57 1. Περιστροφικός διακόπτης λειτουργιών 2. Οθόνη LCD 3. Βύσμα Jack COM Καλώδια μέτρησης, μαύρο 4. Πλήκτρο HOLD 5. Πλήκτρο MAX 6. Πλήκτρο SELECT 7. Βύσμα Jack V Ω Καλώδια μέτρησης, κόκκινο • Περιστροφικός διακόπτης λειτουργιών : OFF, Αμπερόμετρο Εναλλασσόμενο 2/20A~ και...
- Page 58 Χρήση Βολτόμετρο εναλλασσόμενη τάση AC 0 - 600V Βολτόμετρο Συνεχής τάση DC 0 - 600V 230V Phase Neutre Αμπερόμετρο ένταση εναλλασσόμενου ampoule ρεύματος AC 2 - 20A 200 - 600A Αντίσταση (Ωμόμετρο) Ω 0 - 20MΩ Συνέχεια με βομβητή anode (+) δίοδος...
- Page 59 1. Συνδέστε τον μαύρο ακροδέκτη στον πόλο COM και τον κόκκινο ακροδέκτη στον πόλο Ω 2. Γυρίστε τον διακόπτη λειτουργίας στη θέση 3. Συνδέστε τους ακροδέκτες δοκιμής στο κύκλωμα και διαβάστε την τιμή που αναγράφεται στην οθόνη όταν σταθεροποιηθεί. 1. Συνδέστε τον μαύρο ακροδέκτη στον πόλο COM και τον κόκκινο ακροδέκτη στον πόλο Ω...
-
Page 60: Αντικατάσταση Της Μπαταρίας
Αντικατάσταση της μπαταρίας Όταν εμφανίζεται το σύμβολο , πρέπει να αντικαταστήσετε τις μπαταρίες με καινούριες. - Γυρίστε τον διακόπτη στη θέση OFF - Ξεβιδώστε τη βίδα στο πίσω μέρος της τσιμπίδας - Ανοίξτε το καπάκι και αντικαταστήστε τις μπαταρίες στην αντίστοιχη θέση... - Page 61 ΠΡΟΫΠΟΘΕΣΕΙΣ ΕΓΓΥΗΣΗΣ ΚΑΤΑΣΚΕΥΑΣΤΗ Εκτός από τη νόμιμη εγγύηση συμμόρφωσης, η TIBELEC εγγυάται επίσης για διάστημα 3 ετών και εντός της επικράτειας της Ευρωπαϊκής Ένωσης, την αντικατάσταση με ένα νέο, πανομοιότυπο ή ισοδύναμο προϊόν, με την προϋπόθεση ότι το προϊόν έχει...
- Page 62 996 rue des Hauts de Sainghin CRT4 59262 SAINGHIN EN MELANTOIS France...
Need help?
Do you have a question about the 975840 and is the answer not in the manual?
Questions and answers