Advertisement
Quick Links
B
C
A
I
K
M
L
Scrap Soundboard Piece
(34) Threaded Harp Tuning Pins
Brass Driver for Tuning Pins
(10) Threaded Bridge Pins, Large
Allen wrench, 3/32"
(24) Threaded Bridge Pins, medium
Allen Wrench, 5/64"
(24) Medium Brass Eyelets, 1/8"
(10) Jumbo Brass Eyelets, 3/16"
(2) #14 X 2" Wood Screws, Square Drive
#3 Square Drive Bit
(8) Wood Screws, 1-1/4"
(14) Wood Screws, 1-5/8"
BALLAD HARP KIT
Assembly Instructions
Updated February 2021
E
D
F
G
J
N
O
HARDWARE
Musicmakers
14525 61st ST CT N
Stillwater, MN 55082
WOOD PARTS
A. Soundboard, Aircraft Birch
H
B. Back Panel
C. (2) Sides
D. (4) Long Trim Strips, Sides
E. Short Trim Strip, Back
F. Short Trim Strip, Front (Drilled)
G. Inner Reinforcement Bar
H. Pillar
I. Pre-drilled Neck
J. (2) Feet
K. Top Block
L. Arched Cap Block
M. Inner Brace
N. Base Reinforcement
O. Base Block
(3) Wood Screw, 2"
Wood Dowel, 3/8" x 2"
(2) Maple Wood Plugs, 3/8" dia.
Maple Wood Plug, 1/2" dia.
Harp Medallion, 3/4" dia.
(3) Drill bits (1/8", 7/64", 3/16")
(2 oz) Wire Nails, 17 guage, 3/4" long
(4) Rubber Bumpers
(4) Screws for Bumpers, #6 x 3/4"
Tuning Wrench
Set of 34 Harp Strings
Spacing Guide for Bridge Pins
Assembly Instructions
Advertisement

Subscribe to Our Youtube Channel
Related Manuals for Musicmakers BALLAD HARP KIT


Summary of Contents for Musicmakers BALLAD HARP KIT
- Page 1 BALLAD HARP KIT Assembly Instructions Updated February 2021 WOOD PARTS A. Soundboard, Aircraft Birch B. Back Panel C. (2) Sides D. (4) Long Trim Strips, Sides E. Short Trim Strip, Back F. Short Trim Strip, Front (Drilled) G. Inner Reinforcement Bar H.
- Page 2 TIPS TO MAKE THIS A SUCCESSFUL PROJECT _____A. Inventory and inspect all your parts carefully. If anything is missing or defective, please call or email us right away. 651-439-9120 Read through the entire assembly instructions before you _____B. info@harpkit.com start, just to get an overview of the project. This will also help give you an idea of what tools you will want handy to complete the project.
-
Page 3: Assemble The Frame
ASSEMBLE THE FRAME FIG. 1 ____1. Clamp the harp sides to your bench. This will help prevent the sides from sliding around during the assembly process. (fig. 1) (This may seem like an odd way to start, but it really helps to hold both side pieces firmly when drilling pilot holes for the screws. - Page 4 ____4. Apply glue to the sides where the base block FIG. 5 connects, as well as where the top block con- nects. (figs. 5, 6) Insert 1-5/8” wood screws to connect one side to the base block. (fig. 7) Make sure to clean up the excess glue as you connect the sides to the both the top and bottom blocks.
- Page 5 ____7. Apply glue and clamps. Please note the various FIG. 10 methods of clamping. Taping scrapwood to the outside will make it easier to apply the bungee cord. Choose the method that works the best for you. Orient the clamp where the brace is located.
- Page 6 ____10. Gather weights and clamps for pressing the FIG. 13 reinforcement bar and dry fit the reinforce- ment bar with the clamps as well. Apply glue along the length of the reinforce- ment bar and tape on both ends to prevent slippage once the weights or clamps are add- ed. (fig. 15) FIG.
- Page 7 INSTALL THE BACK AND SOUNDBOARD ____12. While you are waiting for the glue to dry on the FIG. 19 soundboard reinforcement strip, you can work on sanding the sides/frame of the soundbox. Make a large sanding block to level the edges of the sides.
- Page 8 ____15. Apply glue to the frame and nail the back panel FIG. 22 in place. (fig. 22) Start by installing one nail at each end of the panel to keep it aligned as you add more nails down each side and across the bottom. (fig. 23) Place your nails about 1-1/2”...
- Page 9 ____19. Apply glue to the front of the frame and nail the soundboard to the frame using your guidelines. FIG. 27 Remember to pay attention to the angle you are installing the nails. Space the nails about 1” apart. Remember, do NOT nail along the top block (same as the back panel) as there will not be trim here.
- Page 10 ____23. Sand the access holes in the back panel first FIG. 31 using 120 grit, and then again with 180 grit sand- paper. Be sure to clean up the entire perimeter of each hole. This will make for more comfort- able handling once the harp is finished.
- Page 11 ____27. Once the bottom trim is installed, make sure the top of the trim strip is flush with the inside top of the base board. File or sand the trim flush FIG. 36 with the base if neeeded. (fig. 36) ____28.
- Page 12 ____32. Allow 30-60 minutes for the glue to dry. Then FIG. 40 remove all of the tape, and excess glue with a purposefully dulled chisel. We’re trying to remove glue, not wood. (fig. 40) ____33. Repeat the trim process for the back of the soundbox.
- Page 13 FIG. 44 ____37. Apply a liberal amount of glue and screw the arched cap block into the top block with the same 2” screws you used as punches. (fig. 44) Be sure to clean off the excess glue. ____38. Sand the top block to be flush with the sides of the harp.
- Page 14 NECK AND PILLAR ASSEMBLY FIG. 49 ____41. The neck and pillar have been pre-fitted at our shop, but you should test these parts without glue to make sure the wood has not swollen from humidity. The neck should fit easily into the large slot at the top of the pillar.
- Page 15 ____45. Use the provided #14 x 2” wood screws along FIG. 53 with the #3 size square drive bit to draw the neck and pillar together firmly. (fig. 53) Make sure to clean up all the excess glue that squeez- es out.
- Page 16 ____49. Use masking tape to mark a depth stop on a 3/8” FIG. 57 drill bit, at a 1-1/4” depth. (fig. 57) This drill bit is not included in your hardware pack. However, it’s a common size in most drill bit sets. The 3/8”...
- Page 17 ____52. Use a hand sander to take off the excess bulk FIG. 61 on the arched cap block, as well as to soften the edges. Do not sand inside the circle guideline you have made. Sand the top shoulder of the harp, so there are soft edges.
- Page 18 ____56. Place the body of the harp on its back on your FIG. 65 workbench. Hold the neck and pillar assembly in place on the body. Check the fit at the back of the neck where it slides into the arched cap block, then check how the bottom of the pil- lar meets the base block.
- Page 19 You might notice some wiggle room in the neck and pillar once you’ve inserted the wood screw into the pillar. This movement is natural and will cease once the strings are installed. Do not glue the top block or the base block. These joints must be left dry to allow for some movement as the harp is put under tension.
- Page 20 OPTIONAL DECORATING Hand painting or woodburning are fun ways to decorate your instrument. Light paint- ing can be applied between coats of varnish or lacquer very nicely and will not harm the sound of the harp. Some people use acrylic paints, and others decorate with colored pencils or pastels.
-
Page 21: Installing The Hardware
INSTALLING THE HARDWARE FIG. 71 ____61. Keep the neck/pillar separate from the sound- chamber for the majority of the hardware installation. ____62. Locate the brass eyelets in your hardware pack. Install the eyelets in the soundboard. The 10 large eyelets will go in the bass (wider end) of the soundboard, near the bottom. - Page 22 FIG. 74 ____65. Use the 3/4” long round head screws provid- ed, and attach the bumpers to the feet. (fig. 75) Sometimes after the bumpers are installed, the harp doesn’t sit quite level. You can use washers to help shim up the bumper giving you trouble. FIG.
-
Page 23: Installing Strings
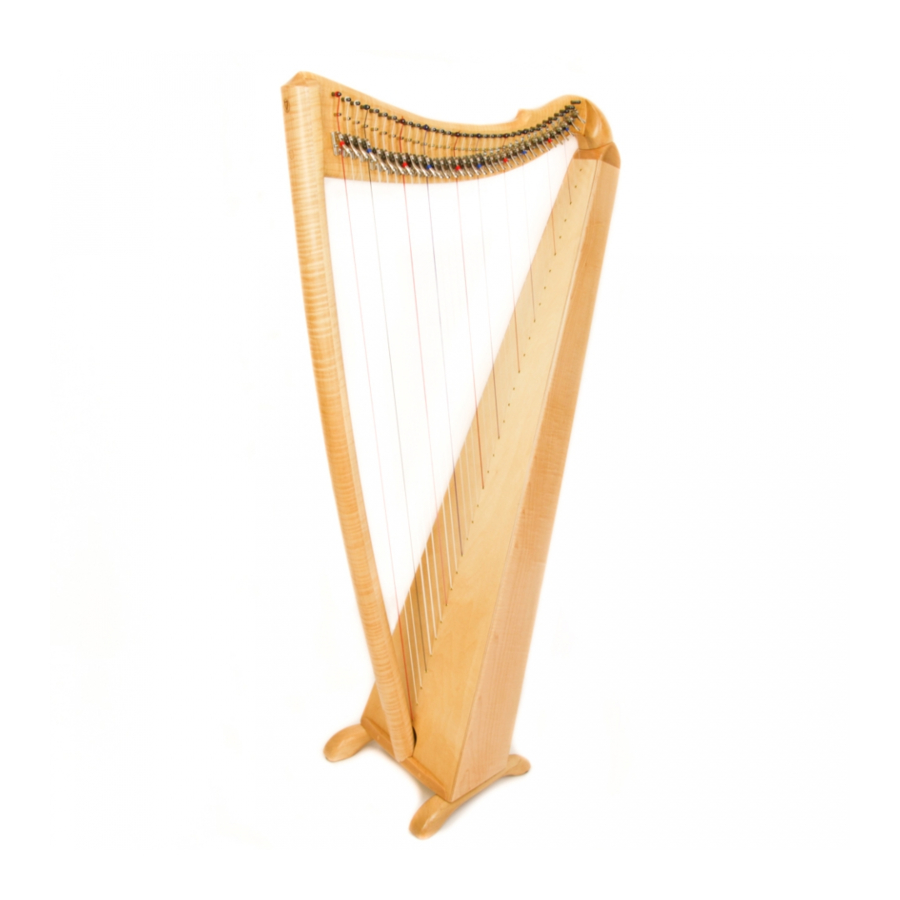
INSTALLING STRINGS ____68. Finally you can install the strings! You will need a pair of scissors, a wire cutter, and your tuning wrench for this last operation, however, the messy part is over. So grab your favorite beverage and move to a comfortable spot in the house where you will turn this project into a musical instrument! www.harpkit.com/blog/how-to-string-a-harp Celebrate!! You did it!! You built a harp. - Page 24 THE FINISHED BALLAD HARP Musicmakers 14525 61st ST CT N Stillwater, MN 55082...
Need help?
Do you have a question about the BALLAD HARP KIT and is the answer not in the manual?
Questions and answers