Advertisement
Quick Links
B
C
A
I
K
M
L
Scrap Soundboard Piece
(34) Threaded Harp Tuning Pins
Brass Driver for Tuning Pins
(10) Threaded Bridge Pins, Large
Allen wrench, 3/32"
(24) Threaded Bridge Pins, medium
Allen Wrench, 5/64"
(24) Medium Brass Eyelets, 1/8"
(10) Large Brass Eyelets, 5/32"
(2) #14 X 2" Wood Screws, Square Drive
#3 Square Drive Bit
(8) Wood Screws, 1-1/4"
(14) Wood Screws, 1-5/8"
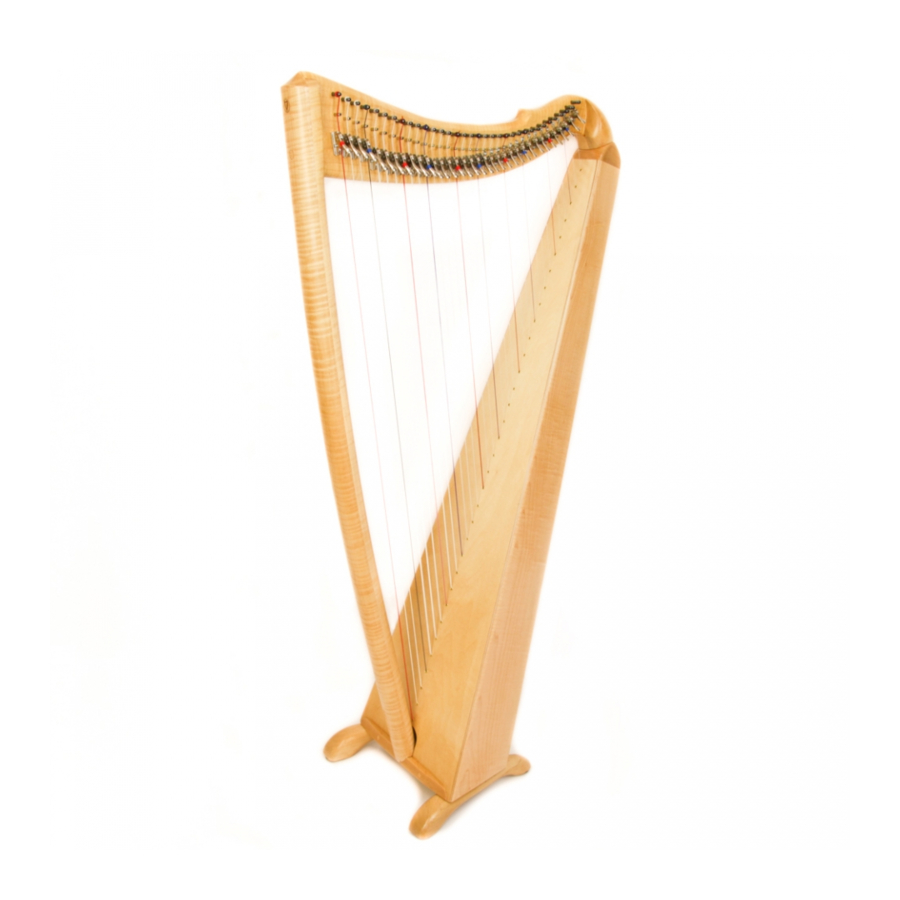
BALLAD HARP KIT
Assembly Instructions
Updated February 2021
E
D
F
G
J
N
O
HARDWARE
Musicmakers
14525 61st ST CT N
Stillwater, MN 55082
WOOD PARTS
H
A. Soundboard, Aircraft Birch
B. Back Panel
C. (2) Sides
D. (4) Long Trim Strips, Sides
E. Short Trim Strip, Back
F. Short Trim Strip, Front (Drilled)
G. Inner Reinforcement Bar Arched
H. Pillar
I. Pre-drilled Neck
J. (2) Feet
K. Cap Block
L. Top Block
M. Inner Brace
N. Base Reinforcement
O. Base Block
(3) Wood Screw, 2"
Wood Dowel, 3/8" x 2"
(2) Maple Wood Plugs, 3/8" dia.
Maple Wood Plug, 1/2" dia.
Harp Medallion, 3/4" dia.
(3) Drill bits (1/8", 7/64", 5/32")
(1 oz) Wire Nails, 17 guage, 3/4" long
(4) Rubber Bumpers
(4) Screws for Bumpers, #6 x 3/4" (black)
Tuning Wrench
Set of 34 Harp Strings, 19 wood dowels
Spacing Guide for Bridge Pins
Assembly Instructions
Advertisement

Related Manuals for Musicmakers BALLAD HARP KIT


Summary of Contents for Musicmakers BALLAD HARP KIT
- Page 1 BALLAD HARP KIT Assembly Instructions Updated February 2021 WOOD PARTS A. Soundboard, Aircraft Birch B. Back Panel C. (2) Sides D. (4) Long Trim Strips, Sides E. Short Trim Strip, Back F. Short Trim Strip, Front (Drilled) G. Inner Reinforcement Bar Arched H.
-
Page 2: Before You Begin
BEFORE YOU BEGIN 651-439-9120 _____A. Inventory and inspect all your parts carefully. If anything is missing Info@harpkit.com or defective, please call or email us right away. _____B. It is a good idea to read through the entire assembly instructions before you start, just to get an overview of the project. - Page 3 FIG. 2A,B,C Gaps ____3. Drill three, 7/64” pilot holes in both sides for the base block screws, as well as 2 pilot holes in both sides for the top block screws. (fig. 3a, 3b, 3c) Be sure to tilt the drill bit to drill parallel to the plane of the sides.
- Page 4 ____5. Flip the harp over so that the glued side is FIG. 5A on top. Use the top block to help balance the sides together. Align the base block, and insert the screws for the remaining side. (fig. 5a) After the base block is attached, insert the remaining screws for the top block.
- Page 5 PREPARING THE SOUNDBOARD FIG. 8A ____8. Take note that the soundboard is punch marked on the outside surface (front) of the board. Using a hand drill or drill press, drill the lowest and highest punch marks with a 1/8” drill bit. These holes will act as a guide for the reinforcement strip.
- Page 6 FIG. 10E NOTE: A go-bar deck is an optional clamping system using flexible sticks/dowels and your work bench! You can utilize this for clamping down the reinforcement bar. If you do this, make sure to put a piece of scrapwood over the length of the reinforcement bar to help distribute equal pressure.
- Page 7 ____13. Dry fit the back to the frame. The back and soundboard panels are cut slightly large to ensure a bit of overhang that can be removed after gluing. Once the back is fitting nicely, remove excess overhang from the top and bottom. This step can be done after gluing, but you may find it easier to do before you glue it to the frame.
- Page 8 ____16. Apply a liberal amount of glue to the frame and proceed to nail/staple the back panel in place. Make sure to match the angle of the nail/staple to the angle of the sides of the soundbox, so that it does not go through the side. This will be more critical when installing the soundboard, as it has the risk of punching through the ouside face of the side of the frame.
- Page 9 FIG. 18A, B Mark where the trim screws will be Soundboard Scrap Soundboard Scrap ____19. Apply glue to the front of the frame and nail/staple the soundboard to the frame using your guidelines created in step 17. Remember to pay attention to the angle you are installing the nails/staples.
-
Page 10: Installing The Trim
INSTALLING THE TRIM ____21. If you haven’t already done so, this is the time to FIG. 21A remove the overhang from the top and bottom of the back and soundboard. (fig. 21a) Also use this time to double check that all the nails/ staples are driven down slightly below the surface of the back and soundboard. - Page 11 ____24. Test fit the trim strips to the soundbox. Be sure that FIG. 24A you know which strip is going where. Then sand along the entire inside edge of the trim strips. Do NOT sand the side of the trim that will be glued down.
- Page 12 NOTE: Once the bottom trim is installed, you will FIG. 26E want to make sure the top of the trim strip is flush with the inside top of the base board. (fig. 26e) Every once in awhile there will be a little overhang from the trim strip.
- Page 13 ____30. Apply a bead of glue to the side of the body where the trim will be. (fig. 30a) Then smooth out the glue to ensure a nice even glue surface along the entire trim strip. (fig. 30b) You want enough glue to make sure you have a solid bond, but not too much where you will have a lot of excess squeeze out.
- Page 14 ____33. Repeat the trim process for the back of the FIG. 33A soundbox. (steps 24-32) Except you will be using tape to secure the bottom trim. (fig. 33a) ____34. Use an 80 grit sanding block or disc sander to flatten the top of the assembled box. (fig. 34a, b) Check the surface with a straight edge to make sure that it’s flat across the entire top.
- Page 15 ____37. Now is a good time to cover the 2 screws on the front FIG. 37A bottom trim with 3/8” wood plugs. Start by putting a small dollop of glue into the hole. (fig. 37a) Use a ham- mer to tap the plug into the hole. The plugs are tapered and will only fit one way.
- Page 16 REINFORCE THE BASE Front of Harp ____39.5 The tension from the strings causes the FIG. 39.5 pillar to exert a tremendous amount of concentrated force on the base. The base reinforcement piece is added to Hole to attach pillar the bottom of the base to provide extra Base support.
- Page 17 NECK AND PILLAR ASSEMBLY ____40. The neck and pillar have been pre-fitted at our shop, but you should test these parts without glue to make sure the wood has not swollen from humidity. The neck should fit easily into the large slot at the top of the pillar.
- Page 18 FIG. 42A, B, C ____43. Stand the harp up, leaning it against your work table, so you can check the fit of the back of the neck on top of the soundchamber. Make a mark at about the center of the top block. (fig. 43a) Then using a straight edge, make a long angled diagonal mark.
- Page 19 FIG. 43G, H, I ____44. Use masking tape to mark a depth stop on your 3/8” FIG. 44A drill bit, at a 1-1/4” depth. (fig. 44a) This drill bit is not included in your hardware pack. However, it’s a com- mon size in most drill bit sets.
- Page 20 ____46. Insert the dowel in the arched top block (WITHOUT GLUE) and then fit the neck over the other end of the dowel. (fig. 46a, b) The hash lines should match up. Now draw a circle around the shoulder of the harp, onto the arched cap block. (fig. 46c) This will serve as a sanding guideline.
- Page 21 FIG. 48C, D FIG. 48E, F FITTING THE NECK AND PILLAR TO THE BODY NOTE: We do our best to ensure the neck and pillar will fit the body of your harp, before it leaves our shop. However, as a result of the building process, sometimes slight variations can occur that will require you to adjust the final fitting at the end of the building process.
- Page 22 Fig. 49b shows a small gap between the pillar and FIG. 49B the base block, and this is acceptable. If the gap is less than 1/8” the screw that you install in step 50, along with the string tension will draw the pillar down, and close the gap.
- Page 23 PREPARING THE HARP FOR FINISH ____51. Any minor cracks and blemishes can be filled with your FIG. 51A favorite wood putty. (fig. 51a) If you have trouble find- ing a paste filler that will match this wood, make up your own out of fine sawdust (from sanding the harp) and epoxy, wood glue, or super glue mixed to the con- sistency of putty (wood glue can be thinned with a drop or two of water.) (fig.
-
Page 24: Installing The Hardware
General Finishing Guidelines STAINS or DYES -- These are coloring agents and should only be used if you want to change he natural color of he wood. We usually do not apply stains to our projets, especially when they are made with naturally beautiful hardwoods such as cherry or walnut. These woods look best with a clear finish. - Page 25 ____55. Orient the feet on the bottom of the harp with FIG. 55A the larger portion of the foot in the front. The feet should be nearly flush with the sides of the body of the harp. (fig. 55a) Drill pilot holes with 7/64”...
- Page 26 ____58. Install the 10 large threaded bridge pins into the lower row of holes drilled in the neck in the 12 bass end holes. Tap them partially in with a hammer and then turn them in with a 3/32” allen wrench until the top is about 5/8”...
-
Page 27: Installing Strings
INSTALLING STRINGS ____60. Finally you can install the strings! You will need a pair of scissors, a wire cutter, and your tuning wrench for this last operation, however, the messy part is over. So grab your favorite beverage and move to a comfortable spot in the house where you will turn this project into a musical instrument! We have a nice video about how to install strings on your harp. - Page 28 HINT: Do not accumulate a lot of windings of windings around the tuning pins, especially with the thick bass (low) strings. They become bulky and cumbersome. If you have that problem, turn the tuning pin backward to unwind the string, then pull more of the string through the hole and tighten agian.
- Page 29 ____9. For the remaining nylon strings (.045” to .025” thickness) you will need to bulk up the knot with a small wooden dowel. Begin by threading the strings through the soundboard. Tie an overhand knot near the end of the string and pull it tight. Then lay the string on top of the dowel formaing a ‘T’.
- Page 30 FIG. 10A REMEMBER: Do not accumulate a lot of windings string around the tuning pins, Cross your windings! especially with the thick bass (low) strings. If you have that problem, turn the tuning pin backward to unwind the string, then pull more of the string through the hole and tighten again.
- Page 31 Caring for your Ballad Harp TUNING TIPS -- It is best to tune the harp with all sharping levers fliped down (disengaged), so there will be no interference from the levers. Please note that this means you may be tuning some strings to flats instead of natural notes.
- Page 32 When you are ready for some accessories, we’ve got you covered:) Visit our website to find a gig bag, sharping levers, harp wheels, harp lights, our harp desk, books and more. www.harpkit.com/harp-accessories Musicmakers 14525 61st ST CT N Stillwater, MN 55082...
Need help?
Do you have a question about the BALLAD HARP KIT and is the answer not in the manual?
Questions and answers