Table of Contents
Advertisement
Available languages
Available languages
Advertisement
Chapters
Table of Contents

Related Manuals for Aube Technologies TH303


Summary of Contents for Aube Technologies TH303
- Page 1 Owner’s Guide TH303 Programmable Thermostat 69-2680EF-07...
-
Page 2: Table Of Contents
Table of contents Overview Configuration About your new thermostat ....1 Default schedule......12 Quick reference to controls ....2 Modifying the schedule....13 Quick reference to screen display ..3 Setup menu ........14 Setup procedure ......16 Installation Removing the faceplate.... -
Page 3: About Your New Thermostat
TH303 About your new thermostat This thermostat has been designed to control an electric heating system such as a baseboard heater, a radiant ceiling, a convector or a fan-forced heater. The thermostat CANNOT be used with: • a resistive load under 0.83 A •... -
Page 4: Quick Reference To Controls
Owner’s Guide Quick reference to controls • To turn the screen backlight on, press the Select button once. The Help tab backlight will remain on for 12 Slide up from the seconds. right and remove • display setpoint to view information temperature, press the Up or on both sides. -
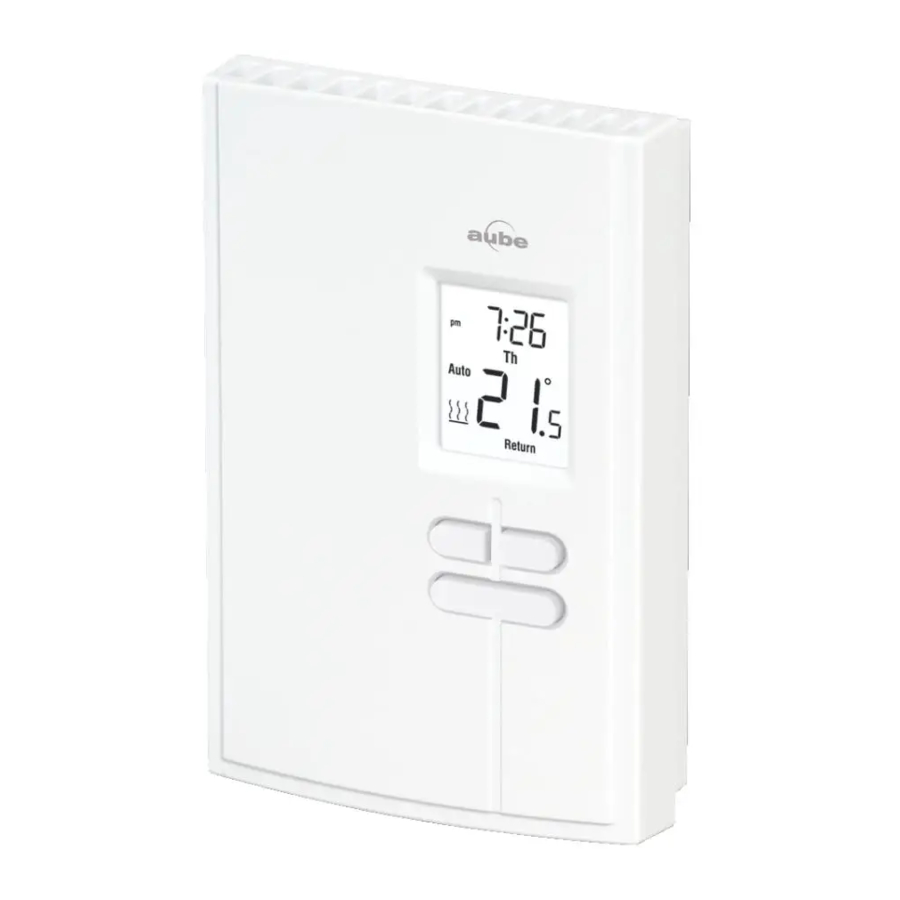
Page 5: Quick Reference To Screen Display
TH303 Quick reference to screen display Countdown mode (see page 11) Flashes during Countdown mode Setpoint temperature Time (see page 2) Automatic mode (see page 8) Manual mode (see page 9) Away mode (see page 10) Ambient temperature Heating intensity indicator (No icon appears when heating is off.) -
Page 6: Removing The Faceplate
Owner’s Guide Removing the faceplate TURN OFF POWER OF THE HEATING SYSTEM AT THE MAIN ELECTRICAL PANEL TO AVOID ELECTRIC SHOCK. WARNING: Installation must be carried out by a certified electrician and must comply with national and local electrical codes. Loosen the screw holding the faceplate to base. -
Page 7: Wiring
TH303 Wiring Connect either one of the 2-wire installation 4-wire installation thermostat wires heater wire and the other Power supply one to the power supply wire using solderless connectors for copper wires. NOTE: Special CO/ALR solderless connectors must be used when connecting with aluminium conductors. -
Page 8: Installing The Thermostat
Owner’s Guide Installing the thermostat Install the base onto an electrical box. Place the FAN switch as follows: Place at Yes if you have a fan-forced heater (to prevent premature burnout of the motor). Leave at No for better temperature regulation if you do not have a fan-forced heater. -
Page 9: Quick Start-Up / Setting The Clock
TH303 Quick Start-up / Setting the clock and date When you power the thermostat, the Time menu flashes on the screen. Set the thermostat’s clock and date as follows: Time Menu Select the format Set the hour Set the minutes... -
Page 10: Automatic (Auto) Mode
Owner’s Guide Automatic (Auto) mode In Automatic mode, the thermostat follows the programmed schedule (see page 12). To place the thermostat in Automatic (Auto) mode: Normal display Auto mode Select Auto Temporary override While the thermostat is in Automatic mode, you can press the Up or Down button to modify the temperature. -
Page 11: Manual (Man) Mode
TH303 Manual (Man) mode Use the Manual mode if you wish to keep the thermostat at the same temperature indefinitely. In this mode, the thermostat will remain at this temperature until you press the Up or Down button to change it. -
Page 12: Away Mode
Owner’s Guide Away mode The Away mode can be used when you are away for an undetermined length of time. For frost protection while saving energy, the Away temperature is set by default at 15°C (59°F) and cannot be modified by simply pressing the Up or Down button. -
Page 13: Countdown Mode
TH303 Countdown mode Use the Countdown mode if you wish to keep the same temperature for a predetermined length of time. The choices of countdown times are: 15, 30 or 45 min, or 1, 2, 4, 8, 12 or 18 hr, or 1 to 14 days. -
Page 14: Default Schedule
Owner’s Guide Default schedule When placed in Automatic mode (see page 8), the thermostat follows the programmed schedule. By default, the thermostat is programmed with the following schedule: Monday to Friday Saturday and Sunday (Mo, Tu, We, Th & Fr) (Sa &... -
Page 15: Modifying The Schedule
TH303 Modifying the schedule To modify the schedule, proceed as follows: Select Exit to return to Select Exit to return to normal display the day selection menu (3 sec.) Normal display Select the days* Set the minutes Program menu Select the period... -
Page 16: Setup Menu
Owner’s Guide Setup menu (1/2) To modify the menu parameters, see page 16. Display Parameter Options Default setting Temperature unit °C / °F °C 5°C - 30°C (41°F - 86°F) 15°C (59°F) Away temperature On / Off Daylight Saving Time On / Off Early Start... - Page 17 TH303 Setup menu (2/2) Away temperature Set the temperature you wish to use when the thermostat is in Away mode (see page 10). Daylight Saving Time When the Daylight Saving Time function is enabled (On), the thermostat automatically switches to Daylight Saving Time on the second Sunday of March and to normal time on the first Sunday of November.
-
Page 18: Setup Procedure
Owner’s Guide Setup procedure The Configuration menu is shown below. Press the Select button for 3 seconds to enter the main menu. Press the Up button twice to enter the Configuration (Conf) menu. Configuration Menu NOTE: If you do not press any button for one Set unit of Set Away... -
Page 19: In Case Of Difficulty
TH303 In case of difficulty (1/2) PROBLEMS SOLUTIONS Thermostat is hot. This is normal. Ensure that the heater capacity does not exceed the thermostat’s maxi- mum load. Displayed tempera- Remediate if any the following conditions exists: ture is incorrect. •... - Page 20 Owner’s Guide In case of difficulty (2/2) PROBLEMS SOLUTIONS TIME is flashing. The thermostat was without power for more than 4 hours. Set its clock and date (Time menu). Temperature does • Ensure the thermostat is in Automatic mode. not change accord- •...
-
Page 21: Specifications
TH303 Specifications Supply: 120/240 VAC, 60 Hz Setpoint range: 5°C to 30°C (41°F to 85°F) Minimum load: 0.83 A (resistive only) Display range: 0°C to 37°C (32°F to 99°F) 200 W @ 240 VAC Setpoint/display resolution: ±0.5°C (±1°F) 100 W @ 120 VAC Operation: 0°C to 50°C (32°F to 120°F) -
Page 22: 3-Year Limited Warranty
Owner’s Guide 3-year limited warranty Resideo warrants this product, excluding battery, to be free from defects in workmanship or materials, under normal use and ser- vice, for a period of three (3) years from the date of first purchase by the original purchaser. If at any time during the warranty period the product is determined to be defective due to workmanship or materials, Resideo shall repair or replace it (at Resideo’s option). -
Page 23: Customer Assistance
TH303 Customer assistance For assistance with this product please visit http://resideo.com or call Customer Care toll-free at 1-800-468-1502. To reset the thermostat, press both Down and Select buttons and hold. After 3 seconds, RST appears. After the next 5 seconds, when RST disappears, release the buttons. - Page 24 Owner’s Guide FCC statement available at: https://customer.resideo.com/en-US/support/residential/codes-and-standards/FCC15105/Pages/default.aspx CAUTION: ELECTRONIC WASTE NOTICE The product should not be disposed of with other household waste. Check for the nearest authorized collection centers or authorized recyclers. The correct disposal of end-of-life equip- ment will help prevent negative consequences for the environment and human health. Resideo Technologies, Inc.
- Page 25 Guide du propriétaire TH303 Thermostat programmable...
- Page 26 Table des matières Aperçu Configuration À propos du thermostat ......1 Horaire par défaut ........12 Coup d’œil rapide sur les commandes..2 Modification de l’horaire......13 Coup d’œil rapide sur l’affichage....3 Menu de configuration ......14 Étapes de configuration......16 Installation Enlever la façade ........
-
Page 27: À Propos Du Thermostat
TH303 À propos du thermostat Ce thermostat a été conçu pour commander un appareil de chauffage électrique tel qu’une plinthe chauffante, un plafond radiant, un convecteur ou un ventilo-convecteur. Ce thermostat NE PEUT être utilisé avec : • une charge résistive inférieure à 0,83 A •... -
Page 28: Coup D'œil Rapide Sur Les Commandes
Guide du propriétaire Coup d’œil rapide sur les commandes • Pour activer le rétroéclairage, Onglet d’aide appuyer une fois sur le bouton Sélection. Le rétroéclairage restera Glisser vers le activé pendant 12 secondes. haut et retirer pour voir l’information • Pour visualiser la température de sur les deux côtés. -
Page 29: Coup D'œil Rapide Sur L'affichage
TH303 Coup d’œil rapide sur l’affichage Mode Compte à rebours (voir la page 11) Clignote durant le mode Compte à rebours Température Heure de consigne Jour (voir la page 2) Mode Automatique (voir la page 8) Mode Manuel (voir la page 9) Mode Absence (voir la page 10) Température ambiante... -
Page 30: Enlever La Façade
Guide du propriétaire Enlever la façade METTRE LE SYSTÈME DE CHAUF- FAGE HORS TENSION À PARTIR DU PANNEAU ÉLECTRIQUE AFIN D’ÉVI- TER TOUT RISQUE DE CHOC ÉLEC- TRIQUE. MISE EN GARDE : L’installation doit être effectuée par un électricien certifié et doit être conforme aux codes nationaux et locaux de l’électricité. -
Page 31: Branchement
TH303 Branchement Installation à 4 fils Relier n’importe quel fil du Installation à 2 fils thermostat au fil de l’appareil de chauffage et l’autre fil au Alimentation fil de l’alimentation en utili- sant des connecteurs sans soudure pour fils de cuivre. -
Page 32: Installer Le Thermostat
Guide du propriétaire Installer le thermostat Installer la base sur une boîte électrique. Placer le sélecteur FAN comme suit: Placer à Oui (Yes) si vous utilisez un ventilo-convecteur (pour éviter que le moteur s’use prématurément). Laisser à Non (No) pour une meilleure ... -
Page 33: Démarrage Rapide / Réglage De L'horloge
TH303 Démarrage rapide / Réglage de l’horloge et de la date Lorsque le thermostat est mis sous tension, le menu de l’heure (Time) clignote à l’écran. Régler l’heure et la date comme suit : Menu de Sélectionner le format Régler l’heure Régler les minutes... -
Page 34: Mode Automatique (Auto)
Guide du propriétaire Mode Automatique (Auto) En mode Automatique, le thermostat suit l’horaire programmé (voir la page 12). Pour placer le thermostat en mode Automatique (Auto) : Affichage normal Mode Automatique Sélectionner Auto Dérogation temporaire Lorsque le thermostat est en mode Automatique, vous pouvez appuyer sur le bouton Haut ou Bas pour modifier la température. -
Page 35: Mode Manuel (Man)
TH303 Mode Manuel (Man) Utiliser le mode Manuel si vous désirez maintenir la même température indéfiniment. Dans ce mode, le thermostat gardera cette température jusqu’à ce que vous la modifiez à l’aide du bouton Haut ou Bas. Pour mettre le thermostat en mode Manuel (Man) :... -
Page 36: Mode Absence (Away)
Guide du propriétaire Mode Absence (Away) Le mode Absence peut être utilisé lorsque vous quittez pour une durée indéterminée. Pour la protection contre le gel ainsi que pour l’économie d'énergie, la température Absence est réglée à 15 °C (59 °F) par défaut. Elle ne peut être modifiée en appuyant simplement sur le bouton Haut ou Bas. -
Page 37: Mode Compte À Rebours (Countdown)
TH303 Mode Compte à rebours (Countdown) Utiliser le mode Compte à rebours si vous désirez maintenir la même température pour une durée prédéterminée. Les choix sont : 15, 30 ou 45 minutes, ou 1, 2, 4, 8, 12 ou 18 heures, ou de 1 à... -
Page 38: Horaire Par Défaut
Guide du propriétaire Horaire par défaut Lorsque le thermostat est placé en mode Automatique (voir la page 8), il suit l’horaire programmé. Par défaut, le thermostat a été programmé avec l’horaire suivant : Lundi au vendredi Samedi et dimanche (Mo, Tu, We, Th & Fr) (Sa &... -
Page 39: Modification De L'horaire
TH303 Modification de l’horaire Pour modifier l’horaire, procéder comme suit : Sélectionner Exit pour Sélectionner Exit pour revenir à la sélection du jour revenir à l’affichage normal (3 sec.) Affichage normal Sélectionner les jours* Régler l’heure Régler les minutes Régler la température Menu de Sélectionner la période... -
Page 40: Menu De Configuration
Guide du propriétaire Menu de configuration (1/2) Pour régler les paramètres du menu, voir la page 16. Réglage Affichage Paramètre Options par défaut Unité de la température °C / °F °C 5 °C - 30 °C (41 °F - 86 °F) 15 °C (59 °F) Température Absence Activée (On) / Désactivée (Off) - Page 41 TH303 Menu de configuration (2/2) Température Absence Régler la température désirée lorsque le thermostat est en mode Absence (Away) (voir la page 10). Heure avancée Lorsque cette fonction est activée (On), le thermostat passe automatiquement à l’heure avancée le deuxième dimanche de mars et à l’heure normale le premier dimanche de novembre.
-
Page 42: Étapes De Configuration
Guide du propriétaire Étapes de configuration Le menu de configuration est illustré ci-dessous. Appuyer sur le bouton Sélection pendant trois secondes pour accéder au menu principal. Appuyer sur le bouton Haut deux fois pour accéder au menu de configuration (Conf). Menu de configuration NOTA : Si vous n'appuyez sur... -
Page 43: En Cas De Difficulté
TH303 En cas de difficulté (1/2) PROBLÈMES SOLUTIONS Ceci est normal. S’assurer que l’appareil de chauffage n’excède pas la charge Le thermostat est maximale du thermostat. Garder les ouvertures d’aération du thermostat propres et chaud. dégagées. Si l’une des situations suivantes existe, y remédier : La température... - Page 44 Guide du propriétaire En cas de difficulté (2/2) PROBLÈMES SOLUTIONS Le thermostat est resté hors tension pendant plus de 4 heures. Régler l'horloge et la TIME clignote. date (menu Time). La température ne • S’assurer que le thermostat est en mode Automatique. change pas en •...
-
Page 45: Fiche Technique
TH303 Fiche technique Alimentation : 120/240 Vca, 60 Hz Plage de réglage : 5 °C à 30 °C (41 °F à 85 °F) Charge minimale : 0,83 A (résistive seulement) Plage d’affichage : 0 °C à 37 °C (32 °F à 99 °F) 200 W @ 240 V c.a. -
Page 46: Garantie Limitée De 3 Ans
Guide du propriétaire Garantie limitée de 3 ans Resideo garantit ce produit, à l’exception des piles, contre tout défaut de pièce ou de main-d’oeuvre, durant une période pour trois (3) ans à partir de la date d’achat par le consommateur d’origine si le produit est utilisé et entretenu convenablement. En cas de défaillance ou de mauvais fonctionnement pendant la période de garantie, Resideo remplacera ou réparera le produit, à... -
Page 47: Service À La Clientèle
TH303 Service à la clientèle Pour obtenir de l’aide sur ce produit, veuillez consulter le http://resideo.com ou joindre le service à la clientèle en composant sans frais le 1-800-468-1502. Pour réinitialiser le thermostat, appuyer sur les boutons Bas et Sélection et les tenir enfoncés. - Page 48 Guide du propriétaire Déclaration de la FCC sur : https://customer.resideo.com/en-US/support/residential/codes-and-standards/FCC15105/Pages/default.aspx MISE EN GARDE : AVIS DE DÉCHETS ÉLECTRONIQUES Ne disposez pas ce produit avec les autres ordures ménagères. Recherchez les centres de collecte ou de recyclage accrédités les plus proches. La mise au rebut appropriée de l’équipe- ment en fin de vie aidera à...
Need help?
Do you have a question about the TH303 and is the answer not in the manual?
Questions and answers