Table of Contents
Advertisement
Advertisement
Table of Contents

Related Manuals for Aube Technologies TH303


Summary of Contents for Aube Technologies TH303
- Page 1 Owner’s Guide TH303 Programmable Thermostat 400-303-000-C...
-
Page 2: Table Of Contents
Table of contents Overview About your new thermostat ... 1 Quick reference to controls ... 2 Quick reference to screen display ... 3 Installation Removing the faceplate... 4 Wiring ... 5 Installing the thermostat ... 6 Quick start-up / Setting the clock... 7 Operating modes Automatic (Auto) mode... -
Page 3: About Your New Thermostat
About your new thermostat This thermostat has been designed to control an electric heating system such as a baseboard heater, a radiant ceiling, a convector or a fan-forced heater. The thermostat CANNOT be used with: • a resistive load under 0.83 A •... -
Page 4: Quick Reference To Controls
400-303-000-C Quick reference to controls • To turn the screen backlight on, press the Select button once. The backlight will remain on for 12 seconds. • display temperature, press the Up or Down button once. The setpoint will be displayed for 5 seconds. •... -
Page 5: Quick Reference To Screen Display
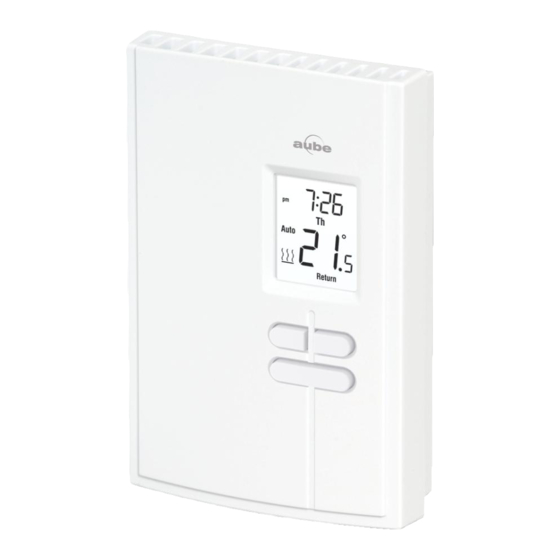
Automatic mode (see page 8) Manual mode (see page 9) Away mode (see page 10) Heating intensity indicator (No icon appears when heating is off.) Countdown mode (see page 11) Periods (see page 12) Setpoint temperature (see page 2) Ambient temperature TH303... -
Page 6: Removing The Faceplate
400-303-000-C Removing the faceplate TURN OFF POWER OF THE HEATING SYSTEM AT THE MAIN ELECTRICAL PANEL TO AVOID ELECTRIC SHOCK. WARNING: Installation must be carried out by a certified electrician and must comply with national and local electrical codes. Loosen the screw holding the faceplate to base. -
Page 7: Wiring
TH303 Wiring Connect either one of the 2-wire installation 4-wire installation thermostat wires heater wire and the other Power supply one to the power supply wire using solderless connectors for copper wires. NOTE: Special CO/ALR solderless connectors must be used when connecting with aluminium conductors. -
Page 8: Installing The Thermostat
• Reinstall the faceplate on the base and secure it in place with the screw. • Apply power to the thermostat at the main electrical panel. FAN switch Keep air vents at top and bottom of thermostat clean... -
Page 9: Quick Start-Up / Setting The Clock
TH303 Quick Start-up / Setting the clock and date When you power the thermostat, the Time menu flashes on the screen. Set the thermostat’s clock and date as follows: Set the year Time Menu Select the format Set the hour... -
Page 10: Automatic (Auto) Mode
Select Auto Temporary override While the thermostat is in Automatic mode, you can press the Up or Down button to modify the temperature. The new temperature will be used until the end of the current period. Auto will flash during the override. You can cancel the override by pressing the Select button twice... -
Page 11: Manual (Man) Mode
TH303 Manual (Man) mode Use the Manual mode if you wish to keep the thermostat at the same temperature indefinitely. In this mode, the thermostat will remain at this temperature until you press the Up or Down button to change it. -
Page 12: Away Mode
To modify the Away temperature, see page 16. NOTE: The Away mode can also be used to prevent tampering of the setpoint temperature in the summer season when heating is not required. To place the thermostat in Away mode: Normal display Away mode... -
Page 13: Countdown Mode
The choices of countdown times are: 15, 30, 45 min, 1, 2, 4, 8, 12, 18 hr and 1 to 14 days. At the end of the countdown, the thermostat automatically returns to the previous mode and uses the temperature programmed for that mode. At any time, you can cancel the Countdown mode by pressing the Select button. -
Page 14: Default Schedule
The schedule consists of 4 periods per day, which represents a typical work day. However, you can program the thermostat to skip (cancel) the periods that do not apply to your situation. For example, Leave and Return periods are skipped for the weekend in the default schedule. -
Page 15: Modifying The Schedule
5°C [41°F].) Its time and temperature display will be replaced by dashes (-). NOTE: If you do not press any button for one minute, the thermostat will automatically save any changes you have made and will return to its normal display. -
Page 16: Configuration Parameters
400-303-000-C Configuration parameters Display Parameter Time format Temperature unit Away temperature Daylight Saving Time Early Start Options Yes / No 12h / 24h °C / °F 5°C - 30°C (41°F - 86°F) On / Off On / Off Default setting To modify FAN switch (see page 6) Time menu (see page 7) - Page 17 Away temperature Set the temperature you wish to use when the thermostat is in Away mode (see page 10). Daylight Saving Time When the Daylight Saving Time function is enabled (On), the thermostat automatically switches to Daylight Saving Time on the second Sunday of March and to normal time on the first Sunday of November.
-
Page 18: Configuration Procedure
To confirm Set Daylight Saving Time Early Start To confirm To confirm NOTE: If you do not press any button for one minute, the thermostat will automatically save any changes you have made and will return to its normal display. -
Page 19: In Case Of Difficulty
The thermostat was without power for more than 4 hours. Set its clock and date TIME is flashing. (Time menu). -
Page 20: Customer Assistance
After 3 seconds, RST appears. After the next 5 seconds, when RST disappears, release the buttons. Except for the time and date, the thermostat has now returned to its default settings. www.aubetech.com To reset the thermostat, press both Down and... -
Page 21: Specifications
- Operation: 0°C to 50°C (32°F to 120°F) - Storage: -20°C to 50°C (-4°F to 120°F) - Permanent memory:You do not need to adjust the temperature settings or the thermostat’s configurations following a power outage. However, you might need to set the thermostat’s clock and date if the outage lasts more than 4... -
Page 22: 3-Year Limited Warranty
400-303-000-C 3-year limited warranty Honeywell warrants this product, excluding battery, to be free from defects in the workmanship or materials, under normal use and service, for a period of three (3) years from the date of purchase by the consumer. If at any time during the warranty period the product is determined to be defective or malfunctions, Honeywell shall repair or replace it (at Honeywell's option).
Need help?
Do you have a question about the TH303 and is the answer not in the manual?
Questions and answers