
Related Manuals for ATV aDrums EXS-3CY


Summary of Contents for ATV aDrums EXS-3CY
- Page 1 EXS-3 aDrums EXS-3CY Quick Start Guide...
-
Page 2: Table Of Contents
Important Information about Use . . . . . . . . . . . . . . . . . . . . . . . . . . . . . . . . . . . . . . . . . . . . . 21 Before using aDrums EXS-3CY, be sure to read ‘4 Important Notices’ p .20 . -
Page 3: Package Contents
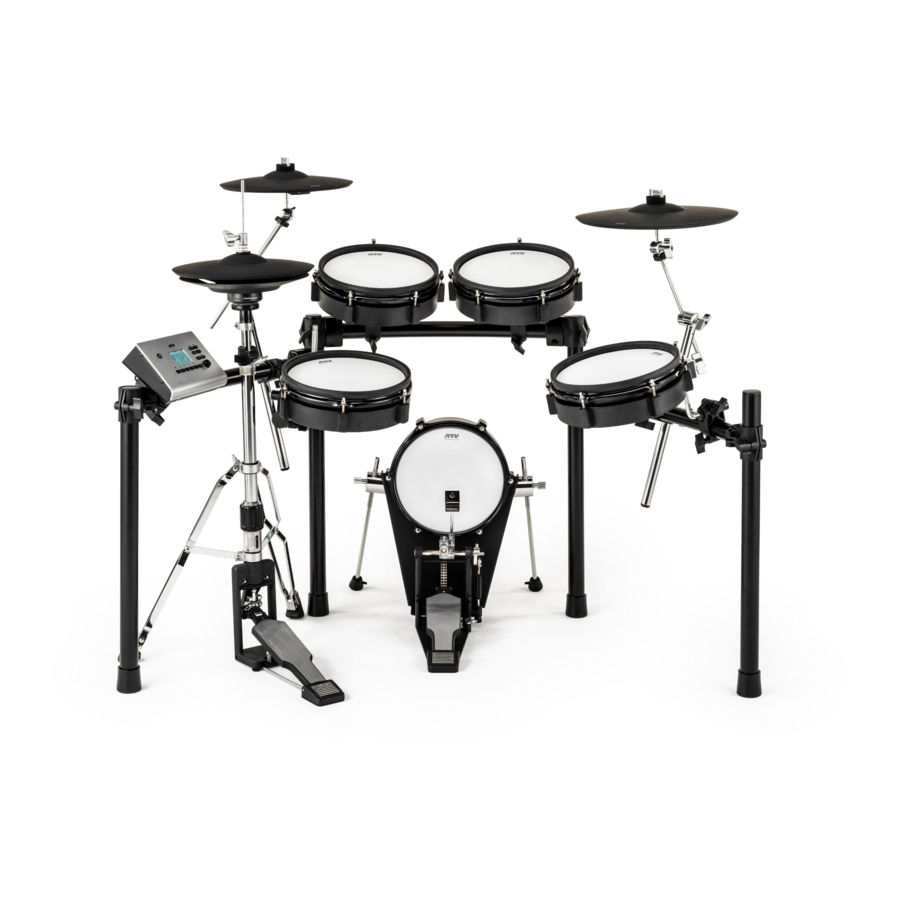
Setup Package Contents This product includes the following items . Spurs for Kick Pad x2 Crash Cymbal Pad x2 Ride Cymbal Pad Kick Pad Hi-hat pad Snare Pad Tom Pads x3 AC adapter for hi-hat pad Quick Start Guide (this booklet) Trigger cable SD memory card Cable tie... -
Page 4: Assembly Guide
Setup Setup Assembly Guide Connect tubes A to F as the figure right shows. *A corresponding label (A to F) is attached to each tube. Insert tube A into the tube C clamp Tube C *Securely tighten the clamp bolt Tube A Insert tube A and tube B into the clamps at the ends of tube D Tube D... - Page 5 Using the drum key remove the tube clamp from the end of tube F as shown Tube End Clamp • When removing the clamp, be careful to avoid inury or scratches to furniture due to rough metal edges at the end of the tube . Insert the cymbal arm clamp onto pipe F as shown Cymbal arm clamp Reattach the tube end clamp to pipe F as shown...
- Page 6 Setup Setup Insert tube A and tube B into the clamps at the ends of tube F Tube F Stand R 70mm Tube A *Securely tighten the Tube B clamp bolts Attach tube E clamps to stands L and R Tube E Stand L Stand R...
- Page 7 Setup Setup Attach the cymbal boom arms *Securely tighten all bolts Attach the L-arm to the clamp (1) and the snare to the L-arm (2) *Securely tighten all bolts *Adjust the tension of the pad head using the included tuning key .
- Page 8 Setup Setup Attach the tom L-arms to the clamps (1) and the toms to the L-arms (2) as shown *Securely tighten all bolts *Adjust the tension of the head using the tuning key included in the package . Attach the cymbal pads to the boom arms. Crash cymbal Ride cymbal Crash cymbal...
- Page 9 Setup Setup Attach the hi-hat cymbals AC adapter for hi-hat optical sensor (bottom cymbal). Switch “On” (light is lit). *This AC adaptor can be used worldwide . Please connect the adaptor to a plug attachment (several types included) that is correct for the country of use .
- Page 10 Setup Setup Attach the xD3 drum sound instrument *After completing the assembly verify that all the bolts are securely tightened.
-
Page 11: Top Panel
[5] Button = LOAD TRACK –––––––––––––––––––––––––– DRUM KIT –––––––––––––––––––––––––– Buttons for which there are no 承認: 設計: 図面番 Mori corresponding menu items are unlit . . HOME 名称: MENU 2017.3.27 ENTER 発行:ATV株式会社 公差:±0.3 承認: 設計: 図面番 Mori SONG 2017.3.27 VARIATION 発行:ATV株式会社 公差:±0.3... -
Page 12: Rear Panel
Setup Setup xD3 Rear Panel SD CARD Insert the included SD card that contains song data . Additional songs can also be The xD3 can be connected to a stored and loaded . The SD card is also used MIDI OUT Mac or Windows PC, allowing MIDI to back-up and import xD3 sound data. -
Page 13: Getting Ready
1 Getting Ready Connecting Audio Equipment In order to use the xD3, you will need the following items. • Headphones or powered speakers, etc. You can play along with your own songs by connecting a music player’s stereo line output to the xD3’s AUDIO IN jack . -
Page 14: Zones Supported By The Xd3'S Trigger Inputs
1 Getting Ready 1 Getting Ready Zones supported by the xD3’s trigger inputs xD3 trigger Choke Supported zone Notes method input KICK Head Input hardware is only single-trigger capable. Side stick sound function can be enabled, see the user’s manual. SNARE Head,Rim (Only available on the snare input.) -
Page 15: Trigger Settings
1 Getting Ready 1 Getting Ready Trigger Settings These settings are used to optimize the performance of the xD3 by calibrating the unit’s triggering sensitivity in response to signals from the pad sensors. Setting up the sensitivity of triggers is important when using the equipment for the first time or when changing the type of pad . -
Page 16: Cross-Talk Cancel Wizard
1 Getting Ready 1 Getting Ready Cross-talk Cancel Wizard Press the [5] (NEXT) button. To cancel, press the [2] (CANCEL) button. Follow the instructions on the screen and strike the indicated pad 3 times with powerful hits. Indicated Pad OK Display *If you press [RETRY], the strikes you made so far will be erased and you can start over. -
Page 17: Performing
2 Performing CLICK Home Screen The Home screen is displayed after turning on the power . Press the [1] (HOME) button from any screen to return to the Home Screen. The Home Screen is displayed when playing the drums . TRACK ––––––––––––––––––––––––––... -
Page 18: Changing The Drum Kit
2 Performing 2 Performing ENTER Changing the Drum Kit MENU MENU Press one of drum kit buttons [1]—[5]. LIST –––––––––––––––––––––––––– DRUM KIT –––––––––––––––––––––––––– The drum kit saved for each button is loaded. *It takes several seconds to load the drum kit. When the drum kit name is displayed,you can start playing. -
Page 19: Detailed Information
3 Detailed Information Details of functions The xD3 has many other functions . For detailed information and a detailed explanation of the functions, please refer to the User’s Manual that you can download from the following URL: http://www.atvcorporation.com/en/products/drums/exs-5_3/support.html Specifications Electronic Drum Sound Module Model: xD3 Item Specification... -
Page 20: Important Notice
Always follow the basic precautions listed below to avoid the possibility of serious injury from fire, electrical shock or other hazards, and serious damages to the aDrums EXS-3CY instrument or other goods and assets. Before using aDrums EXS-3CY, be sure to read all the safety information below . -
Page 21: Important Information About Use
• This product incorporates audio / sound data contents in stereo equipment, mobile phone, or other electric devices. which ATV and third parties own copyrights . Using and Otherwise, the instrument, TV or radio may generate noise. copying these materials without permission (except for personal and other uses permitted by the copyright law) is •... - Page 22 For korrekt behandling, indsamling og genbrug skal du kontakte dit lokale kommunekontor, affaldsstation eller butikken, hvor du købte produktet. ATV EUROPE LDA. Rua 28 de Janeiro, nr. 350 – Fração CC-11, Centro Empresarial Candal Park Santa Marinha, 4400-335 Vila Nova de Gaia, PORTUGAL...
Need help?
Do you have a question about the aDrums EXS-3CY and is the answer not in the manual?
Questions and answers