Table of Contents
Advertisement
Quick Links
Advertisement
Table of Contents

Related Manuals for PHOTONIS TacFusion


Summary of Contents for PHOTONIS TacFusion
- Page 1 TacFusion User Manual A1...
- Page 2 About this User Manual This User Manual is applicable to TacFusion. This document includes instructions for using and managing the product. Pictures, charts, images and all other information hereinafter are for description and explanation only. The information contained in the User Manual is subject to change, without notice, due to firmware updates or other reasons.
- Page 3 User Manual A1 TacFusion Regulatory Information FCC Information Please take attention that changes or modification not expressly approved by the party responsible for compliance could void the user’s authority to operate the equipment. FCC compliance This equipment has been tested and found to comply with the limits for a Class B digital device, pursuant to part 15 of the FCC Rules.
- Page 4 TacFusion User Manual A1 EU Conformity Statement This product and, if applicable, the supplied accessories are marked with “CE” and comply therefore with the applicable harmonized European standards listed under the Radio Equipment Directive 2014/53/EU, the EMC Directive 2014/30/EU, the RoHS Directive 2011/65/EU.
-
Page 5: Table Of Contents
2.3.1 Power On ..............................12 2.3.2 Power Off ..............................13 2.4. Cable Connection ............................... 13 2.5. Focus .................................. 13 3. TacFusion Setup ................................14 3.1. Menu Description .............................. 14 3.2. Local Output ..............................15 3.3. File Export ................................16 3.4. Display Setting ..............................16 3.4.1 Contouring Function .......................... - Page 6 TacFusion User Manual A1 3.7. GPS ..................................21 3.8. Reset Default Settings ............................21 4. Capture and Video ................................ 22 4.1. Capture Settings ..............................22 4.1.1 Capture Snapshots ............................. 22 4.1.2 View Snapshot ............................22 4.1.3 Delete Snapshots ............................22 4.2.
-
Page 7: Overview
User Manual A1 TacFusion 1. Overview 1.1. General Safety WARNING and CAUTION statements have been strategically placed throughout the text prior to operating or maintenance procedures, practices, or conditions considered essential to the protection of personnel (WARNING) or equipment and property (CAUTION). -
Page 8: Box Content
TacFusion User Manual A1 1.2. Box Content TacFusion comes with the items listed in Table 1 and depicted in Figure 1. TacFusion USB (1x) Batteries (4x) Daytime pinhole cover (1x) Figure 1. Box contents Table 1. Box contents Item Remark... -
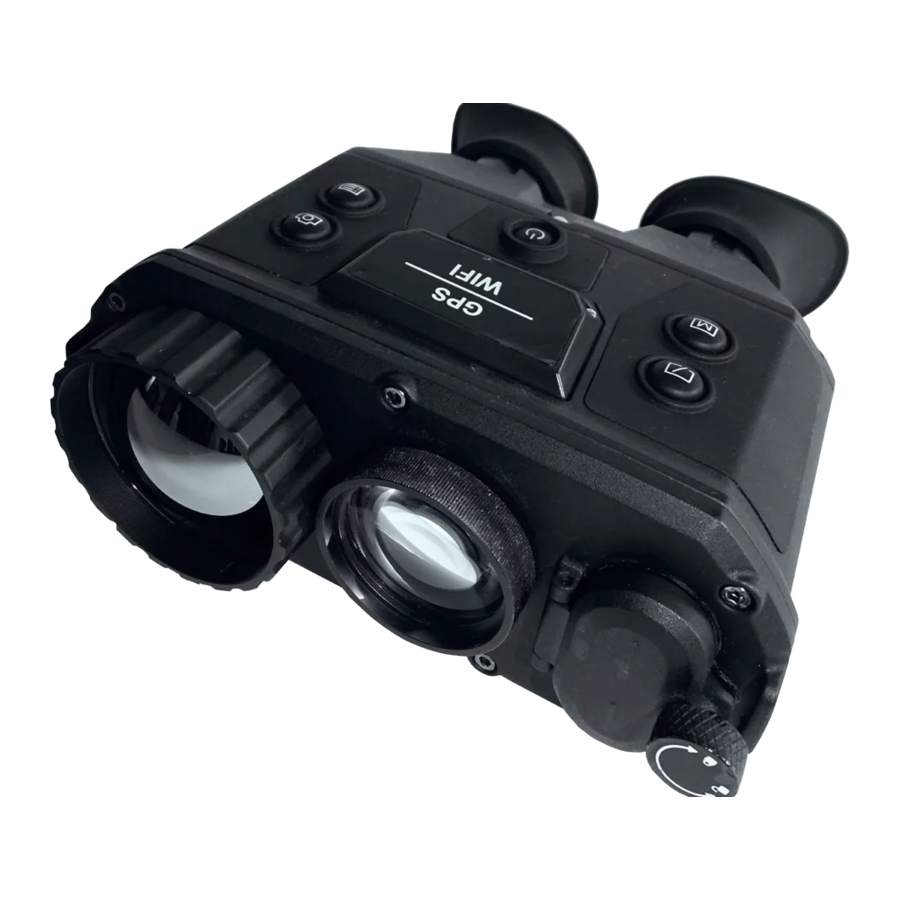
Page 9: Description
TacFusion 1.3. Description TacFusion is a pair of binoculars with both thermal observation function and target searching function. In harsh conditions, such as in a total dark or under extreme low illumination, the user can observe targets from long distance. -
Page 10: Cables Description
Detecting human eyes that are approaching in order to save power. The OLED screen turns on automatically when eyes are detected. 1.5.2 Cables Description The aviation plug cable can be connected to connector, which is located at the bottom part of TacFusion. Figure 3. Cable description Table 3. Cable description... -
Page 11: Button Description
Hold the button to show the menu bar. Note: Contouring function will be further explain in Section 3.4.1. Different modes in TacFusion such as Thermal, Visible and Fusion including White Hot and Black Hot modes will be explained in Section 3.5. -
Page 12: Device Operation
TacFusion User Manual A1 2. Device Operation 2.1. Device Charging Purpose: For the first use, it is advised to charge the batteries with your charger until they are fully charged. Steps: 1. Take the proper plug adapter. 2. Push and hold it, at the mean time slide it toward the inside to assemble the power adapter. -
Page 13: Battery Installation
2.3. Turning the power ON/OFF 2.3.1 Power On Step: When the TacFusion is sufficiently charged, hold the button to turn ON the TacFusion. Please ensure that the batteries are installed correctly. Notes: See the battery icon for the power status. -
Page 14: Power Off
To plug in/out the cable, hold the cable end and then plug in/out. Do NOT twist the cables, which could damage the inside pins. Purpose: Connect the TacFusion with the aviation cable, you can connect the device to your PC via USB interface or the display via the BNC interface. Steps: Connect the aviation cable with the aviation interface. -
Page 15: Tacfusion Setup
Figure 9. Step 1. 2. Slightly rotate the focus wheel to focus the objective lens. Rotate to focus Rotate to focus Figure 10. Step 2. 3. TacFusion Setup 3.1. Menu Description Step: Hold the button to show the menu bar. -
Page 16: Local Output
Figure 12. Menu interface. 3.2. Local Output Before you start: Connect the TacFusion to the display unit via CVBS interface of the aviation plug. Refer to Section 2.4. Purpose: View the TacFusion image on the display unit for details. Steps: 1. -
Page 17: File Export
User Manual A1 TacFusion 3.3. File Export Before starting: Connect the TacFusion to your PC via USB interface of the aviation plug. Refer to Section 2.4. Purpose: Export the videos and snapshots to your PC. Steps: 1. In your PC, go to the Removable Disk. -
Page 18: Display Brightness & Contrast
This adjustment also affects the brightness and contrast of menu, icons, etc. Screen Brightness Steps: 1. Hold the button to show the menu of TacFusion. 2. Press the button and button to move the cursor to Settings submenu. 3. Press the button to confirm. -
Page 19: Cursor
Cursor submenu. 3. Press the button to confirm. 4. Manually move the TacFusion, align the horizontal line with the target bottom and measure the distance to the target. 5. Hold the button to exit. -
Page 20: Digital Zoom
ON/OFF the OSD. 3.5. Palettes Setting Figure 14. Thermal view. Purpose: The TacFusion equipped by dual-lens: thermal and visible light lens. The user can set the thermal or visible view to show thermal channel, visible light channel, or both them (Fusion mode). -
Page 21: Mobile Application
Figure 15. Palette setting. Note: The Thermal Mode in TacFusion has two different contrast theme namely White Hot Mode and Black Hot Mode. The users can change these modes by pressing the button when using the Thermal Mode. -
Page 22: Gps
Wi-Fi name: Wlan-Serial Number 4. Once connected to the Wi-Fi of TacFusion, open the software. 5. Click icon option button ⊜ on the top left corner and choose device. 6. Click icon add icon ⊕ on the top right corner and choose Wi-Fi configuration. -
Page 23: Capture And Video
When capturing succeeded, it shows Snapshot captured. When capturing failed, it shows Capturing failed. 4.1.2 View Snapshot Steps: 1. Hold the button to show the menu of TacFusion. 2. Press the button and button to move the cursor to File>Image submenu. 3. Press the button to confirm. -
Page 24: Video Playback
TacFusion User Manual A1 4.2.2 Video Playback Steps: 1. Hold the button to show the menu of TacFusion. 2. Press the button and button to move the cursor to File>Video submenu. 3. Press the button to confirm. 4. Press the button and button to select video. -
Page 25: Appendix
TacFusion 5. Appendix 5.1. Dimensions Figure 16. Dimension of TacFusion 5.2. Common Material Emissivity Reference The emissivity describes the effectiveness of surface of a material to emit the thermal radiation. Table 7 shows the emissivity reference of different materials which useful in term of thermal imaging. - Page 26 Customers should ensure that they have up-to-date Photonis product information before placing orders. Photonis makes no representations or warranties as to the use of the product other than as set forth in the user manual or according to standard rules of use for such products.
Need help?
Do you have a question about the TacFusion and is the answer not in the manual?
Questions and answers