Sony Handycam HDR-CX760V Operating Manual
Digital hd video camera recorder
Hide thumbs
Also See for Handycam HDR-CX760V:
- Guia de operaciones (94 pages) ,
- Specifications (5 pages) ,
- Operating manual (100 pages)
Table of Contents
Advertisement
Available languages
Available languages
Quick Links
Additional information on this product and
answers to frequently asked questions can be
found at our Customer Support Website.
Puede encontrar más información sobre este
producto y respuestas a las preguntas más
frecuentes en nuestro sitio Web de atención al
cliente.
http://www.sony.net/
Printed on 70% or more recycled paper using
VOC (Volatile Organic Compound)-free
vegetable oil based ink.
Impreso en papel reciclado en un 70% o más
utilizando tinta hecha con aceite vegetal exento
de compuesto orgánico volátil (COV).
2012 Sony Corporation
Printed in Japan
Digital HD Video
Camera Recorder
Please also refer to :
Por favor consulte también:
http://www.sony.net/SonyInfo/Support/
HDR-CX760V/PJ710/PJ710V/PJ760/PJ760V
4-418-119-11(1)
Operating Guide
US
Guía de operaciones
ES
Advertisement
Chapters
Table of Contents

Related Manuals for Sony Handycam HDR-CX760V


Summary of Contents for Sony Handycam HDR-CX760V
- Page 1 VOC (Volatile Organic Compound)-free vegetable oil based ink. Impreso en papel reciclado en un 70% o más utilizando tinta hecha con aceite vegetal exento de compuesto orgánico volátil (COV). 2012 Sony Corporation Printed in Japan Digital HD Video Camera Recorder Please also refer to : Por favor consulte también:...
- Page 2 Owner’s Record The model and serial numbers are located on the bottom. Record the serial number in the space provided below. Refer to these numbers whenever you call upon your Sony dealer regarding this product. Model No. HDR- Serial No.
-
Page 3: Important Safety Instructions
IMPORTANT SAFETY INSTRUCTIONS SAVE THESE INSTRUCTIONS. DANGER - TO REDUCE THE RISK OF FIRE OR ELECTRIC SHOCK, CAREFULLY FOLLOW THESE INSTRUCTIONS. Read these instructions. Keep these instructions. Heed all warnings. Follow all instructions. Do not use this apparatus near water. ... - Page 4 Representative plug of power supply cord of countries/regions around the world. A Type B Type (American (British Type) Type) The representative supply voltage and plug type are described in this chart. Depend on an area, Different type of plug and supply voltage are used. Attention: Power cord meeting demands from each country shall be used.
- Page 5 Countries/regions Thailand Vietnam Oceania Countries/regions Australia New Zealand North America Countries/regions Canada Central America Countries/regions Bahamas Costa Rica Cuba Dominican (rep) El Salvador Guatemala Honduras Jamaica Mexico Nicaragua Panama South America Countries/regions Argentina Brazil Chile Colombia Peru Venezuela Middle East Countries/regions Iran Iraq...
-
Page 6: Read This First
Do not handle damaged or leaking lithium ion batteries. Be sure to charge the battery pack using a genuine Sony battery charger or a device that can charge the battery pack. Keep the battery pack out of the reach of small children. -
Page 7: Declaration Of Conformity
The UL Mark on the product means it has been UL Listed. If you have any questions about this product, you may call: Sony Customer Information Center 1-800- 222-SONY (7669). The number below is for the FCC related matters only. -
Page 8: About Language Setting
Connect the equipment into an outlet on a circuit different from that to which the receiver is connected. Consult the dealer or an experienced radio/ TV technician for help. The supplied interface cable must be used with the equipment in order to comply with the limits for a digital device pursuant to Subpart B of Part 15 of FCC Rules. -
Page 9: About This Manual, Illustrations And On-Screen Displays
(“Handycam” User Guide) “Handycam” User Guide is an on-line manual. Refer to it for in-depth instructions on the many functions of the camcorder. Access the Sony support page. http://www.sony.net/SonyInfo/ Support/ Select your country or region. Search for the model name of your camcorder within the support page. -
Page 10: Table Of Contents
Table of contents IMPORTANT SAFETY INSTRUCTIONS............3 Read this first.. - Page 11 Recording images with the selected image quality........41 Selecting the image quality of movies (Recording mode)..
- Page 12 Saving images with an external device Dubbing guide..................61 The devices on which the created disc can be played back.
-
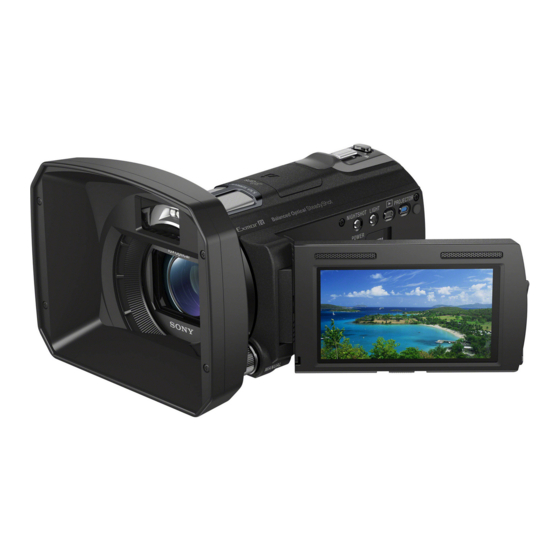
Page 13: Parts And Controls
Parts and controls Figures in ( ) are reference pages. Built-in microphone Active Interface Shoe Flash/Video light Lens (Carl Zeiss lens) Remote sensor/Infrared port Camera recording lamp (72) The camera recording lamp lights up in red during recording. - Page 14 HDR-PJ710/PJ710V HDR-CX760V HDR-PJ760/PJ760V (View Images) button LIGHT (Video Light) button (40) NIGHTSHOT button (39) POWER button Memory card access lamp (25) While the lamp is lit or flashing, the camcorder is reading or writing data. ...
- Page 15 HDR-CX760V/PJ760/PJ760V Power zoom lever (30) PHOTO button (27) Eyecup Viewfinder (23) CHG (charge) lamp (18) Battery pack (18) START/STOP button (27) DC IN jack (18) Viewfinder lens adjustment lever (23) (microphone) jack (PLUG IN POWER) ...
-
Page 16: Wireless Remote Commander
To attach the Step Down Ring Align the Step Down Ring with the camcorder properly (), then turn it in the direction of the arrow until the Step Down Ring is locked in place (). You can change to the filter diameter to ... -
Page 17: Getting Started
Getting started Supplied Items The numbers in ( ) are the supplied quantity. Camcorder (1) AC Adaptor (1) Power cord (Mains lead) (1) HDMI cable (1) A/V connecting cable (1) USB connection support cable (1) The USB connection support cable is designed ... -
Page 18: Charging The Battery Pack
Charging the battery pack Close the LCD screen after replacing the viewfinder (HDR- CX760V/PJ760/PJ760V) and attach the battery pack. Connect the AC Adaptor () and the power cord (mains lead) () to your camcorder and the wall outlet (wall socket). The CHG (charge) lamp turns on. -
Page 19: Charging The Battery Using Your Computer
You can charge the battery by connecting the Built-in USB Cable to a wall outlet (wall socket) using an AC-UD10 USB charger/AC Adaptor (sold separately). You cannot use a Sony CP- AH2R, CP-AL, or AC-UP100 portable power supply device (sold separately) to charge the camcorder. -
Page 20: To Remove The Battery Pack
To remove the battery pack Close the LCD screen. Slide the BATT (battery) release lever () and remove the battery pack (). To use a wall outlet (wall socket) as a power source Make the same connections as those for charging the battery pack. Even if the battery pack is attached, the battery pack is not discharged. -
Page 21: Charging The Battery Pack Abroad
Charging the battery pack abroad You can charge the battery pack in any countries/regions using the AC Adaptor supplied with your camcorder within the AC 100 V - 240 V, 50 Hz/60 Hz range. Do not use an electronic voltage transformer. -
Page 22: Turning The Power On, And Setting The Date And Time
and time Open the LCD screen of your camcorder and turn the power You can also turn on the camcorder by pressing POWER (p. 14). Select the desired language, then select [Next]. Select the desired geographical area with / , then select [Next]. - Page 23 To turn off the power Close the LCD screen or press the POWER button (p. 14). If the viewfinder is pulled out, retract the viewfinder as shown in the illustration on the right (HDR-CX760V/PJ760/PJ760V). On turning the camcorder on or off using the LCD screen or the viewfinder (HDR-CX760V/PJ760/PJ760V) The power of the camcorder is turned on or off depending on the status of the LCD screen or the viewfinder.
- Page 24 To adjust the angle of the LCD panel First open the LCD panel 90 degrees to the camcorder (), and then adjust the angle (). To turn off the beep sound [Setup] [ Select Notes The recording date, time and condition, and coordinates (HDR-CX760V/PJ710V/PJ760V) are recorded ...
-
Page 25: Preparing The Recording Media
Preparing the recording media The recording media that can be used are displayed on the screen of your camcorder as following icons. Default recording medium Internal memory Notes You cannot select a different recording medium for movies and for photos. ... -
Page 26: Types Of Memory Card You Can Use With Your Camcorder
To eject the memory card Open the cover and lightly push the memory card in once. Notes To ensure stable operation of the memory card, it is recommended to format the memory card with your camcorder before the first use (p. 72). Formatting the memory card will erase all the data stored on it and the data will be irrecoverable. -
Page 27: Recording/Playback
Recording/Playback Recording In the default setting, movies and photos are recorded on the internal memory. Movies are recorded with high definition image quality (HD). Recording movies Open the LCD screen and press MODE to turn on the lamp. Press START/STOP to start recording. -
Page 28: Screen Indicators During Recording
Press PHOTO lightly to adjust the focus, then press it fully. When the focus is adjusted properly, AE/AF lock indicator appears on the LCD screen. To display items on the LCD screen Items on the LCD screen disappear if you do not operate the camcorder for a few seconds after you turn the camcorder on or switch between the movie recording and photo shooting modes. -
Page 29: To Record In Mirror Mode
Tracking focus (37) Zoom, Remaining battery Counter (hour: minute: second), Capturing a photo, Recording/playback/editing media (93) Tracking focus cancel button (37) Intelligent Auto button (38) Audio mode (71), Audio Level Display (71) Approximate number of recordable photos, Aspect ratio (16:9 or 4:3), Photo size (L/M/S) ... -
Page 30: Zooming
The following states will be indicated if data is still being written onto the recording media after recording has finished. During this time, do not apply shock or vibration to the camcorder, or remove the battery or AC Adaptor. Access lamp (p. - Page 31 You can magnify images up to 10 times using optical zooming in the following cases: When [ SteadyShot] is set to other than [Active] When the (Photo) is lit Further zooming: [Digital Zoom] (p. 70) ...
-
Page 32: Playback
Playback You can search for recorded images by date and time of recording (Event view) or location of recording (Map view) (HDR-CX760V/PJ710V/PJ760V). Open the LCD screen and press button on the camcorder to enter the playback mode. You can enter the playback mode by ... -
Page 33: Playing Movies And Photos From A Map (Hdr-Cx760V/Pj710V/Pj760V)
To go back to the Event View screen Previous/next Change to the movie/ photo recording mode Reduced-size images which enable you to view many images at the same time on an index screen are called “thumbnails. ” Notes To prevent your image data from being lost, save all your recorded images on external media periodically. ... - Page 34 Select the desired image When you use the map data for the first time A message appears asking you to confirm whether you agree with the terms of the license agreement of the map data. You can use the map data by touching [Yes] on the screen after agreeing to the terms of the license agreement (p 89).
-
Page 35: Operating Buttons While Playing
Operating buttons while playing Items on the LCD screen disappear if you do not attempt to operate the camcorder for a few seconds. To display the items again, touch the LCD screen. While playing a movie Volume Delete Context To stop Previous To fast-reverse While viewing photos... -
Page 36: To Play Back Images With Other Devices
(photo) Delete Context Previous As you repeat selecting times about 30 times about 60 times. Select during pause to play movies slowly. To repeat Slideshow, select To play back images with other devices You may not be able to play back normally images recorded on your camcorder with other devices. Also, ... -
Page 37: Advanced Operations
Advanced operations Recording people clearly Recording the selected subject clearly (Face Priority) Your camcorder can track a face you select and adjust the focus, exposure, and skin tone of the face automatically. Touch one of the faces targeted. The double-lined frame Release selection is displayed. -
Page 38: Capturing Smiles Automatically (Smile Shutter)
When you want to record the sound clearly without any interference, such as when you record a music concert, set [Closer Voice] to [Off]. [Face Detection] (p. 71) Capturing smiles automatically (Smile Shutter) A photo is recorded automatically when the camcorder detects the smile of a person during movie recording (p. -
Page 39: Reducing Camera-Shake ( Steadyshot)
Sound detection: The camcorder detects and suppresses the wind noise so that the voice of a person or the surrounding sound can be recorded clearly. (Auto Wind NR) To cancel the Intelligent Auto function, select [Off]. To record images brighter than those recorded using the Intelligent Auto function ... -
Page 40: Recording Movies In Dim Places (Video Light)
Infrared port appears. To cancel the NightShot function, press NIGHTSHOT again. Notes Using NightShot in bright places will cause a malfunction of your camcorder. Do not cover the infrared port. Infrared rays are required when using NightShot. When recording movies using the NightShot ... -
Page 41: Recording Images With The Selected Image Quality
Recording images with the selected image quality Selecting the image quality of movies (Recording mode) You can switch the recording mode to select the movie quality when recording high definition image quality (HD) movies. The recording time (p. 78) or the type of media device to which the images can be copied may change, depending on the recording mode selected. -
Page 42: Changing The Image Quality Of Photos
Standard image quality (STD) is fixed to this value. Frame Rate](p. 71) Recording standard definition image quality (STD) movie: [ Dubbing guide (p. 61) Changing the image quality of photos The number of photos you can shoot differs, depending on the image size selected. -
Page 43: Shooting Images With The Shutter Speed Priority Mode
Shooting images with the Shutter Speed priority mode You can express the movement of a moving subject in various way by adjusting the shutter speed. When shooting a mountain stream, for example, a splash of water will be captured clearly with high speed shutter, or a trailing image of water with low speed shutter. -
Page 44: Recording Information On Your Location (Gps) (Hdr-Cx760V/Pj710V/Pj760V)
Select [Reset] to reset the items adjusted manually to the default settings. Press MANUAL. The camera data that appears on the LCD screen will differ, depending on the recording settings of the camcorder. The settings will be displayed with the following icons. -
Page 45: Obtaining A Map Of The Current Location (Triangulating Priority Mode)
GPS triangulating status Searching for the satellites Number of dots changes Unable to Triangulating triangulate Triangulating meters Unable to record location information Images will be registered using the location information that was previously obtained. If you do not want to record location information ... -
Page 46: Checking The Triangulating Status
Checking the triangulating status The camcorder displays the status of the GPS signal reception when you are unable to obtain the triangulating information. Display your current location (p. 45). If your current location appears on the LCD screen, you do not need to continue this operation. -
Page 47: Hints For Better Reception
If data on your current location cannot be obtained A display that allows you to triangulate the location again appears. In this case, follow the instructions that appears on the LCD screen. Hints for better reception Use the GPS function outdoors and in open ... -
Page 48: Enjoying A Digest Of Your Movies (Highlight Playback)
Enjoying a digest of your movies Playback) You can enjoy a digest of high definition image quality (HD) movies and photos, similar to a short movie. Press (View Images) (p. 32). Display the desired event at the center of the Event View, and select [ Highlight]. -
Page 49: Saving Highlight Playback In Hd Image Quality ( Scenario Save)
After the music file is transferred to the camcorder, if you cannot play the music, the music file may be damaged. Delete the music [Setup] file by selecting Playback Settings] [Empty Music], then transfer the music file again. You can restore the music data recorded on your camcorder at the default using “Music Transfer. -
Page 50: Playing Images On A Tv
Selecting [Share] allows you to upload the Highlight movie to the Web using the built-in “PlayMemories Home” software (p. 60), or create DVDs using the “DVDirect Express” DVD writer (p. 63) B : Your camcorder plays the Highlight Movie saved. To play back a Highlight Movie ... -
Page 51: Enjoying 5.1Ch Surround Sound
Notes Refer to the instruction manuals of the TV as well. Use the supplied AC Adaptor as the power source (p. 20). When movies are recorded with standard definition image quality (STD), they are played back in standard definition image quality (STD) even on a high definition TV. -
Page 52: Using "Bravia" Sync
“Photo TV HD” standard. “Photo TV HD” allows for highly-detailed, photo-like depiction of subtle textures and colors. By connecting Sony’s Photo TV HD- compatible devices using an HDMI cable * , a whole new world of photos can be enjoyed in breathtaking HD quality. - Page 53 Adjust the focus of the projected image using the PROJECTOR FOCUS lever. PROJECTOR FOCUS lever The projected image is larger when the distance between your camcorder and the reflecting surface increase. It is recommended that you place the camcorder about 0.5 m (1.6 feet) or further away from the surface that the images are to be projected onto.
-
Page 54: Editing
Editing Editing on your camcorder Notes Some basic editing operations can be done on the camcorder. If you want to perform advanced editing operations, install the “Expanded Feature” for the built-in “PlayMemories Home” software. You cannot restore images once they are ... -
Page 55: Capturing A Photo From A Movie
Select the point where you want to divide the movie into scenes using , and then select A: Returns to the beginning of the selected movie B: Adjusts the dividing point with more precision Notes A slight difference may occur from the point ... -
Page 56: Saving Movies And Photos With A Computer
The built-in “PlayMemories Home” software is not supported with Mac computers. To import images from the camcorder to your Mac and play them, use the appropriate software on your Mac. For details, visit the following URL. http://www.sony.co.jp/imsoft/Mac/ Importing images Playback... -
Page 57: Preparing A Computer (Windows)
Preparing a computer (Windows) Step 1 Checking the computer system Microsoft Windows XP SP3 /Windows Vista /Windows 7 SP1 Intel Core Duo 1.66 GHz or faster, or Intel Core 2 Duo 1.66 GHz or faster (Intel Core 2 Duo 2.26 GHz or faster is required when processing FX or FH movies, and Intel Core 2 Duo 2.40 GHz or faster is required when processing PS movies.) - Page 58 For details on “PlayMemories Home, ” select (“PlayMemories Home Help Guide”) on the software or visit the PlayMemories Home support page (http:// www.sony.co.jp/pmh-se/). Notes Make sure to set [USB LUN Setting] to [Multi] when you install the “PlayMemories Home” software.
-
Page 59: To Create A Blu-Ray Disc
To create a Blu-ray disc, the “BD Add-on Software” must be installed. Visit the following URL to install the software. http://support.d-imaging.sony.co.jp/ BDUW/ Your computer must support the creation of Blu-ray discs. BD-R (unrewritable) and BD-RE (rewritable) ... -
Page 60: Starting The "Playmemories Home" Software
To use this software, you must download it from the following URL and install it on your computer. For Windows: http://www.sony.co.jp/ imsoft/Win/ For Mac: http://www.sony.co.jp/imsoft/ Mac/ For details, refer to the “Music Transfer”... -
Page 61: Saving Images With An External Device
Saving images with an external device Dubbing guide You can save high definition image quality (HD) movies using an external device. Select the method to be used according to the device. External devices DVDirect Express DVD writer Saving images on a DVD disc with high definition image quality (HD). -
Page 62: The Devices On Which The Created Disc Can Be Played Back
The devices on which the created disc can be played back DVD disc with high definition image quality (HD) AVCHD format playback devices, such as a Sony Blu-ray disc player or a PlayStation DVD disc with standard definition image quality (STD) Ordinary DVD playback devices, such as a DVD player. -
Page 63: Creating A Disc With The Dvd Writer Or Recorder
AC Adaptor for this operation (p. 20) Refer to the instruction manual supplied with the device connected. Sony DVD writer may not be available in some countries/regions. Creating a disc with DVDirect Express Connect your camcorder and the “DVDirect Express”... -
Page 64: Creating A High Definition Image Quality (Hd) Disc With A Dvd Writer
Creating a high definition image quality (HD) disc with a DVD writer Use the built-in USB cable to connect your camcorder to a Sony DVD writer other than DVDirect Express (sold separately), etc., which is compatible with high definition image quality (HD) movies. -
Page 65: Your Camcorder
connecting cable Input White Signal flow Connect your camcorder to the input jacks of the recording device. Start playback on your camcorder, and record it on the recording device. When dubbing is finished, stop the recording device, and then your camcorder. -
Page 66: Saving Images On An External Media Device
Saving images on an external media device You can save movies and photos on an external media device (USB storage devices), such as an external hard disk drive. The following functions will be available after you have saved your images on an external media device. -
Page 67: To Delete Images In The External Media Device
Operation is not assured with every device satisfying requirements for operating. For details on available external media devices, go to the Sony support website in your country/region. The number of scenes you can save on the external media device are as follows. However,... -
Page 68: Customizing Your Camcorder
Customizing your camcorder Using menus The camcorder has various menu items under each of 6 menu categories. Shooting Mode (Items for selecting a shooting mode) p. 70 Camera/Mic (Items for customized shooting) p. 70 Image Quality/Size (Items for setting up image quality or size) p. 71 Playback Function (Items for playback) ... - Page 69 To find a menu item quickly The [Camera/Mic] and [Setup] menus have sub-categories. Select the sub-category icon so that the LCD screen displays the list of menus in the sub-category selected. Sub-category icons When you cannot select a menu item Grayed out menu items or settings are not available.
-
Page 70: Menu Lists
Menu lists Shooting Mode Movie ... Records movies. Photo ... Shoots photos. Smth Slw REC ... Records smooth slow-motion movies. Golf Shot ... Divides two seconds of fast movement into frames which are then Camera/Mic Manual Settings White Balance ... Adjusts the color balance to the recording environment. Spot Meter/Fcs ... -
Page 71: Playback Function
Face Face Detection ... Automatically detects faces. Smile Shutter ... Automatically takes a shot whenever a smile is detected. Smile Sensitivity ... Sets the smile detection sensitivity for the Smile Shutter function. Flash Flash ... Sets how the flash is activated when shooting photos. Flash Level ... - Page 72 Edit/Copy Delete... Deletes movies or photos. Protect ... Protects movies or photos to avoid deleting. Copy ... Copies images. Direct Copy ... Copies images stored in the camcorder to some type of external media Setup Media Settings Media Select ... Selects the type of recording media (p. 25). Media Info ...
- Page 73 Language Setting ... Sets the display language (p. 22). Calibration ... Calibrates the touch panel. Battery Info ... Displays the approximate remaining battery time. Eco Mode ... Sets the LCD screen and the power so that they turn off automatically. Demo Mode ...
-
Page 74: Others/Index
During repair, we may check a minimum amount of data stored on the internal memory in order to investigate the problem. However, your Sony dealer will neither copy nor retain your data. See the “Handycam” User Guide (p. 9) for ... -
Page 75: Self-Diagnosis Display/Warning Indicators
If the problem persists even after you have tried to fix a couple of times, contact your Sony dealer or local authorized Sony service facility. In this case, when you contact them, give them all the numbers of the error code beginning with C or E. - Page 76 The battery pack temperature is high. Change the battery pack or place it in a cool place. No memory card is inserted (p. 25). When the indicator flashes, there are not enough free spaces for recording images. Delete unnecessary images (p.
-
Page 77: Recording Time Of Movies/Number Of Recordable Photos
Recording time of movies/number of recordable photos “HD” stands for high definition image quality, and “STD” stands for standard definition image quality. Expected time of recording and playback with each battery pack Recording time Approximate time available when you use a fully charged battery pack. -
Page 78: Expected Recording Time Of Movies
Expected recording time of movies Internal memory HDR-PJ710/PJ710V High definition image quality (HD) in h (hour) and min (minute) Recording mode HDR-PJ710 [60p Quality 2 h 35 min (2 h 35 min) [Highest 3 h 5 min Quality (3 h 5 min) [High Quality 4 h 10 min (4 h 10 min) -
Page 79: Memory Card
(unit: minute) conditions. 16 GB 32 GB Notes (205) (410) The unique pixel array of Sony’s ClearVid and the image processing system of Sony’s BIONZ allows still image resolution equivalent to the (210) (420) sizes described. On bit-rate and recording pixels The bit-rate, pixels and aspect ratio of each ... - Page 80 LP: Approx. 5 Mbps (average) 1,440 1,080 pixels/16:9 Standard definition image quality (STD): HQ: Approx. 9 Mbps (average) 720 480 pixels/16:9, 4:3 The photo recording pixels and the aspect ratio. Photo recording mode, Dual capture: 6,544 ...
-
Page 81: About Handling Of Your Camcorder
If any solid object or liquid gets inside the casing, unplug your camcorder and have it checked by a Sony dealer before operating it any further. Avoid rough handling, disassembling, modifying, physical shock, or impact such as hammering, dropping or stepping on the product. -
Page 82: When The Camcorder Is Connected To A Computer Or Accessories
Wash off any liquid that may have contacted your skin. If any liquid gets in your eyes, wash with plenty of water and consult a doctor. When not using your camcorder for a long time To keep your camcorder in optimum state for a ... -
Page 83: Notes On Optional Accessories
Commander may shorten, or the Wireless Remote Commander may not function properly. In this case, replace the battery with a Sony CR2025 lithium battery. Use of another battery may present a risk of fire or explosion. LCD screen Do not apply excessive pressure on the LCD ... - Page 84 About the Carl Zeiss lens Your camcorder is equipped with a Carl Zeiss lens, which was developed jointly by Carl Zeiss, in Germany, and Sony Corporation, and produces superior images. It adopts the MTF measurement system for video cameras and offers a quality typical of a Carl Zeiss lens.
-
Page 85: How To Charge The Pre-Installed Rechargeable Battery
MTF= Modulation Transfer Function. The number value indicates the amount of light from a subject coming into the lens. About care and storage of the lens Wipe the surface of the lens clean with a soft cloth in the following instances: When there are fingerprints on the lens ... -
Page 86: Specifications
3 lx (lux) ([Low Lux] is set to [On], shutter speed 1/30 second) 0 lx (lux) (NIGHTSHOT is set to [On]) The unique pixel array of Sony’s ClearVid and the image processing system (BIONZ) allow still image resolution equivalent to the sizes described. - Page 87 Continuous projection time (when using the supplied battery pack): Approx. 1 h 40 min. General Power requirements: DC 6.8 V/7.2 V (battery pack) DC 8.4 V (AC Adaptor) USB Charging: DC 5 V 500 mA/1.5 A Average power consumption: HDR-PJ710/PJ710V HD: 3.4 W STD: 3.1 W HDR-CX760V/PJ760/PJ760V During camera recording using the...
- Page 88 Memory Stick” and “MagicGate Memory Stick Duo” are trademarks or registered trademarks of Sony Corporation. “InfoLITHIUM” is a trademark of Sony Corporation. “x.v.Color” is a trademark of Sony Corporation. “BIONZ” is a trademark of Sony Corporation. is a registered trademark of ...
-
Page 89: End-User License Agreement For Map Data For Video Camera
License, you agree to be bound by the terms of this LICENSE. If you do not agree to the terms of this LICENSE, SONY is unwilling to license the SOFTWARE to you. In such event, the SOFTWARE will not be available and you may not use the SOFTWARE. - Page 90 SOFTWARE is at your sole risk. The SOFTWARE is provided “AS IS” and without warranty of any kind and SONY, its affiliates, its and their respective suppliers and SONY’s Licensors (in this section, SONY, its affiliates, their respective suppliers and SONY’s Licensors shall be collectively referred...
- Page 91 LICENSE, and such SOFTWARE delivered or otherwise furnished shall be marked and embedded the “Notice of Use” as designated by SONY and/or its affiliates and shall be treated in accordance with such notice. NOTICE OF USE...
-
Page 92: Screen Indicators
Japan Jordan Royal Jordanian Geographic Centre Mexico Fuente: INEGI (Instituto Nacional de Estadística y Geografía.) Norway Copyright 2000; Norwegian Mapping Authority Portugal Source: IgeoE – Portugal Spain Información geográfica propiedad del CNIG Sweden Based upon electronic data National Land Survey Sweden. - Page 93 Intelligent Auto (face detection/scene detection/ camera-shake detection/ sound detection) (38) Center Indicator Meaning Slideshow Set NightShot (39) Warning (75) Playback mode (35) Right Indicator Meaning Recording image quality (HD/STD), frame rate (60p/60i/24p) and recording mode (PS/FX/ FH/HQ/LP) (41) 60min Remaining battery Recording/playback/...
-
Page 94: Index
Index Symbols 5.1ch surround sound ...51 Active Interface Shoe ...13, 83 AE Shift ...70 AGC Limit ...70 Auto Wind NR ...39 AVCHD recording disc ...9, 41 A/V connecting cable...50 Battery pack ...18 Beep ...24 “BRAVIA” Sync ...52 Built-in USB Cable ...19 Calibration ...84 Care ...81 Charging the battery pack ...18... - Page 95 Saving images on an external media device...66 Scenario Save ...49 Screen indicators ...28, 92 SD card ...26 Self-diagnosis display ...75 Setting the date and time ...22 Shutter Speed ...43 Smile Shutter ...38 Specifications ...86 Starting PlayMemories Home ...60 Summer Time ...22 Supplied Items ...17 Thumbnails ...33 Touch panel ...28...
-
Page 96: Lea Este Apartado En Primer Lugar
No manipule baterías de iones de litio dañadas o que presenten fugas. Asegúrese de cargar la batería con un cargador de baterías original de Sony o con un dispositivo que pueda cargarla. Mantenga la batería fuera del alcance de niños pequeños. -
Page 97: Acerca De La Grabación
Acerca del ajuste de idioma Para ilustrar los procedimientos operativos se utilizan indicaciones en pantalla en cada idioma local. Si es necesario, cambie el idioma de la pantalla antes de utilizar la videocámara (p. 17). Acerca de la grabación Antes de comenzar a grabar, pruebe las ... -
Page 98: Más Información Sobre La Videocámara (Guía Del Usuario De "Handycam")
Proyector visor Visite la página de soporte de Sony. http://www.sony.net/SonyInfo/Support/ Seleccione su país o región. Busque el nombre del modelo de la videocámara en la página de soporte. Revise el nombre del modelo en la parte ... - Page 99 Índice Lea este apartado en primer lugar............. . 2 Más información sobre la videocámara (Guía del usuario de “Handycam”).
- Page 100 Grabación de imágenes con la calidad de imagen seleccionada..... . . 36 Selección de la calidad de imagen de las películas (modo de grabación). . . 36 Cambio de la calidad de imagen de las fotos..
- Page 101 Descarga del software dedicado para la videocámara........57 Instalación Music Transfer.
-
Page 102: Piezas Y Controles
Piezas y controles Los números entre ( ) corresponden a las páginas de referencia. Micrófono incorporado Active Interface Shoe Flash/luz de video Objetivo (objetivo Carl Zeiss) Sensor remoto/puerto de infrarrojos Indicador de grabación de la cámara (71) El indicador de grabación de la cámara se enciende de color rojo durante la grabación. - Page 103 Antena GPS (HDR-CX760V/PJ710V/ PJ760V) Una antena GPS está ubicada en el panel de cristal líquido. HDR-PJ710/PJ710V HDR-CX760V HDR-PJ760/PJ760V Botón (Ver Imágenes) Botón LIGHT (Luz de video) (35) Botón NIGHTSHOT (35) Botón POWER Indicador de acceso de la tarjeta de memoria (20) Si el indicador está...
- Page 104 HDR-CX760V/PJ760/PJ760V Palanca del zoom motorizado (25) Botón PHOTO (22) Ocular Visor (18) Indicador CHG (carga) (13) Batería (13) Botón START/STOP (22) Toma DC IN (13) Palanca de ajuste del objetivo del visor (18) ...
-
Page 105: Control Remoto Inalámbrico
Para conectar el anillo reductor Alinee correctamente el anillo reductor con la videocámara () y luego, gírelo en la dirección de la flecha hasta que quede asegurado en su lugar (). Puede cambiar el diámetro de filtro a 37 mm ... -
Page 106: Procedimientos Iniciales
Procedimientos iniciales Elementos suministrados Los números entre ( ) indican la cantidad suministrada. Videocámara (1) Adaptador de alimentación de ca (1) Cable de alimentación (1) Cable HDMI (1) Cable de conexión de A/V (1) Cable de soporte de conexión USB (1) El cable de soporte de conexión USB está... -
Page 107: Cargar La Batería
Cargar la batería Cierre la pantalla de cristal líquido después de cambiar el visor (HDR- CX760V/PJ760/PJ760V) y conecte la batería. Conecte el adaptador de alimentación de ca () y el cable de alimentación () a la videocámara y al tomacorriente de pared. -
Page 108: Cargar La Batería Usando Su Computadora
AC-UD10 cargador USB/adaptador de alimentación de ca (se vende por separado). No puede usar un dispositivo de suministro de alimentación portátil CP-AH2R, CP-AL o AC-UP100 de Sony (se vende por separado) para cargar la videocámara. Tiempo de carga Tiempo aproximado (min) necesario para cargar completamente una batería totalmente... - Page 109 Para extraer la batería Cierre la pantalla de cristal líquido. Deslice la palanca de liberación de BATT (batería) () y retire la batería (). Para usar un tomacorriente de pared como fuente de alimentación Realice las mismas conexiones que las que se usan para cargar la batería. Aunque la batería esté...
-
Page 110: Carga De La Batería En El Extranjero
Tiempo de grabación, tiempo de reproducción (p. 75) Indicador de batería restante (p. 23) Carga de la batería en el extranjero (p. 16) Carga de la batería en el extranjero Puede cargar la batería en cualquier país o región con el adaptador de alimentación de ca suministrado con la videocámara dentro de un rango de ca de entre 100 V y 240 V 50 Hz/ 60 Hz No utilice un transformador de voltaje electrónico. -
Page 111: Encendido Y Ajuste De La Fecha Y La Hora
Encendido y ajuste de la fecha y la hora Abra la pantalla de cristal líquido de la videocámara y enciéndala. También puede encender la videocámara si presiona POWER (p. 9). Seleccione el idioma deseado y seleccione [Sig.]. Seleccione la zona geográfica deseada con y luego seleccione [Sig.]. - Page 112 Para apagar la videocámara Cierre la pantalla de cristal líquido o presione el botón POWER (p. 9). Si el visor está extendido, retráigalo como se muestra en la ilustración a la derecha (HDR-CX760V/PJ760/PJ760V). Cómo encender y apagar la videocámara usando la pantalla de cristal líquido o el visor (HDR-CX760V/PJ760/PJ760V) La videocámara se enciendo o se apaga dependiendo del estado de la pantalla de cristal líquido o del visor.
- Page 113 Para ajustar el ángulo del panel de cristal líquido Primero abra el panel de cristal líquido 90 grados respecto a la videocámara () y, a continuación, ajuste el ángulo (). Para apagar el pitido [Configuración] [ Seleccione Notas La fecha, la hora, las condiciones y las coordenadas de grabación (HDR-CX760V/PJ710V/PJ760V) se ...
-
Page 114: Preparación Del Soporte De Grabación
Preparación del soporte de grabación Los soportes de grabación que se pueden usar aparecen en la pantalla de la videocámara con los siguientes iconos. Soporte de grabación predeterminado Memoria interna Notas No puede seleccionar un soporte de grabación diferente para películas y para fotos. ... - Page 115 Notas Para asegurar el funcionamiento estable de la tarjeta de memoria, es recomendable formatearla con la videocámara antes del primer uso (p. 70). Al formatear la tarjeta de memoria, se borrarán todos los datos almacenados en ella y no podrá recuperarlos. Guarde los datos importantes en su computadora u otro soporte.
-
Page 116: Grabación/Reproducción
Grabación/reproducción Grabación En el ajuste predeterminado, las películas y las fotos se graban en la memoria interna. Las películas se graban con calidad de imagen de alta definición (HD). Grabación de películas Abra la pantalla de cristal líquido y presione MODE para encender el indicador (Película). -
Page 117: Botón Menu
Presione PHOTO levemente para ajustar el enfoque y luego presiónelo completamente. Si el enfoque se ajusta adecuadamente, aparecerá el indicador de bloqueo AE/AF en la pantalla de cristal líquido. Para mostrar elementos en la pantalla de cristal líquido Los elementos en la pantalla de cristal líquido desaparecen si no utiliza la videocámara durante algunos segundo después de encenderla o cambia entre los modos de grabación de películas y captura de fotos. - Page 118 Seguimiento del enfoque (32) Zoom, batería restante Contador (hora: minuto: segundo), Captura de una foto, Soporte de grabación/ reproducción/edición (91) Botón de cancelación del seguimiento de enfoque (32) Botón Auto inteligente (33) Modo audio (69), Visual. nivel aud. (69) ...
-
Page 119: Utilización Del Zoom
Notas Si cierra la pantalla de cristal líquido mientras graba películas, se detendrá la grabación. El tiempo máximo de grabación continua de películas es de aproximadamente 13 hora. Cuando un archivo de película supera los 2 GB el siguiente archivo de película se crea automáticamente. ... - Page 120 Notas Mantenga el dedo en la palanca del zoom motorizado. Si retira el dedo de la palanca del zoom motorizado, puede que también se grabe el sonido de funcionamiento de la palanca del zoom motorizado. No es posible cambiar la velocidad de zoom con el botón ...
-
Page 121: Reproducción
Reproducción Puede buscar imágenes grabadas por fecha y hora de grabación (Visualización eventos) o lugar de grabación (Visualización mapas) (HDR-CX760V/PJ710V/PJ760V). Abra la pantalla de cristal líquido y presione el botón videocámara para ingresar al modo de reproducción. Puede ingresar al modo de reproducción ... -
Page 122: Reproducir Películas Y Fotos Desde Un Mapa (Hdr-Cx760V/Pj710V/Pj760V)
Para volver a la pantalla Visualización de eventos Anterior/siguiente Cambiar al modo de grabación de película/foto Las imágenes de tamaño reducido que permiten ver varias imágenes al mismo tiempo en una pantalla de índice se conocen como “miniaturas”. Notas Para evitar que se pierdan sus datos de imagen, guarde periódicamente todas las imágenes grabadas en ... - Page 123 Seleccione el tamaño de imagen deseado Cuando usa los datos de mapa por primera vez Aparece un mensaje para que confirme si acepta los términos del acuerdo de licencia de los datos de mapas. Puede usar los datos de los mapas si toca [Sí] en la pantalla después de aceptar el acuerdo de licencia (p.
-
Page 124: Botones De Funcionamiento Durante La Reproducción
Botones de funcionamiento durante la reproducción Los elementos en la pantalla de cristal líquido desaparecen si no intenta usar la videocámara durante algunos segundo. Para volver a mostrar los elementos, toque la pantalla de cristal líquido. Durante la reproducción de una película Volumen Borrar Contexto... - Page 125 (foto) Borrar Contexto Anterior Si sigue seleccionando durante la reproducción, las películas se reproducen con un aumento de velocidad de aproximadamente 5 veces 10 veces 30 veces 60 veces. Seleccione durante la pausa para reproducir la película en cámara lenta. ...
-
Page 126: Funciones Avanzadas
Funciones avanzadas Grabación nítida de personas Grabación nítida del motivo seleccionado (Prioridad de cara) La videocámara puede seguir una cara seleccionada y ajustar el enfoque, la exposición y el tono de piel de la cara de manera automática. Toque una de las caras objetivo. Aparece el marco de doble línea. -
Page 127: Captar De Sonrisas Automáticamente (Captador De Sonrisas)
[Detección de rostro] (p. 69) Captar de sonrisas automáticamente (Captador de sonrisas) Se graba automáticamente una foto cuando la videocámara detecta la sonrisa de una persona durante la grabación de una película (p. 69). ([Captura dual] es el ajuste predeterminado.) La videocámara está... -
Page 128: Reducción De Las Vibraciones De La Cámara ( Steadyshot)
Detección de sonido: La videocámara detecta y suprime el ruido del viento, de manera que la voz de una persona o el sonido circundante se puedan grabar con claridad. (Red. ruid. viento auto) Para cancelar la función Auto inteligente, ... -
Page 129: Grabación En Lugares Oscuros (Nightshot)
Grabación en lugares oscuros (NightShot) Puede grabar imágenes incluso en condiciones de oscuridad total. Presione NIGHTSHOT. Puerto de infrarrojos aparece. Para cancelar la función NightShot, presione NIGHTSHOT nuevamente. Notas Si usa NightShot en lugares muy iluminados, causará fallas de funcionamiento en la videocámara. -
Page 130: Grabación De Imágenes Con La Calidad De Imagen Seleccionada
Grabación de imágenes con la calidad de imagen seleccionada Selección de la calidad de imagen de las películas (modo de grabación) Puede cambiar el modo de grabación para seleccionar la calidad de película al grabar películas con calidad de imagen de alta definición (HD). -
Page 131: Cambio De La Calidad De Imagen De Las Fotos
Para las películas con calidad de imagen de definición estándar (STD) [Estándar ]: calidad estándar, STD 9M (HQ) * El ajuste predeterminado La calidad de imagen estándar (STD) se fija en este valor. Imág. p. segundo] (p. 69) ... -
Page 132: Obturador
Captura de las imágenes con el modo de prioridad Velocidad del obturador Puede expresar el desplazamiento de un motivo en movimiento de varias maneras al ajustar la velocidad del obturador. Al grabar un vertiente en una montaña, por ejemplo, podrá capturar claramente una salpicadura de agua si usa una velocidad de obturación alta o podrá... -
Page 133: Grabación De Información Sobre La Ubicación (Gps)
Para asignar el elemento de menú al selector MANUAL Mantenga presionado MANUAL por unos segundo. Gire el selector MANUAL y seleccione el elemento que desea asignar. Seleccione [Reiniciar] para restaurar los elementos ajustados manualmente a los ajustes predeterminados. Presione MANUAL. Los datos de la cámara que aparecen en la ... -
Page 134: Obtener Un Mapa De La Ubicación Actual
Estado de triangulación de GPS Búsqueda de satélites Triangulación Medidores de triangulación Las imágenes se registrarán usando la información de ubicación que se obtuvo previamente. Si no desea grabar información de ubicación [Configuración] Seleccione [ Ajustes generales] [Ajuste GPS] ... -
Page 135: Verificar El Estado De Triangulación
Verificar el estado de triangulación La videocámara muestra el estado de la recepción de señal GPS cuando no puede obtener la información de triangulación. Muestra la ubicación actual (p. 40). Si aparece su ubicación actual en la pantalla de cristal líquido, no necesita continuar con esta operación. - Page 136 Si no se pueden obtener los datos de su ubicación actual Aparece una pantalla que le permite volver a triangular la ubicación. En este caso, siga las instrucciones que aparecen en la pantalla de cristal líquido. Sugerencias para lograr una mejor recepción Use la función GPS en exteriores y en áreas ...
-
Page 137: Disfrute De Un Resumen De Sus Películas (Reproducción De Selección)
Disfrute de un resumen de sus películas (Reproducción de selección) Puede disfrutar un resumen de sus películas y fotos con calidad de imagen de alta definición (HD), similar a un cortometraje. Presione (Ver Imágenes) (p. 27). Muestre el evento deseado en el centro de Visualización eventos y seleccione [ Selección]. -
Page 138: Escenario)
Para borrar los puntos, seleccione [Despejar tds puntos]. Notas Las escenas de Reproducción de selección cambiarán cada vez que seleccione una Reproducción de selección. El ajuste [Intervalo reproducc.] se borra cuando la Reproducción de selección se detiene. Si después de transferir un archivo de música ... -
Page 139: Conversión Del Formato De Datos A Calidad De Imagen Std
Para borrar un escenario guardado, seleccione [Borrar]/[Borrar todo] durante la reproducción del escenario. Conversión del formato de datos a calidad de imagen STD (Película Selección) Puede convertir el formato de los datos de la Reproducción de selección o Escenarios de selección a calidad de imagen de definición estándar (STD) y guardarlos como “Película Selección”. -
Page 140: Reproducción De Imágenes En Un Televisor
Reproducción de imágenes en un televisor Los métodos de conexión y la calidad de la imagen que se visualiza en un televisor dependen del tipo de televisor conectado y de los conectores utilizados. Conexión a un televisor Conexión a un que no sea de alta televisor de alta definición de 16:9... - Page 141 Notas Si intenta reproducir sonido de 5,1 canales con los altavoces de la videocámara, el sonido de 5,1 canales se convierte y se emite automáticamente como sonido de 2 canales. Para disfrutar del sonido envolvente de 5,1 canales de las películas grabadas con calidad de imagen de alta definición (HD) en sonido de 5,1 canales, necesita un dispositivo compatible con sonido envolvente de 5,1 canales.
-
Page 142: Uso Del Proyector Incorporado (Hdr-Pj710/Pj710V/Pj760/Pj760V)
Al conectar dispositivos compatibles con Photo TV HD de Sony utilizando un cable HDMI * , podrá disfrutar de un mundo completamente nuevo de fotografías con una impresionante calidad HD. - Page 143 Ajuste el objetivo de la imagen proyectada con la palanca PROJECTOR FOCUS. Palanca PROJECTOR FOCUS La imagen proyectada es más grande cuando la distancia entre la videocámara y la superficie reflectante aumenta. Se recomienda que coloque la videocámara a aproximadamente 0,5 m o más lejos de la superficie sobre la cual se proyectarán las imágenes.
-
Page 144: Edición
Edición Edición en su videocámara Notas Algunas operaciones de edición básicas se pueden realizar en la videocámara. Si desea llevar a cabo operaciones de edición avanzadas, instale “Función adicional” para el software “PlayMemories Home” incorporado. Una vez eliminadas, las imágenes no se ... -
Page 145: División De Una Película
División de una película [Dividir] en Seleccione la pantalla de reproducción de películas. Seleccione el punto donde desea dividir la película en escenas con y luego seleccione A: Permite volver al principio de la película seleccionada B: Ajusta el punto de división con más precisión Notas Es posible que se produzca una leve diferencia... - Page 146 Relación de aspecto 4:3 con calidad de imagen de definición estándar (STD): 0,3 M (4:3) Acerca de la fecha y la hora de grabación de las fotos capturadas La hora y la fecha de grabación de las fotos capturadas coinciden con la fecha y la hora de grabación de las películas.
-
Page 147: Almacenamiento De Películas Y Fotos Con Una Computadora
El software “PlayMemories Home” incorporado no es compatible con computadoras Mac. Para importar imágenes desde la videocámara a la computadora Mac y luego reproducirlas, utilice el software adecuado en la computadora Mac. Para obtener más detalles, visite la siguiente URL. http://www.sony.co.jp/imsoft/Mac/ Reproducción Cargar... -
Page 148: Preparación De Una Computadora (Windows)
Preparación de una computadora (Windows) Paso 1 Comprobación del sistema de la computadora Sistema operativo Microsoft Windows XP SP3 /Windows 7 SP1 Intel Core Duo 1,66 GHz o más rápido, o Intel Core 2 Duo 1,66 GHz o más rápido (se necesita Intel Core 2 Duo de 2,26 GHz o más rápido para procesar películas FX o FH, y se necesita Intel Core 2 Duo de 2,40 GHz o más... - Page 149 Para obtener detalles sobre “PlayMemories Home”, seleccione (“Guía de ayuda de PlayMemories Home”) en el software o visite la página de soporte de PlayMemories Home (http://www.sony. co.jp/pmh-se/). Notas Asegúrese de ajustar [Ajuste USB LUN] en [Multi] cuando instale el software “PlayMemories Home”.
- Page 150 Para crear un disco Blu-ray, debe tener instalado el software “Software Complementario de BD”. Para instalar el software, visite la siguiente URL. http://support.d-imaging.sony.co.jp/ BDUW/ La computadora debe admitir la creación de discos Blu-ray. Existen soportes BD-R (no regrabables) y ...
-
Page 151: Inicio Del Software "Playmemories Home
Para usar este software, debe descargarlo desde la siguiente URL e instalarlo en su computadora. Para Windows: http://www.sony.co.jp/imsoft/Win/ Para Mac: http://www.sony.co.jp/imsoft/Mac/ Para obtener más detalles, consulte la ayuda de “Music Transfer”. Instalación del software para una... -
Page 152: Almacenamiento De Imágenes En Un Dispositivo Externo
Almacenamiento de imágenes en un dispositivo externo Guía de copiado Puede guardar películas con calidad de imagen de alta definición (HD) utilizando un dispositivo externo. Seleccione el método que desea usar según el dispositivo. Dispositivos externos DVDirect Express Grabadora de Almacenamiento de imágenes en un disco DVD con calidad de imagen de alta definición (HD). -
Page 153: Dispositivos En Los Que Se Puede Reproducir El Disco Creado
Dispositivos en los que se puede reproducir el disco creado DVD con calidad de imagen de alta definición (HD) Dispositivos de reproducción de formato AVCHD, como un reproductor de discos Sony Blu-ray o una consola PlayStation Disco DVD con calidad de imagen de definición estándar (STD) Dispositivos de reproducción de DVD comunes, como un reproductor de DVD. -
Page 154: Creación De Un Disco Con La Grabadora De Dvd
(p. 15). Consulte los manuales de instrucciones suministrados con el dispositivo conectado. Es posible que la grabadora de DVD Sony no esté disponible en algunos países o regiones. Creación de un disco con DVDirect Express Conecte la videocámara y la grabadora... -
Page 155: Mediante Una Grabadora De Dvd
DVD Utilice el cable USB incorporado para conectar la videocámara a una grabadora de DVD Sony que no sea DVDirect Express (se vende por separado), etc., que sea compatible con películas con calidad de imagen de alta definición (HD). - Page 156 Cable de conexión de Entrada Rojo Blanco Flujo de señales Conecte la videocámara a las tomas de entrada del dispositivo de grabación. Inicie la reproducción en la videocámara y grabe en el dispositivo de grabación. Cuando haya finalizado la copia, detenga el dispositivo de grabación y, a continuación, detenga la videocámara.
-
Page 157: Almacenamiento De Imágenes En Un Dispositivo De Soporte Externo
Almacenamiento de imágenes en un dispositivo de soporte externo Puede guardar películas y fotos en dispositivos de soporte externos (dispositivos de almacenamiento USB), como una unidad de disco duro externo. Las siguientes funciones estarán disponibles cuando haya guardado las imágenes e un dispositivo de soporte externo. - Page 158 Para obtener más detalles sobre los soportes externos disponibles, visite el sitio Web de soporte de Sony correspondiente a su país o región. A continuación se indica la cantidad de escenas que puede guardar en el dispositivo de soporte externo.
- Page 159 Si el dispositivo de soporte externo tiene un cable de alimentación de ca conéctelo al tomacorriente de pared. La cantidad de escenas puede ser menor dependiendo del tipo de imágenes grabadas. No puede copiar imágenes desde un dispositivo ...
-
Page 160: Personalización De La Videocámara
Personalización de la videocámara Uso de los menús La videocámara posee diversos elementos de menú bajo cada una de las 6 categorías de menú. Modo toma (Elementos para seleccionar un modo de captura) p. 68 Cámara/Micrófono (Elementos para captura de imágenes personalizada) p. 68 Calidad img/Tamaño (Elementos para ajustar la calidad y el tamaño de la imagen) ... - Page 161 Para buscar un elemento de menú rápidamente Los menús [Cámara/Micrófono] y [Configuración] tienen subcategorías. Seleccione el icono de una subcategoría para que la pantalla de cristal líquido muestre la lista de menús de la subcategoría seleccionada. Iconos de subcategoría Cuando no puede seleccionar un elemento de menú Los elementos de menú...
-
Page 162: Listas De Menú
Listas de menú Modo toma Película ... Graba películas. Foto ... Captura fotos. GRAB. lenta uniform ... Graba películas en cámara lenta uniforme. Toma estilo golf ... Divide dos segundo de movimiento rápido en cuadros que luego se graban Cámara/Micrófono Ajustes manuales Balance blancos ... - Page 163 Ajuste selector... Asigna la función al selector MANUAL. Luz NIGHTSHOT ... Emite luz infrarroja cuando se usa NightShot. Cara Detección de rostro ... Detecta las caras automáticamente. Captador de sonrisas ... Toma una fotografía automáticamente cuando se detecta una sonrisa. Sensib.
- Page 164 Función reproducc. Visualización eventos ... Inicia la reproducción de imágenes en la pantalla Visualización de eventos. Visualización mapas* ... Inicia la reproducción de imágenes en la pantalla Visualización mapas. Película Selección ... Inicia la reproducción de las escenas de Reproducción de selección o Escenario ...
- Page 165 Grabar en disco ... Guarda las imágenes que todavía no se han guardado en un disco. Ajustes generales Pitido ... Define si los pitidos de funcionamiento de la videocámara suenan o no. Luminosidad LCD ... Ajusta el brillo de la pantalla de cristal líquido..
-
Page 166: Otros/Índice
Al presionar RESET, se restablecen todos los ajustes, incluido el del reloj. Póngase en contacto con su distribuidor Sony o con un centro de servicio técnico local autorizado de Sony. Según el problema, es posible que sea necesario ... - Page 167 Con la configuración predeterminada, si pasan unos 2 minuto sin utilizar la videocámara, ésta se apagará automáticamente. Cambie el ajuste de [Modo eco] (p. 71), o encienda la videocámara nuevamente. Cargue la batería (p. 13). Las imágenes no se graban al presionar START/STOP o PHOTO.
-
Page 168: Visualización De Autodiagnóstico/Indicadores De Advertencia
PJ760/PJ760V), compruebe lo siguiente. Si el problema persiste aun después de intentar solucionarlo varias veces, póngase en contacto con su distribuidor Sony o con un centro de servicio técnico local autorizado de Sony. En este caso, cuando se ponga en contacto con ellos, infórmeles todos los números del código de error que... -
Page 169: Tiempo De Grabación De Películas/Número De Fotos Que Puede Grabar
La cantidad de luz no es suficiente, por lo que se producen vibraciones con facilidad. Use el flash. La videocámara se encuentra en posición inestable, por lo que se producen sacudidas con facilidad. Sostenga la videocámara de forma estable con ambas manos y grabe la imagen. -
Page 170: Tiempo De Grabación Esperado Para Películas
Los tiempos de grabación están medidos con la videocámara grabando películas con calidad de imagen de alta definición (HD) con [ grabación] ajustado en [Estándar El tiempo de grabación normal indica el tiempo de grabación al repetir las operaciones de inicio/parada, al cambiar el indicador MODE y al utilizar el zoom. -
Page 171: Tarjeta De Memoria
Calidad de imagen de definición estándar (STD) 5,1 canales 2 canales Puede cambiar el formato de sonido de la grabación con [Modo audio] (p. 69). Cuando usa una tarjeta de memoria Sony. (unidad: minuto) 2 GB 4 GB 8 GB... -
Page 172: Número Esperado De Fotos Que Puede Grabar
Notas La exclusiva matriz de píxeles del sensor de ClearVid de Sony y el sistema de procesamiento de imágenes de BIONZ de Sony permiten una resolución para las imágenes equivalente a los tamaños descritos. Velocidad de bits y píxeles de grabación... -
Page 173: Acerca Del Manejo De La Videocámara
Si dentro de la videocámara entra algún objeto o líquido, desconéctela y haga que la revise un distribuidor de Sony antes de volver a utilizarla. Evite manipular, desmontar o modificar la videocámara bruscamente y exponerla a golpes o impactos como martillazos, caídas o... -
Page 174: Condensación De Humedad
de la pila: Póngase en contacto con un centro de servicio técnico local autorizado de Sony. Límpiese con agua cualquier líquido que haya entrado en contacto con su piel. Si le entra líquido en los ojos, láveselos con ... - Page 175 Recomendamos el uso de accesorios Sony originales. Es posible que los accesorios originales de Sony no estén disponibles en algunos países o regiones. Zapata de interfaz activa La Zapata de interfaz activa proporciona alimentación a accesorios como luz de video, flash o micrófono (se vende por separado).
-
Page 176: Pantalla De Cristal Líquido
En este caso, reemplace la batería por una batería de litio Sony CR2025. Es posible que el uso de otra batería presente riesgo de fuego o explosión. Pantalla de cristal líquido No ejerza excesiva presión sobre la pantalla de... - Page 177 La videocámara está equipada con un objetivo Carl Zeiss, que fue desarrollado por Carl Zeiss en Alemania en conjunto con Sony Corporation. Permite obtener imágenes de mejor calidad. Utiliza el sistema de medición MTF para videocámaras y ofrece la calidad típica de un objetivo Carl Zeiss.
-
Page 178: Especificaciones
Nota sobre la eliminación o transferencia de la videocámara Aunque elimine todas las películas e imágenes fijas, o ejecute [Formatear] (p. 70), es posible que los datos de la memoria interna no se borren completamente. Si transfiere la videocámara, es recomendable que ... -
Page 179: Pj760V)
[Activar], velocidad de obturación de 1/30 segundo) 0 lx (lux) (NIGHTSHOT está ajustado en [Activar]) La exclusiva matriz de píxeles del sensor ClearVid de Sony y el sistema de procesamiento de imágenes (BIONZ) permiten una resolución para las imágenes equivalente a los tamaños descritos. -
Page 180: Adaptador De Alimentación De Ca
Memory Stick” y “MagicGate Memory Stick Duo” son marcas comerciales o marcas comerciales registradas de Sony Corporation. “InfoLITHIUM” es una marca comercial de Sony Corporation. “x.v.Color” es una marca comercial de Sony Corporation. “BIONZ” es una marca comercial de Sony Corporation. - Page 181 DETENIDAMENTE EL SIGUIENTE ACUERDO. IMPORTANTE, LEA DETENIDAMENTE: Este Acuerdo de Licencia del Usuario Final (“LICENCIA”) es un contrato legal entre usted y Sony Corporation (“SONY”), el licenciante de los datos de mapas incluidos en su videocámara de grabación (“PRODUCTO”). En este documento, dichos datos de mapas, incluidas las actualizaciones posteriores, se denominan el SOFTWARE.
- Page 182 LICENCIA), y el destinatario acepte los términos y condiciones de esta LICENCIA. Terminación. Sin perjuicio de cualquier otro derecho, SONY puede dar término a esta LICENCIA si usted no cumple con los términos y condiciones de la misma. En tal caso, debe cesar el uso del SOFTWARE y de todos sus componentes.
- Page 183 ANTERIOR NO SE APLIQUE A USTED. ACUERDO COMPLETO Estos términos y condiciones constituyen el acuerdo completo entre SONY y usted en cuanto al tema en cuestión y sustituye totalmente cualquier acuerdo escrito u oral que exista antes de él entre nosotros con respecto al tema en cuestión.
- Page 184 Derechos de autor e información de marca comercial 1993-2011 NAVTEQ 2012 ZENRIN CO., LTD. Australia Hema Maps Pty. Ltd, 2010. Copyright. Based on data provided under license from PSMA Australia Limited (www.psma.com.au). Product incorporates data which is 2010 Telstra Corporation Limited, GM Holden Limited, Intelematics Australia Pty Ltd, NAVTEQ International LLC, Sentinel Content Pty Limited and...
-
Page 185: Indicadores De La Pantalla
Indicadores de la pantalla Los siguientes indicadores aparecen cuando cambia los ajustes. Consulte la página 23 y 30 para obtener información sobre los indicadores que aparecen durante la grabación o la reproducción. Central Izquierda Derecha Parte inferior Izquierda Indicador Significado Botón MENU (66) Grabación con disparador automático (68) - Page 186 Parte inferior Indicador Significado [Nivel referencia mic] bajo (69) [Red. ruid. viento auto] ajustado en [Desactivar] (69) [Voz más cerca] ajustado en [Desactivar] (32) Micróf. zoom integr. (69) Modo audio (69) Low Lux (68) Medidor/Enfoq punt (68)/ Medidor puntual (68)/ Exposición (68) Cambio AE (68) Velocidad obturador (38)
-
Page 187: Índice
Índice Active Interface Shoe ...8, 81 Ajuste de la fecha y la hora ...17 Ajustes de soporte ...20 Ajuste selección ...43 Almacenamiento de imágenes en un dispositivo de soporte externo ...63 Auto Inteligente ...33 Batería ...13 Borrar ...50 Botones de funcionamiento ...30 “BRAVIA”... - Page 188 Red. ruid. viento auto ...34 Reparación ...72 Reproducción ...27 Reproducción de discos ...59 Reproducción de escenarios ...44 Reproducción de selección ...43 RESET ...9 Selección soporte ...20 Selector MANUAL ...38 Solución de problemas ...72 Sonido envolvente de 5,1 canales ...46 Sonido viento ...69 Soportes de grabación ...20 Su ubicación ...40 Tamaño imagen ...37...
Need help?
Do you have a question about the Handycam HDR-CX760V and is the answer not in the manual?
Questions and answers