Table of Contents
Advertisement
Quick Links
Y ARDBEAST CHIPPERS
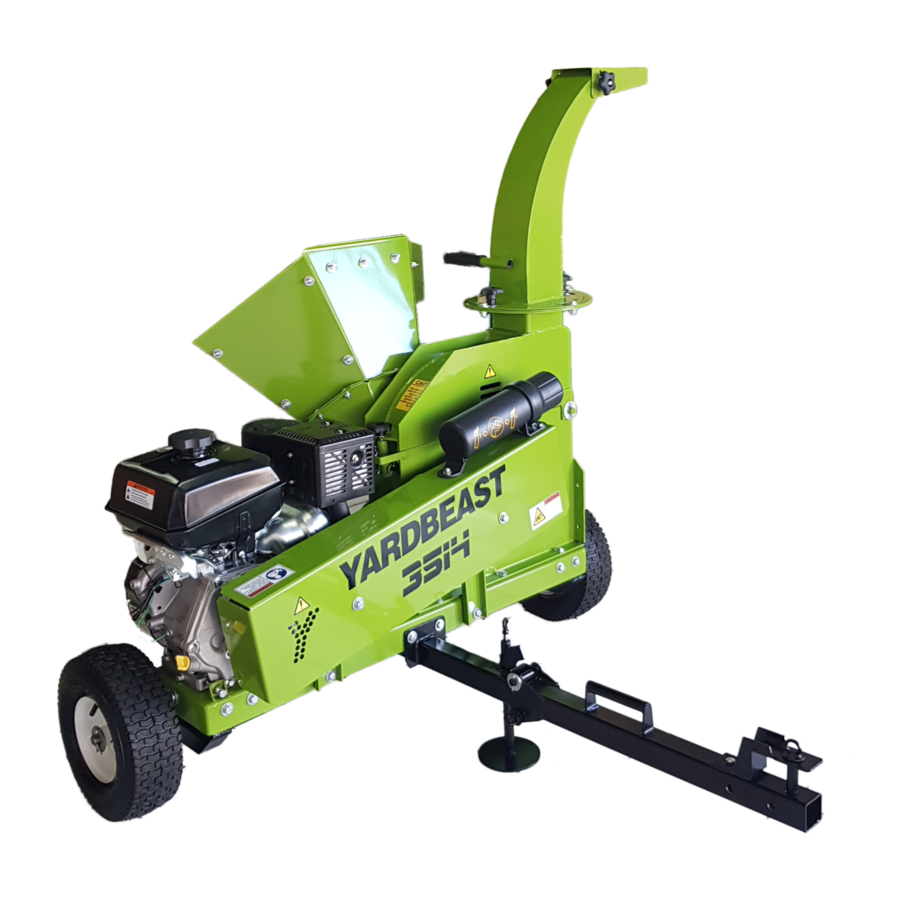
3.5" Heavy-Duty Wood Chipper
Read and follow all instructions in this manual before operating the chipper. Please
keep this manual stowed inside the manual tube guard for quick access to
information. Read it thoroughly and make sure to understand the operating,
maintenance and security indications. Failure to follow these indications can result in
www.yardbeast.com | 305.396.3396 | 1925 NW 21
3514
USER MANUAL
WARNING
serious injury to yourself and others.
st
Terrace. Miami, FL 33142 |
1
Advertisement
Table of Contents

Related Manuals for Yardbeast 3514


Summary of Contents for Yardbeast 3514
- Page 1 Read it thoroughly and make sure to understand the operating, maintenance and security indications. Failure to follow these indications can result in serious injury to yourself and others. www.yardbeast.com | 305.396.3396 | 1925 NW 21 st Terrace. Miami, FL 33142 | ...
- Page 2 FIRST AND FOREMOST.. THANK YOU! We thank you so much for having purchased a wood chipper from Yardbeast. We are continuously striving to design and craft high performance chippers that stand out from the rest; to exceed the requirements put forth by customers like you. You can tell the difference of our chipper by their weight and rigidity of its components.
-
Page 3: Table Of Contents
You can choose the options that are presented below: Mail: 1925 NW 21 ST TERRACE, Miami, FL 33142 Phones (305)-396-3396 Web: www.yardbeast.com Email: ustomer.service@yardbeast.com ... -
Page 4: Important Safety Measures
Important Safety Measures This machine is designed to be used in compliance with safety regulations contained in this manual. As with any type of motorized equipment, an error or negligence on the part of the operator can cause serious injury. ... - Page 5 comply with as well as specific safety instructions that will ensure a safe operation of the chipper. This sticker is in place to let you know the chips come out of the discharge flying at very high speed. This decal lets you know that the engine ...
-
Page 6: Facts About Your Chipper
This sticker highlights areas where you can get in contact with the power transmission belts, pulleys and other rotating elements. Only access these areas when the chipper is at a complete stop and the engine has been cleared out to be completely turned off. ... - Page 7 Use protection equipment. 104 dB Keep bystanders at 30 feet from chipper. Inspect blades before each use. Max. branch diameter. 3.5” (89mm) Do not operate a chipper on slopes without wheel chocks. Use recommended ...
-
Page 8: Train Yourself
Train yourself 1. Read, understand and comply with all instructions included in this manual and in the machine before assembling and putting it into operation. Keep this manual in the tube guard for future consultation, as well as for ordering spare parts. ... -
Page 9: Preparations Before Chipping
Preparations before chipping 1. Carefully inspect the area where the equipment will be used. 2. Protect your eyes, always use safety glasses while operating this machine. Otherwise, objects thrown that bounce can seriously injure your sight. 3. Use ear protection. This will protect you from the noise produced by the chipper when you feed the material into the hopper. ... -
Page 10: Maintenance And Storage
Maintenance and Storage 1. Never tamper with the safety components recklessly . Check periodically that they are functioning properly. 2. Make sure all screws, bolts , pins and cotter pins are in good condition to make sure the machine is in safe operating condition . Also , visually inspect the chipper to control if it is damaged and determine if repair is necessary. ... - Page 11 FASTENER PREPARATION BEFORE ASSEMBLY HAND TOW Fastener Package 6- Green Washers 1- Tow Pin (Black Color) 2- Tow Washers (Worn on the outside) 4- 3/16” x 1” Cotter Pin 8- 3/8” x 1” Gr5 Hex Bolt 8- 3/8” Lock Washer 8- 3/8”...
-
Page 12: Assembly Instructions Chipper
Assembly Instructions (Hand Tow Kit) The Yardbeast usually arrives in two separate boxes. One is a crate where the chipper is shipped, and the other is a cardboard box where the hand kit or ATV kit is shipped. ... - Page 13 4. Lift the end of the chipper (chipper frame first) with the help of a piece of 4x2 wood (you can use another material or geometry, as long as it lifts the chipper and is stable). Make sure the chipper is stable, and assemble the rear wheel axle. ...
- Page 14 6. Place the wheels on the rear shaft and secure them with the flat washers and cotter pin. Fasteners Used on Rear Wheels On each wheel: 1- Green Thick Washer 1- 3/16” x 1” Cotter Pin ...
- Page 15 8. Assemble the feed chute and tighten. Fasteners Used on Feed Chute 8- 5/16” X 1 G2 Hex Bolts 16- 5/16” Flat Washer (front and back) 8- 5/16” Lock Washer 8- 5/16” Hex Nut ...
- Page 16 10. When assembling the discharge chute, make sure the flange sits on top of the discharge base. Before putting together make sure to rub grease on the surface to improve the rotation. To adjust and eliminate play on the discharge chute, tighten the 4 hex bolts, apply pressure until you are able ...
-
Page 17: Assembly Instructions Trash Arm
Assembly Instructions (Trash Arm) At Yardbeast we developed something cool called a Trash Arm. Sometimes if you are chipping in confined spaces, or areas where you need to pick up the chipped material after, you might want to use the trash arm, a simple device designed to ... -
Page 18: Setting Up Your Wood Chipper
Setting up your Wood Chipper Read and follow all instructions in the manual for more information on this matter. Once you have finished putting together your wood chipper, you must prepare the engine for the first start. Locate the fuel cap on top of the engine and remove it. - Page 19 Chipper Features and Controls ...
- Page 20 FEED CHUTE: A maximum of 3-1/2” diameter branches are allowed through the chute. Always keep the debris rubber guard in place as wood pieces may kickback from the inside. WARNING : When operating the wood chipper, always use protective safety equipment;...
- Page 21 QUICK LOCK: T he Quick lock is a unique feature to Yardbeast that allows you to quickly inspect the chipper rotor and components. Always make sure this is properly locked before operating the chipper. Engine Controls ...
-
Page 22: Wood Chipper Good Practices
Wood Chipper Good Practices Good practices for the operator: 1. Check the oil and fuel level before starting the engine. 2. Do not put hands near rotating parts or power inputs . Contact with the chipper and rotating parts –while in operation- can seriously damage fingers, hands . ... -
Page 23: Chipper Operation
13. If any situations occur which are not covered in this manual, be careful and use common sense. Swiftly turn off the chipper and then contact us for further advice on your situation. Chipper Operation The wood material to be chopped enters the cutting chamber through the feed Hopper. The movement of the blade against the anvil produces a scissor cutting effect on the ... - Page 24 Our chippers are fitted with an industrial/commercial grade centrifugal clutch. The main goal of this mechanical element is to provide automatic power transfer from the engine to the rotor. This allows for easy starts, and provides engine protection. If you are chipping and the engine RPM falls below 1,800 RPM, the clutch will automatically disengage, allowing the engine to recover.
-
Page 25: Maintenance
Maintenance General guidelines: 1. Always observe safety precautions when performing maintenance on the chipper. 2. The warranty on this wood chipper, does not cover items that have been subjected to wear, misuse or negligence of the operator. To receive any warranty benefits;... - Page 26 ● Check blade edge. If need be, regrind blade at 30 deg. angle. ● Regrind anvil ● Check belt tension / wear Engine Maintenance Use only original spare parts for the engine. Other parts may not perform as well thus, damaging the unit.
-
Page 27: Servicing Your Beast
Engine Maintenance Chart. (Based on the Kohler CH440 Command Pro engine) After first 5 hours ● Change the oil Every 50 hours or annually ● Service/replace Quad-Clean TM precleaner *** ● Change oil ● Clean cooling areas Every 200 hours ●... - Page 28 Replacing the Belt Tools: Hex Wrench 7/16”, 1/2”, 9/16”, 3/4”. 1. Stop the engine, disconnect the spark plug and check that the engine has stopped completely. 2. Remove the bolts holding the belt shroud in place and remove. 3.
- Page 29 Replacing the Blade Tools: Hex Wrench 9/16” Piece of wood (optional) or Something to hold the rotor disk in place. 1. Place a wood piece to secure the rotor from moving. ...
- Page 30 2. Loosen the bolts on the blade with a hex wrench. 3. Insert a wood piece on the opposite of the rotor previous to replacing the blade. 4. Replace blade. Start by preloading the bolts from the inside out (1,2,3). Once bolts are preloaded, tighten to 25 ft-lbs each bolt.
- Page 31 We recommend checking our online blog for more service articles at www.yardbeast.com/ r ead-blog Storage of your unit. 1. Care must be taken to prevent rust on the surfaces. Cover all equipment with a light coat of oil and use an oil-soaked cloth for cleaning all equipment. Then ...
- Page 32 Low engine 1. Lack of fuel 1. Fill with fuel performance 2. Fuel quality is not good. 2. Drain old fuel and replace 3. Carburetor is dirty with fresh fuel. 4. Obstructed air filter 3. Clean carb according to 5. Choke lever not in correct engine Service Manual. ...
Need help?
Do you have a question about the 3514 and is the answer not in the manual?
Questions and answers