Table of Contents
Advertisement
Quick Links
User Manual
User Manual
Heavy Duty Professional Wood Chipper
Heavy Duty Professional Wood Chipper
WARNING
Read and follow all instructions in this manual before
to operate this machine. Please keep this manual
consultation at any time. Read it thoroughly and
with the operating instructions, maintenance and security
indications. Failure to follow these instructions can
injury to yourself and others.
www.yardbeast.com | (305) 396-3396
www.yardbeast.com
©
3.5"
YB3514
this manual before attempting
this manual available for
thoroughly and become familiar
, maintenance and security
instructions can result in serious
Rederick Metal Industries Corp.
Rederick Metal Industries Corp.
1925 NW 21st Terrace
Ver 2.0
Miami, FL 33142
1
Advertisement
Table of Contents

Related Manuals for Yardbeast YB3514


Summary of Contents for Yardbeast YB3514
- Page 1 , maintenance and security indications. Failure to follow these instructions can instructions can result in serious injury to yourself and others. Rederick Metal Industries Corp. Rederick Metal Industries Corp. 1925 NW 21st Terrace Miami, FL 33142 www.yardbeast.com www.yardbeast.com | (305) 396-3396 Ver 2.0...
-
Page 2: Table Of Contents
THANK YOU! INDEX very grateful that have Important safety measures ………………….3 purchased a wood chipper manufactured by us. The same has been designed and Assembly of the 3514………….….……………8 carefully fabricated to give you excellent performance, great reliability and exceed Controls and Features ………………………..11 your expectations. -
Page 3: Important Safety Measures
1925 NW 21 ST TERRACE, presented below: 1925 NW 21 ST TERRACE, Miami, FL 33142 /Phones: (305) Miami, FL 33142 /Phones: (305)-396-3396/ web site: www.yardbeast.com IMPORTANT SAFETY MEASURES IMPORTANT SAFETY MEASURES This machine is designed to be used in o be used in... - Page 4 ONLOOKERS AWAY AT ONLOOKERS AWAY AT: Wear Ear Protection Wear Eye Protection Wear Eye Protection Wear Safety Gloves 30 ft. 30 ft. No hands beyond Caution this point INSPECT BLADES BEFORE EACH USE INSPECT BLADES BEFORE EACH USE Protective equipment required for the Protective equipment required for the operation of this equipment.
- Page 5 persons below 16 years of age should AVOID SLOPES operate this equipment. 4. Without receiving appropriate instructions, do not allow anyone to operate this machine. 5. Do not start the chipper in closed spaces or in an area with poor ventilation. The exhaust gases from the engine contain carbon monoxide, a lethal gas which is odorless.
- Page 6 5. Perform a visual inspection of the Clean up spilled fuel on the engine machine in frequent intervals to check and equipment. Move machine to whether the chippers has suffered any another area. Wait 5 minutes before important damage. starting the engine. 6.
-
Page 7: Maintenance And Storage
running. Turn off the engine and wait until all running. Turn off the engine and wait until all moving parts are at a complete stop. moving parts are at a complete stop. 11. Observe the rules of proper disposal laws proper disposal laws and regulations for gas, fuel, oil, fuel, oil, etc. -
Page 8: Assembly Of The 3514
4 Wheels 1 Pull Bar Manuals and Operator safety accesories. 4. Remove the chipper by removing the Assembly of the YARDBEAST 3514 platform anchor plates used for shipping. See Fig Note: This unit is shipped without fuel and without oil in the engine. Fill with gasoline... - Page 9 -Insert rotating axle and bolt it as shown in Figure below. a. 4 Hex Bolts 3/8 "x 1" b. 4 Hex Nuts 3/8 " c. 4 Pressure Washers 3/8 " d. Plain Washers 4 3/8 " Pull Bar Assembly -Next figure shows the assembly of the pull bar.
- Page 10 Setting up your Wood Chipper Setting up your Wood Chipper Fuel & Oil Read and follow all instructions in the all instructions in the engine manual for more information on ormation on this matter. Once you have finished assembling your wood chipper, you must , you must prepare your engine for the first start.
-
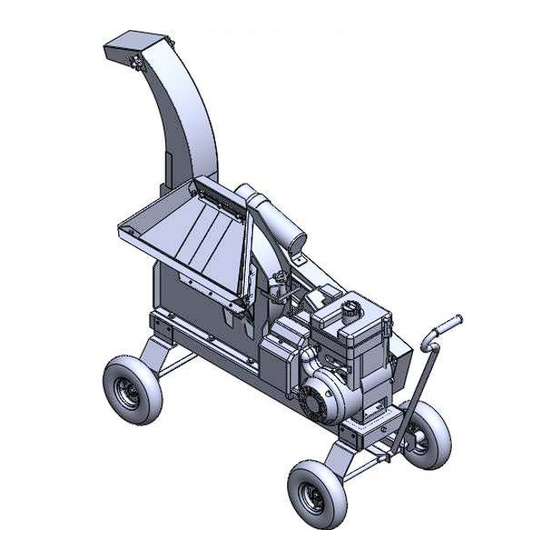
Page 11: Controls And Features
FEATURES & CONTROLS Feed Hopper Discharge Manual canister Engine Pull Bar Recoil Start Anvil Main Bearing Units... -
Page 12: Operation
FEED HOPPER: A maximum of 3 ximum of 3-1/2 inch diameter branches allowed. Always keep Always keep WARNING the debris protection guard in place the debris protection guard in place, as Use protective equipment safety Use protective equipment safety wood pieces may ricochet off the chute he chute. - Page 13 2. Move the choke lever to the choke 5. If engine doesn’t start. Repeat three last position. steps until it does. See figure below. 6. Once engine starts to run, you must swiftly move the choke lever to the RUN position. 7.
-
Page 14: Maintenance And Adjustment
be checked at least once before be checked at least once before Before making adjustments or repair Before making adjustments or repair each use. into the unit. 4.Periodically check all bolts, nuts, safety .Periodically check all bolts, nuts, safety pins, etc. •... -
Page 15: Service
problems are detected. SERVICING YOUR WOODCHIPPER YOUR WOODCHIPPER Replacing Power Belt Rotor Blade 1.Stop the engine, disconnect the spark sconnect the spark WARNING plug and check that the engine has plug and check that the engine has The rotor blade is sharp. Wear The rotor blade is sharp. - Page 16 Please contact us at: Please contact us at: www.yardbeast.com www.yardbeast.com 2. Follow the off-season storage season storage lubrication (Customer Contact Form) (Customer Contact Form) recommendations for the engine engine.
-
Page 17: Troubleshooting
TROUBLESHOOTING Problem Cause Solution 1. The spark plug is disconnected 1. Connect the cable to spark plug. Engine does 2. The fuel tank is empty. 2. Fill tank with clean, fresh fuel. not start 3. Shut-off valve is closed. 3. Turn the fuel valve ON 4. - Page 18 COMMON SPARE PARTS Component Part Number and Description Part Number and Description # PART: 351401 | BLADE # PART: 351402 | ANVIL # PART: 351403 | KNOB # PART: 351404 | V-BELT SET (2 UNITS) BELT SET (2 UNITS) # PART: 351405 | CLUTCH (2-GROOVE) GROOVE) # PART: 351406...
-
Page 19: Warranty
States; except those sold through authorized Rederick MI Corp. Dealers and/or channels of export distribution. e. Parts that are not genuine to the Yardbeast Chipper line will not be covered by this or any other warranty expressed by Rederick MI Corp. - Page 20 or oral, except as mentioned above, given by any person or entity, including a dealer or a retailer, with respect to any product manufactured by us shall bind Rederick Metal Industries Corporation. During the period of the warranty, the remedy is repair or replacement of the product as set forth above.
-
Page 21: Parts List
PARTS B BASE Component Part No. Base 351407 Fixed axle 351408 Live axle 351409 Live axle support 351410 Belt tensioner 351411 Pull handle bar 351412 10” Pneumatic Wheel 351406 Rubber grip 351413 Pull bar pin 351414... - Page 22 DISCHARGE NECK Component Part No. Discharge 351415 Deflector 351416 351403 Knob ROTOR Component Part No. Rotor disc 351417 Blade 351401...
- Page 23 CHIPPER Component Part No. Bottom 351418 351419 Feed Hopper 351420 Main Bearings 351421 Dirt Screen 351422 Anvil 351402 Open/Close Pin 351423 Safety lock tube 351424 Safety lock pin 351425 Spacers 351426 351403 Knob...
- Page 24 BELT GUARD Component Part No. Belt Guard 351427 Long support arm 351428 Short support arm 351429 Spacer 351430 3/8" Safety hex nut 351431 3/8" Flat Washer 351432 351433 3/8" Pressure Washer...
- Page 25 NOTES:...
Need help?
Do you have a question about the YB3514 and is the answer not in the manual?
Questions and answers