
Related Manuals for Kargo Master 4A82L


Summary of Contents for Kargo Master 4A82L
- Page 1 Instruction Guide 4A82L Kargo Master Rancho Cordova, CA 95742 800-343-7486 CustomerService@KargoMaster.com 20210630R4 DATE: ______________...
-
Page 2: Table Of Contents
Examples of Ladder Clamps Firmly Against Ladder Rungs ..................13 Before You Begin Read all instructions prior to assembling or installing any Kargo Master product. Have vehicle specific mount kit installed on vehicle. Most times it is easier to assemble on top of the roof, after the mount kit has been installed. -
Page 3: Parts
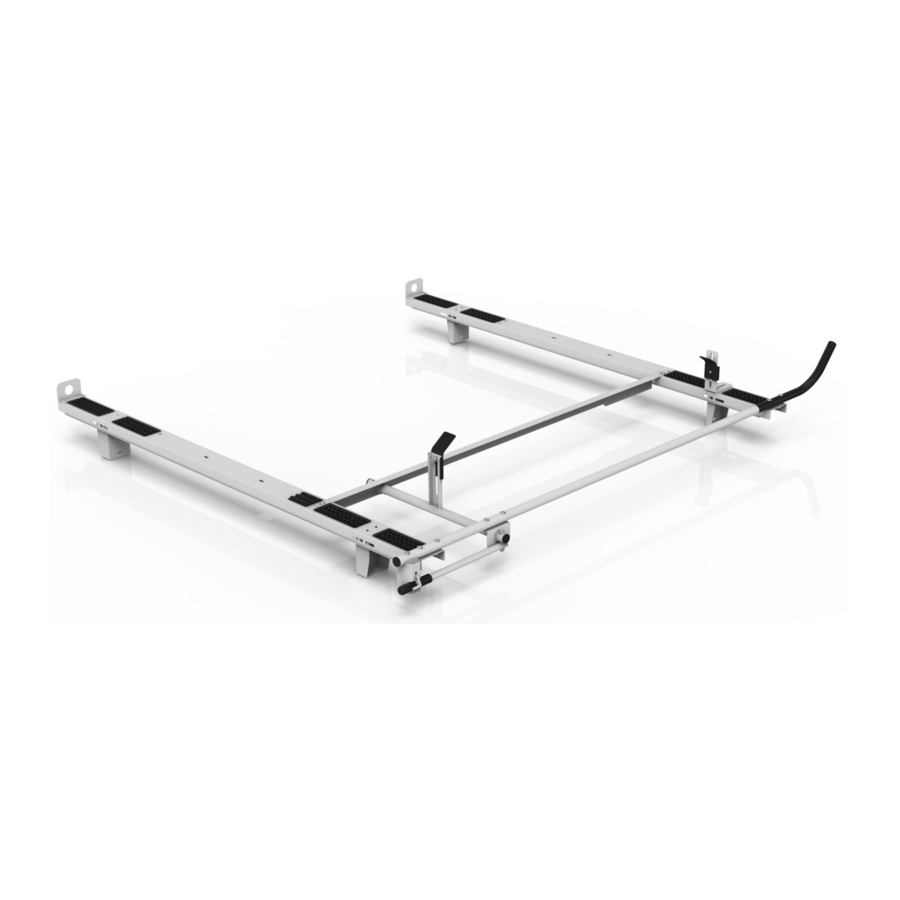
Instructions – 4A82L Parts For Technical Support Call: 800-343-7486, Monday-Friday, 7AM - 4 PM (PST) Page 2... -
Page 4: Hardware
Instructions – 4A82L Hardware For Technical Support Call: 800-343-7486, Monday-Friday, 7AM - 4 PM (PST) Page 3... - Page 5 Instructions – 4A82L Hardware (Continued) For Technical Support Call: 800-343-7486, Monday-Friday, 7AM - 4 PM (PST) Page 4...
-
Page 6: Step 1 - Install End Stops
Instructions – 4A82L Step 1 – Install End Stops Skip this step if installing a drivers side ladder rack. Bolt end stops to one end of each bow using 5/16” x 3/4” carriage bolts, 5/16” washers and 5/16” lock nuts in the location and orientation shown. -
Page 7: Step 2 ─ Attach Bows To Feet
Instructions – 4A82L Step 2 ─ Attach Bows to Feet Have the vehicle specific mounting installed on the vehicle. Place each bow on top of the feet in the orientation shown. The driver side of the bow is the side with the end stops installed. -
Page 8: Step 3 - Install Side Tube
Instructions – 4A82L Step 3 – Install Side Tube Place sealant around swaged end of side support bar. Slide side support bar into side tube assembly. Be sure the holes in each line up. Place side tube assembly on top of the installed bows. -
Page 9: Step 4 - Install Hanger Bracket
Instructions – 4A82L Using 5/16” x 2” carriage bolts, 5/16” flat washers and 5/16” lock nuts, fasten the side tube assembly to both pans. Be sure to leave one square slot open at the rear of the side tube. -
Page 10: Step 5 - Attach Clamp Tube And L-Bracket
Instructions – 4A82L Step 5 – Attach Clamp Tube and L-Bracket Place clamp and lock L bracket on top of installed bows. Be sure to have the long flange of the L bracket to the center of the vehicle. -
Page 11: Step 6 - Mount Handle
Instructions – 4A82L Bolt clamp and lock L bracket to both bows using 3/8” x 1” carriage bolts, 3/8” flat washers and 3/8” lock nuts as shown. Repeat on opposite bow. TIGHTEN. Step 6 – Mount Handle ... -
Page 12: Step 7 - Mount Latch Assembly
Instructions – 4A82L Step 7 – Mount Latch Assembly Bolt latch to the rear of the mount tube that was installed in Step 5 using 5/16” x 2” carriage bolt, 5/16” curved washer and a 5/16” lock nut. TIGHTEN. - Page 13 Instructions – 4A82L GO BACK AND ENSURE ALL HARDWARE IS TIGHT. YOUR INSTALLATION IS NOW COMPLETE. Refer to the Clamp and Lock Adjustment instructions to adjust the rack to your ladder. ALWAYS BE SURE LADDER IS SECURE PRIOR TO TRANSPORTATION.
-
Page 14: Angle Pad Orientations And Locations
Instructions – 4A82L Angle Pad Orientations and Locations Standard Flipped Oritentation Orientation Clamp Mechanism Orientation and Angled Pad Positions Rear- Facing Examples of Ladder Clamps Firmly Against Ladder Rungs Be sure to position the ladder hook in a way so the hook clamps the ladder tight into place.
Need help?
Do you have a question about the 4A82L and is the answer not in the manual?
Questions and answers