Table of Contents
Advertisement
Available languages
Available languages
Quick Links
Advertisement
Chapters
Table of Contents

Related Manuals for PRESIDIUM PEGG


Summary of Contents for PRESIDIUM PEGG
- Page 2 Language Contents 1. English Language pg. 03 2. Chinese Language pg. 15 3. French Language pg. 26 4. German Language pg. 38 5. Italian Language pg. 50 6. Russian Language pg. 62 7. Spanish Language pg. 74...
-
Page 3: Table Of Contents
06 IV. IMPORTANT NOTICE pg. 08 1. GETTING STARTED with your Presidium Electronic Gem Gauge pg. 10 2. PERFORMING A TEST with your Presidium Electronic Gem Gauge pg. 11 3. TAKING CARE of your Presidium Electronic Gem Gauge pg. 14... -
Page 4: Disclaimers, Exclusions And Limitations Of Liability
PLEASE READ AND NOTE PRESIDIUM WARRANTY TERMS AND CONDITIONS as stated in the warranty card. Presidium warranty for its testers are subject to proper use by its users in accordance with all the terms and conditions as stated in the relevant user handbook and shall cover only manufacturing defects. -
Page 5: About This Book
II. About this book Thank you for purchasing the Presidium Electronic Gem Gauge (“PEGG” or “gauge”). This handbook is designed to help you set up your gauge and describes all you need to know about how to use your gauge accurately and take care of it in line with its requirements. -
Page 6: About Your Presidium Electronic Gem Gauge
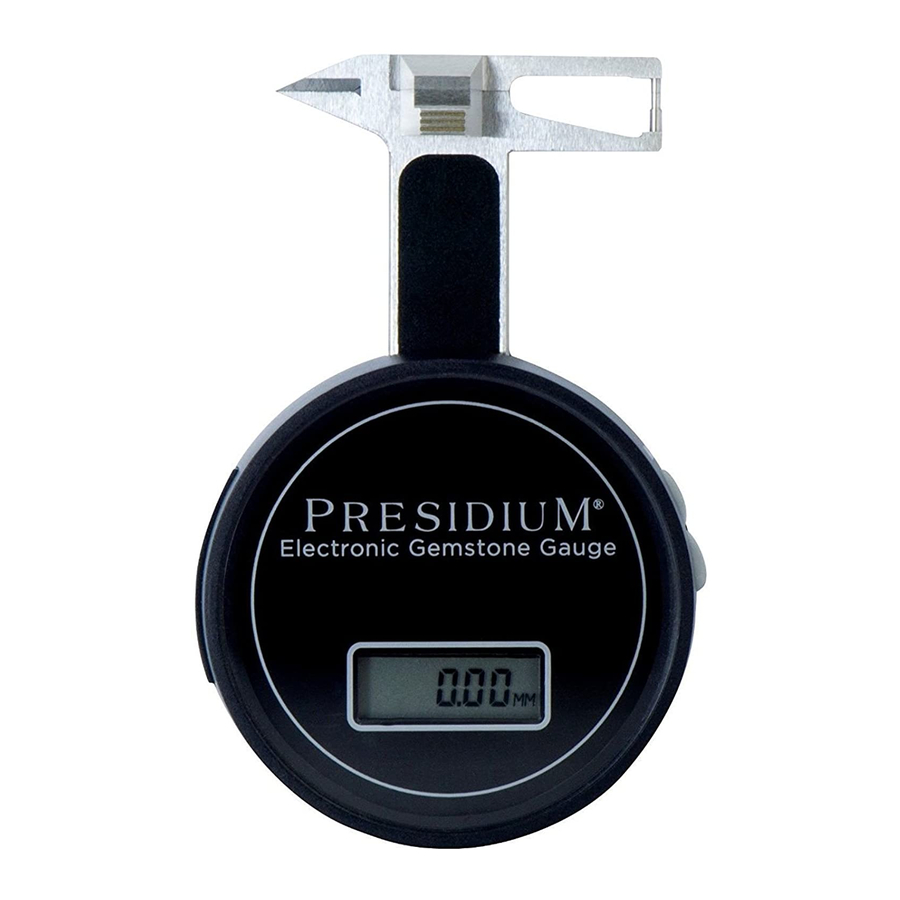
III. About your Presidium Electronic Gem Gauge The Presidium Electronic Gem Gauge utilizes capacitance measurement in which the capacitance IC output the change in capacitance of two sliding plates into binary values and finally being converted by equations in microprocessor into dimension (in millimeters) and weight (in carat). - Page 7 Display Window Battery Compartment Slider Wedge-shaped Points Fixed Rod Protruding Probe Jewelry Attachment Zero Reset / ct/mm conversion Button...
-
Page 8: Important Notice
IV. IMPORTANT NOTICE • Keep the gauge dry. Precipitation and all types of liquids or moisture can contain minerals that will corrode electronic circuits. If your gauge does get wet, remove the battery, and allow the gauge to dry completely before replacing it. •... - Page 9 Do not paint the gauge. Paint can clog the moving parts and prevent proper operation. If your gauge is not working properly, kindly contact Presidium Customer Service at service@presidium.com. sg or: Presidium Instruments Pte Ltd Unit 7, 207 Henderson Road...
-
Page 10: Getting Started With Your Presidium Electronic Gem Gauge
1. GETTING STARTED with your Presidium Electronic Gem Gauge Inserting the battery into your Presidium Electronic Gem Gauge 1. Pull the battery slider sideway outward using either fingernails or a screwdriver. 2. Place a CR 2032 3V battery with the (+) sign facing upward in the battery compartment and close by pushing the battery slider sideway inward (Fig. -
Page 11: Performing A Test With Your Presidium Electronic Gem Gauge
2. PERFORMING A TEST with your Presidium Electronic Gem Gauge • The Presidium Electronic Gem Gauge should be held in the palm of either hand. Control the Slider with the thumb (Fig 2.1). Fig. 2.1 • When measuring loose stones, pull the Slider (Fig. 2.2) and place the stone on the Slider platform. - Page 12 • Slowly close the Slider. The reading will be displayed on the window immediately. • Press MM/Ct (Fig. 2.3) to convert between dimension in millimeter or weight in carat. Fig. 2.3 When measuring mounted stones, insert the jewelry attachment to the gauge (Fig. 2.4) and place the stone between the jewelry attachment and Slider anvil.
- Page 13 Functions of your Presidium Electronic Gem Gauge Use the Wedge Shape Points when measuring: - Stones mounted in rubbed over settings - Interiors of empty settings - Ring size Use the Projecting Probe when measuring: - Depth of mounted stones...
-
Page 14: Taking Care Of Your Presidium Electronic Gem Gauge
3. TAKING CARE of your Presidium Electronic Gem Gauge Do not leave worn out batteries in the battery compartment as the batteries may corrode, leak or damage the gauge. Batteries should be removed when the gauge is expected to be stored for an extended period of time. - Page 15 Presidium 电子宝石量规 (PEGG)用户手册...
- Page 16 目录 (Chinese Version) I. 关于本手册 pg. 17 II. 关于 Presidium 电子宝石量规 pg. 18 III.重要说明 pg. 20 1.开始使用 Presidium 电子宝石量规 pg. 21 2.在 Presidium 电子宝石量规上执行检测 pg. 22 3.维护 Presidium 电子宝石量规 pg. 25...
- Page 17 I. 关于本手册 感谢您选购 Presidium 电子宝石量规(简称“PEGG” 或“量规”)。 本手册旨在帮助您设置量规,并且将介绍关于如何正确地 使用您的量规及按照要求对其进行护理的所有知识。请仔 细阅读这些说明,将其放在方便之处以便将来参考。...
- Page 18 II. 关于 Presidium 电子宝石量规 Presidium 电子宝石量规采用电容测量法,该法用电容 将两个滑动极板的电容变化以二进制数值输出,最后 在微处理器中通过公式换算为尺寸(单位:毫米)和重量 (单位:克拉)。 Presidium 电子宝石量规的特点如下: • 测量范围为 0.0 到 25.0mm • 精度: 0.01mm / 公差: 0.02mm • 直接读出毫米/克拉数 • 触摸按钮归零,方便在测量过程中随时复位至零点 • 平滑游标机构 • 电池消耗量很低 • 轻便易携 • 放在便携袋中时电磁式电源开关自动关闭 产品规格: • 测量范围: 0.00mm-25.00mm • 精度: 0.01mm / 公差: 0.02mm •...
- Page 19 显示窗 电池匣 游标 楔形尖头 固定杆 探针 首饰夹具 复零 / 克拉/毫米换算按钮...
- Page 20 • 切勿在低温环境中使用、存放或暴露量规。 当量规 回到正常温度时可能在仪器内部形成湿气,从而 对电子线路板造成损害。 • 切勿尝试通过未在本手册中说明的方法来打开量 规。 • 切勿跌落、撞击或摇晃量规。 粗暴地使用可能导致 内部电路板和精密器械断裂。 • 切勿使用刺激性化学物质、清洁溶剂或强力洗涤剂 来清洗量规。 • 切勿给量规上漆。 油漆可能会阻塞活动部件,影响 其正常工作。 如果量规无法正常工作,请通过以下方式联系 Presidium 客户服务部门 - 电子邮件:service@presidium.com.sg 或者寄信至: Presidium Instruments Pte Ltd Unit 7, 207 Henderson Road Singapore 159550 Attn: Customer Service Executive...
- Page 21 1. 开始使用 Presidium 电子宝石量规 在 Presidium 电子宝石量规中装入电池 1. 使用指甲或螺丝刀将电池滑架侧缘向外拉出。 2. 将 CR 2032 3V 电池 (+) 记号朝上放入电池匣,然 后将电池滑架侧缘推入以关闭电池匣(图 1.1)。 3. 推荐使用碱性电池,因为它一般可以保证约 2.5 个 小时的持续工作时间,使用普 通电池的话其工作时 间较短。 图 1.1 电池信息 切勿将用完的电池留在电池匣内,因为电池电解液可能出 现泄露,从而腐蚀或损坏量规。 如果预计要将仪器存放 较长时间,应取出电池。...
- Page 22 2. 在 Presidium 电子宝石量规上执行检测 • 应该用任一手的手掌握持 Presidium 电子宝石量 规。 用拇指操作游标。(图 2.1) 图 2.1 • 测量裸石时,应拨动游标(图 2.2),将宝石放在 游标平台上。 宝石的底面应该与平台平行,以防宝 石移动 。 图 2.2...
- Page 23 • 慢慢合上游标。 读数将立即显示在窗口上。 • 按 MM/Ct(图 2.3)可在以毫米为单位的尺寸和以 克拉为单位的重量之间转换 。 图 2.3 测量已镶嵌的宝石时,请将首饰夹具插在量规上 (图 2.4),然后将宝石夹在首饰夹具和游标测量头之 间。 图 2.4 • 慢慢合上游标(图 2.5),读数将直接显示在显示 窗口上。 按 MM/Ct(图 2.3)可在以毫米为单位的 尺寸和以克拉为单位的重量之间转换。 图 2.5...
- Page 24 Presidium 电子宝石量规的功能 测量以下对象时请使用楔形尖头: - 采用折边镶法镶嵌的宝石 - 空镶托的内部 - 可测量的戒围 测量以下对象时请使用探针: - 已镶嵌宝石的高度 - 大型裸石(尤其是花式切割宝石)的宽度和长度 测量以下对象时请使用首饰夹具: - 宝石在高镶托中的高度 - 宝石在有小孔的镶托中的高度 连接此附件后,请复位归零 (图 2.6)。 图 2.6...
- Page 25 3. 维护 Presidium 电子宝石量规 切勿将用完的电池留在电池匣内,因为电池电解液可能出 现泄露,从而腐蚀或损坏量规。 如果预计要将量规存放 较长时间,应取出电池。 您的量规融合了大量的设计与工艺,因此应小心使用。 感谢您抽出时间阅读本用户手册,它会让您更好地了解您 新购买的产品。 Presidium 还建议您完成质保注册流程,可以通过将质保 注册卡寄送给我们,也可以通过 http://www.presidium. com.sg/ 在线注册 。...
- Page 26 Manuel de l’utilisateur pour Presidium Electronic Gem Gauge (PEGG)
- Page 27 Table des matières (French Version) I. A propos de ce manuel pg. 28 II. A propos de votre jauge Presidium Electronic Gem Gauge pg. 29 III. AVIS IMPORTANT pg. 31 1. PREMIERE UTILISATION de votre jauge Presidium Electronic Dial Gauge pg.
-
Page 28: A Propos De Ce Manuel
I. A propos de ce manuel Nous vous remercions d’avoir acheté la jauge Presidium Gem Computer Gauge (“PECG” ou “jauge”). Ce manuel est conçu pour vous aider à configurer votre jauge et décrit tout ce que vous devez savoir sur la façon d’utiliser votre jauge de façon précise et de prendre soin... -
Page 29: A Propos De Votre Jauge Presidium Electronic Gem Gauge
II. A propos de votre jauge Presidium Electronic Gem Gauge La jauge Presidium Gem Computer Gauge utilise la mesure de capacité dans laquelle le CI capacitatif produit le changement capacitatif de deux plaques coulissantes en valeurs binaires et est finalement converti par les équations du microproceseur en dimensions (en... - Page 30 Écran d'affichage Logement des piles Coulisse Pointes en coins Partie fixe Sonde en saillie Accessoire joaillerie Remise à zéro/ct/bouton de conversion en mm...
-
Page 31: Avis Important
III. AVIS IMPORTANT • La jauge doit être protégée de l’humidité Les précipitations et tous les types de liquides ou d’humidité peuvent contenir des minéraux susceptibles de détériorer les circuits électroniques. Si votre testeur est humide, retirez les piles et laissez l’appareil sécher complètement avant de le remettre en place. - Page 32 Ne pas peindre la jauge. La peinture peut bloquer les pièces mobiles et empêcher le bon fonctionnement du testeur. Si votre jauge ne fonctionne pas correctement, veuillez contacter le service clientèle de Presidium service@presidium.com.sg ou : Presidium Instruments Pte Ltd Unit 7, 207 Henderson Road...
-
Page 33: Premiere Utilisation De Votre Jauge Presidium Electronic Dial Gauge
1. PREMIERE UTILISATION de votre jauge Presidium Electronic Dial Gauge Insérer une pile dans votre jauge Presidium Electronic Gem Gauge 1. Faites sortir le logement des piles escamotable situé sur le côté en utilisant soit un tournevis soit vos ongles. -
Page 34: Realiser Un Test Sur Votre
2. REALISER UN TEST sur votre Presidium Electronic Gem Gauge • La jauge Presidium Electronic Gem Gauge devrait être tenue dans la paume d’une main. Contrôlez la coulisse avec le pouce (Fig 2.1). Fig. 2.1 • Quand vous mesurez des pierres non montées, tirez la coulisse (Fig. - Page 35 • Fermer doucement la coulisse. Le résultat s’affichera immédiatement. Pressez MM/Ct (Fig. 2.3) pour convertir la dimension • en millimètres ou le poids en carat. Fig. 2.3 Lorsque vous mesurez des pierres serties, insérer l’accessoire de joaillerie sur la jauge (Fig. 2.4) et placez la pierre entre l’accessoire de joaillerie et l’enclume coulissante.
- Page 36 Fonctions de votre jauge Presidium Electronic Gem Gauge Utiliser les pointes en forme de coins pour les mesures : - Pierres montées sur des sertissages polis - Intérieurs de sertissages vides - Taille de la bague si elle est mesurable Utilisez la sonde en saillie lors des mesures : - Profondeur des pierres montées...
-
Page 37: Prendre Soin De Votre Jauge Presidium Electronic Gem Gauge
3. PRENDRE SOIN de votre jauge Presidium Electronic Gem Gauge Ne laissez pas de piles usagées dans le logement à piles car elles peuvent se corroder, fuir ou endommager la jauge. Les piles devraient être enlevées lorsque la jauge va être rangée pendant une longue période. - Page 38 Benutzeranleitung für Presidium Electronic Gem Gauge (PEGG)
- Page 39 40 II. Informationen zu Ihrem Presidium Electronic Gem Gauge pg. 41 III. WICHTIGER HINWEIS pg. 43 1. ERSTE SCHRITTE mit dem Presidium Electronic Gem Gauge pg. 45 2. DURCHFÜHREN EINER MESSUNG mit dem Presidium Electronic Gem Gauge pg. 46 3.
-
Page 40: Über Diese Anleitung
I. Über diese Anleitung Vielen Dank, dass Sie sich für das Presidium Electronic Gem Gauge (“PEGG” oder “Messgerät”) entschieden haben. Diese Anleitung soll Ihnen die Inbetriebnahme Ihrer Messuhr erleichtern und enthält alle erforderlichen Informationen zur korrekten Nutzung der Messuhr und der sachgerechten Pflege. Bitte lesen Sie diese Anleitung sorgfältig und bewahren Sie sie für einen... -
Page 41: Informationen Zu Ihrem Presidium Electronic Gem Gauge
II. Informationen zu Ihrem Presidium Electronic Gem Gauge Das Presidium Electronic Gem Gauge verwendet eine kapazitive Messtechnik zur Längenbestimmung, bei der Kapazitätsänderungen zwischen zwei verschiebbaren Platten zunächst in digitale Werte und dann über Formeln von einem Mikroprozesser in Millimeter und Karatgewicht umgewandelt werden. - Page 42 Anzeigefenster Batteriefach Schieber V-förmiger Messschenkel Daumenauflage Abgesetzte Messzange Schmuckaufsatz Nullstellung / ct/mm Konvertierungstaste...
-
Page 43: Wichtiger Hinweis
III. WICHTIGER HINWEIS • Das Messgerät trocken halten. Niederschlag und Flüssigkeiten oder Feuchtigkeit können Mineralien enthalten, die auf elektrische Schaltkreise korrodierend wirken. Falls das Messgerät nass wird, entfernen Sie die Batterie und lassen Sie es vor der weiteren Verwendung vollständig trocknen. •... - Page 44 Das Messgerät nicht lackieren oder bemalen. Lack oder Farbe kann die beweglichen Teile verkleben und den einwandfreien Betrieb verhindern. Falls das Messgerät nicht korrekt funktioniert, wenden Sie sich bitte an den Presidium-Kundendienst unter service@presidium.com.sg oder an: Presidium Instruments Pte Ltd Unit 7, 207 Henderson Road...
-
Page 45: Erste Schritte Mit Dem Presidium Electronic Gem Gauge
1. ERSTE SCHRITTE mit dem Presidium Electronic Gem Gauge Einlegen der Batterie in den Presidium Electronic Gem Gauge 1. Ziehen Sie den Batterieschieber mit dem Finger oder einem Schraubendreher nach außen zur Seite. 2. Setzen Sie eine CR 2032 3 V-Batterie mit dem (+) Symbol nach oben in das Batteriefach ein und drücken Sie den Batterieschieber seitlich nach innen... -
Page 46: Durchführen Einer Messung Mit Dem Presidium Electronic Gem Gauge
2. DURCHFÜHREN EINER MESSUNG mit dem Presidium Electronic Gem Gauge • Der Presidium Electronic Gem Gauge sollte in der Handfläche gehalten werden. Bewegen Sie den Schieber mit der Daumenauflage (Abb. 2.1). Abb. 2.1 • Ziehen Sie beim Messen loser Steine den Schieber (Abb. - Page 47 • Schließen Sie langsam den Schieber. Da Messergebnis wird sofort im Anzeigefenster an gezeigt. Drücken Sie MM/Ct (Abb. 2.3) um zwischen • Abmessung in Millimeter und Gewicht in Karat umzuschalten Abb. 2.3 Setzen Sie beim Messen gefasster Steine den Schmuckaufsatz auf das Messgerät (Abb. 2.4) und platzieren Sie den Stein zwischen Schmuckaufsatz und Schieberamboss.
- Page 48 Abb. 2.5 Funktionen Ihres Presidium Electronic Gem Gauge Verwenden Sie die V-förmigen Messschenkel beim Messen von: – gefassten Steinen – Innenbereiche leerer Fassungen – Messbarer Ringgröße Verwenden Sie die abgesetzte Messzange beim Messen von: – Tief gefassten Steinen – Breite und Länge großer, loser Steine, speziell bei...
-
Page 49: Wartung Und Pflege Des Presidium Electronic Gem Gauge
3. WARTUNG UND PFLEGE des Presidium Electronic Gem Gauge Entnehmen Sie verbrauchte Batterien aus dem Batteriefach, da Batterien korrodieren oder auslaufen und das Messgerät beschädigen können. Entnehmen Sie die Batterien auch, wenn das Instrument voraussichtlich für einen längeren Zeitraum nicht verwendet wird. - Page 50 Guida per l’utente di Presidium Electronic Gem Gauge (PEGG)
- Page 51 Indice (Italian Version) I. Informazioni su questa guida pg. 52 II. Informazioni su Presidium Electronic Gem Gauge pg. 53 III. AVVISO IMPORTANTE pg. 55 1. OPERAZIONI PRELIMINARI con Presidium Electronic Gem Gauge pg. 57 2. SVOLGIMENTO DI UN TEST con Presidium Electronic Gem Gauge pg.
-
Page 52: Informazioni Su Questa Guida
I. Informazioni su questa guida Grazie per aver acquistato Presidium Electronic Gem Gauge (“PEGG” o “misuratore”). Questa guida è stata creata allo scopo di aiutare l’utente a impostare il misuratore e contiene tutte le informazioni necessarie a garantire un utilizzo accurato e una manutenzione in linea con i requisiti del misuratore. -
Page 53: Informazioni Su Presidium Electronic Gem Gauge
Inclusi nella confezione: • Presidium Electronic Gemstone Gauge • Accessorio per gioielleria con incastonatura alta • Tabella per la stima del peso delle gemme Presidium • Guida dell’utente • Certificato di garanzia • Custodia in plastica per il trasporto... - Page 54 Finestra del display Vano batterie Meccanismo di scorrimento Punte a cuneo Asticella fissa Sonda sporgente Accessorio per gioielleria Pulsante Zero Reset/ct/mm conversion...
-
Page 55: Avviso Importante
III. AVVISO IMPORTANTE • Tenere all’asciutto il misuratore. La pioggia e tutti i tipi di liquidi o condensa possono contenere minerali in grado di corrodere i circuiti elettrici. In caso di penetrazione di liquidi all’interno del misuratore, rimuovere la batteria e lasciare asciugare completamente il misuratore prima di reinserirla. - Page 56 • Non verniciare il misuratore. La vernice potrebbe ostruire le parti e impedire il corretto funzionamento. In caso di malfunzionamento del misuratore, contattare il servizio clienti Presidium all’indirizzo di posta elettronica service@presidium.com.sg o tramite corrispondenza all’indirizzo: Presidium Instruments Pte Ltd...
-
Page 57: Operazioni Preliminari Con Presidium Electronic Gem Gauge
1. OPERAZIONI PRELIMINARI con Presidium Electronic Gem Gauge Inserire la batteria all’interno di Presidium Electronic Gem Gauge 1. Estrarre il vano scorrevole della batteria tirandolo lateralmente verso l’esterno usando le unghie o un cacciavite. 2. Inserire una batteria CR 2032 3V con il simbolo (+) rivolto verso l’alto nel vano della batteria e chiudere... -
Page 58: Svolgimento Di Un Test Con Presidium Electronic Gem Gauge
2. SVOLGIMENTO DI UN TEST con Presidium Electronic Gem Gauge • Presidium Electronic Gem Gauge deve essere impugnato nel palmo della mano destra o sinistra. Controllare il meccanismo di scorrimento con il pollice. (Fig. 2.1) Fig. 2.1 • Per la misurazione di pietre sciolte, tirare il meccanismo di scorrimento (Fig. - Page 59 • Chiudere lentamente il meccanismo di scorrimento. La lettura verrà visualizzata immediatamente nella finestra. • Premere MM/Ct (Fig. 2.3) per eseguire la conversione tra dimensione in millimetri o peso in carati. Fig. 2.3 Per misurare le pietre incastonate, inserire l’accessorio per gioielleria nel misuratore (Fig.
- Page 60 Fig. 2.5 Funzioni di Presidium Electronic Gem Gauge Utilizzare le punte a cuneo per misurare: - Pietre montate con incastonatura rub over - Interni di incastonature vuote - Dimensione dell’anello misurabile Utilizzare la sonda sporgente per misurare: - Spessore delle pietre incastonate...
-
Page 61: Manutenzione Di Presidium Electronic Gem Gauge
Grazie per aver dedicato il tempo necessario a leggere la guida dell’utente contenente informazioni utili a comprendere meglio il prodotto appena acquistato. Presidium consiglia inoltre di registrare la garanzia inviandoci la scheda di registrazione della garanzia o registrandosi on-line all’indirizzo http://www.presidium. - Page 62 Руководство для пользователей, прибор Presidium Electronic Gem Gauge (PEGG)
- Page 63 Содержание (Russian Version) I. Руководство для пользователей pg. 64 II. Прибор Presidium Electronic Gem Gauge pg. 65 III. ВАЖНЫЕ ИНСТРУКЦИИ ПО ТЕХНИКЕ БЕЗОПАСНОСТИ pg. 67 1. ПОРЯДОК РАБОТЫ, прибор Presidium Electronic Gem Gauge pg. 69 2. ТЕСТИРОВАНИЕ, прибор Presidium Electronic Gem Gauge pg.
- Page 64 I. Руководство пользователя Благодарим за покупку Presidium Electronic Gem Gauge («PEGG» или «измерительный прибор»). Данное руководство предназначено для того, чтобы помочь Вам настроить свой прибор, а также предоставить информацию о том, что Вы должны знать для правильного использования прибора и...
-
Page 65: Прибор Presidium Electronic Gem Gauge
II. Прибор Presidium Electronic Gem Gauge Принцип работы прибора Presidium Electronic Gem Gauge построен на измерение емкости, при этом значение входной емкости изменяется в емкость двух скользящих плат в виде двоичных величин, которые затем преобразуются уравнениями в микропроцессоре в размеры (мм) и вес (карат). - Page 66 Панель индикации Батарейный отсек Ползунок Клиновидные держатели Неподвижный шток Выступающий щуп Насадка для ювелирных изделий Кнопка «Zero Reset / ct/mm conversion» («Сброс»/ «Преобразование карат/мм»)
-
Page 67: Важные Инструкции По Технике Безопасности
III. ВАЖНЫЕ ИНСТРУКЦИИ ПО ТЕХНИКЕ БЕЗОПАСНОСТИ • Храните измерительный прибор в сухом месте. Атмосферные осадки и все типы жидкости или влага могут содержать минералы, которые способствуют коррозии электронных схем. Если на прибор попала вода, то выньте из него аккумулятор. После того, как прибор тщательно просушили, заново... - Page 68 препятствовать правильному функционированию прибора. В случае возникновения каких-либо сбоев при эксплуатации весов свяжитесь со службой технической поддержки компании Presidium по электронной почте service@presidium.com.sg или по адресу : Presidium Instruments Pte Ltd Unit 7, 207 Henderson Road Singapore 159550 Attn: Customer Service Executive...
-
Page 69: Порядок Работы, Прибор Presidium Electronic Gem Gauge
1. ПОРЯДОК РАБОТЫ, прибор Presidium Electronic Gem Gauge Установка аккумулятора в прибор Presidium Electronic Gem Gauge 1. Выдвиньте наружу батарейный блок при помощи отвертки или вручную. 2. Установите аккумулятор типа «CR 2032», 3В, в батарейный отсек стороной с положительным значком (+) верх. Задвиньте батарейный блок... -
Page 70: Тестирование, Прибор Presidium Electronic Gem Gauge
2. ТЕСТИРОВАНИЕ, прибор Presidium Electronic Gem Gauge • Возьмите прибор Presidium Electronic Gem Gauge в любую руку. Управляйте ползунком при помощи большого пальца. (Рис. 2.1) Рис. 2.1 • Если необходимо измерить незакрепленные (Рис. 2.2) и камни, потяните ползунок вниз поместите камень на платформу ползунка. - Page 71 • Медленно задвиньте ползунок. На экране дисплея сразу появится показание. Нажмите кнопку «MM/Ct» («мм/карат») (Рис. 2.3) • для преобразования размеров в мм в вес в каратах и наоборот. Рис. 2.3 Если необходимо измерить камни в оправе, вставьте насадку для ювелирных изделий в прибор (Рис. 2.4) и...
- Page 72 Рис. 2.5 Функции Presidium Electronic Gem Gauge Используйте клиновидные держатели при измерении: - Камней, монтированных в притертую закрепку - Внутренней части пустых закрепок - Размера кольца Используйте выступающий щуп при измерении: - Высоты закрепленных камней - Ширины и длины крупных одиночных камней, особенно...
-
Page 73: Тех. Обслуживание, Прибор Presidium Electronic Gem Gauge
Благодарим Вас, что Вы уделили время для прочтения руководства для пользователей. Это позволит Вам лучше понять ценность приобретенного товара. Компания Presidium также рекомендует Вам, чтобы Вы зарегистрировали свою гарантию посредством отсылки регистрационной гарантийной карточки или зарегистрировались в онлайн режиме на веб-сайте... - Page 74 Manual del usuario para el Presidium Electronic Gem Gauge (PEGG)
- Page 75 Contenido (Spanish Version) I. Acerca de este manual pg. 76 II. Acerca del Presidium Electronic Gem Gauge pg. 77 III. AVISO IMPORTANTE pg. 79 1. PRIMEROS PASOS con su Presidium Electronic Gem Gauge pg. 81 2. REALIZAR UNA PRUEBA con su Presidium Electronic Gem Gauge pg.
-
Page 76: Acerca De Este Manual
I. Acerca de este manual Gracias por comprar el Presidium Electronic Gem Gauge (“PEGG” o “medidor”). Este manual está diseñado para ayudarle a instalar su medidor y describe todo lo que necesita saber sobre cómo utilizar el medidor de forma precisa y cuidarlo según sus requisitos. -
Page 77: Acerca Del Presidium Electronic Gem Gauge
II. Acerca del Presidium Electronic Gem Gauge Presidium Electronic Gauge utiliza medición de capacitancia en la cual el circuito integrado de capacitancia proporciona el cambio en capacitancia de dos placas deslizantes en valores valores que se convierten mediante ecuaciones en un microprocesador en dimensión (en milímetros) y peso (en quilates). - Page 78 Contenido del envase: • Presidium Electronic Gem Gauge • Accesorio para joyas de alto engaste • Tabla de estimación de presos de piedras preciosas Presidium • Manual del usuario • Tarjeta de garantía • Funda de plástico Ventana de visualización...
-
Page 79: Aviso Importante
III. AVISO IMPORTANTE • Mantenga seco el medidor. La precipitación y todos los tipos de líquidos o humedad pueden contener minerales que generen corrosión en los circuitos eléctricos. Si su medidor se moja, extraiga la pila y permita que el medidor se seque completamente antes de volver a colocarla. - Page 80 No pinte el medidor. La pintura puede obstruir las piezas móviles y evitar un funcionamiento correcto. Si el medidor no funciona adecuadamente, póngase en contacto con el Servicio de atención al cliente de Presidium al service@presidium.com.sg o: Presidium Instruments Pte Ltd Unit 7, 207 Henderson Road Singapore 159550...
-
Page 81: Primeros Pasos Con Su Presidium Electronic Gem Gauge
1. PRIMEROS PASOS con su Presidium Electronic Gem Gauge Inserción de la batería en el Presidium Electronic Gem Gauge 1. Tire del lateral deslizante de la batería hacia afuera con las uñas o un destornillador. 2. Coloque la batería CR 2032 de 3V con el signo (+) hacia arriba en el compartimiento para la batería y... -
Page 82: Realizar Una Prueba Con Su Presidium Electronic Gem Gauge
2. REALIZAR UNA PRUEBA con su Presidium Electronic Gem Gauge • El Presidium Electronic Gem Gauge debe sostenerse en la palma de la mano. Controle el mecanismo deslizante con el dedo gordo (Fig. 2.1). Fig. 2.1 • Cuando mida piedras sueltas, empuje el mecanismo de deslizamiento (Fig. - Page 83 • Cierre lentamente el mecanismo de deslizamiento. La lectura se mostrará inmediatamente en la ventana. Pulse MM/Ct (Fig. 2.3) para convertir entre dimensión • en milímetros o peso en quilates Fig. 2.3 Al medir piedras montadas, inserte el accesorio para joyas en el medidor (Fig.
- Page 84 Fig. 2.5 Funciones del Presidium Electronic Gem Gauge Utilice las puntas con forma de cuña al realizar la medición de: - Piedras montadas sobre engaste en bisel - Interiores de engastes vacíos - Tamaño de anillo que es medible Utilice la sonda sobresaliente al realizar la medición de:...
-
Page 85: Cuidado Del Presidium Electronic Gem Gauge
3. Cuidado del Presidium Electronic Gem Gauge No deje pilas gastadas dentro del compartimiento para pilas, ya que estas pueden corroerse, tener fugas o dañar el medidor. Las pilas deberán retirarse cuando el medidor se vaya a almacenar durante un período extendido.
Need help?
Do you have a question about the PEGG and is the answer not in the manual?
Questions and answers