Table of Contents
Advertisement
Quick Links
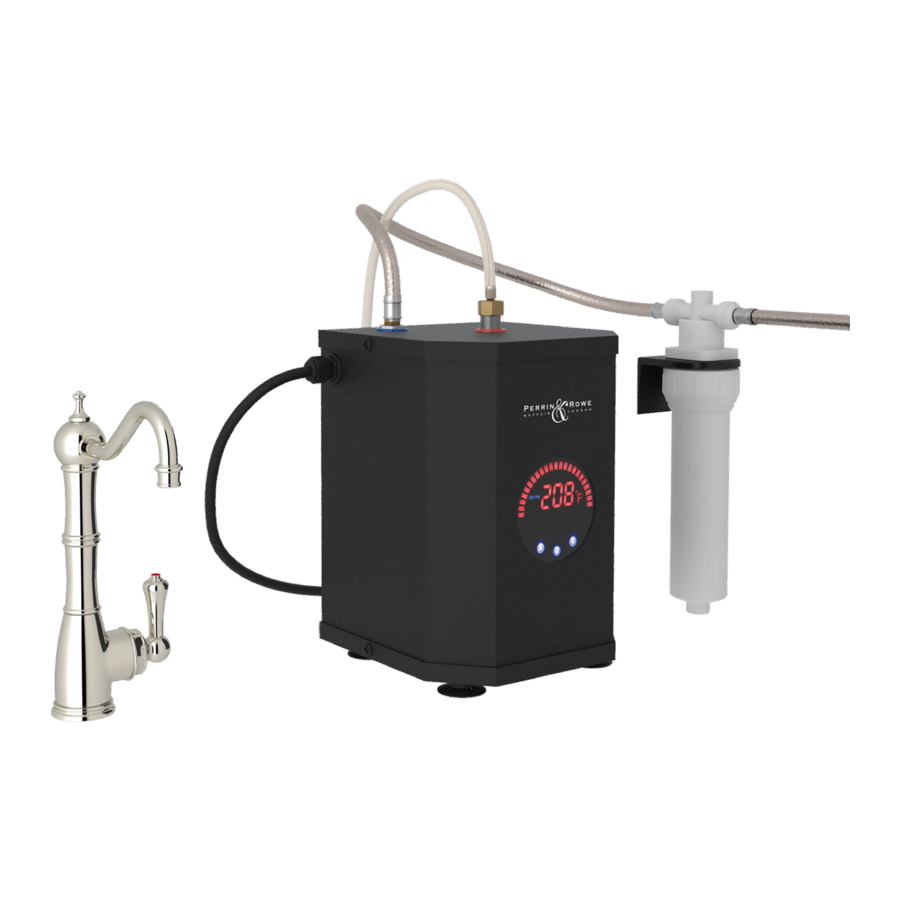
FEATURES
Complete with the following items:
•
— U.1998 Hot water tank
— U.1323LS-2 Hot water faucet
— U.1106 Hot water filter
Instantly provides near boiling flltered water for
•
beverages and food preparation
Unique Anti-Scald lock: innovative push mechanism
•
with exclusive spring-back valve
Long lasting brass construction
•
Swivel spout for ease of filling containers
•
Order U.PRF1 for hot water replacement filter cartridge
•
9"
INLET FROM FAUCET
8"
Consult your local House of Rohl showroom for additional information and specifications. For complete warranty details and a list of showrooms, go to houseofrohl.com
PERRIN & ROWE
AND FILTER KIT
U.KIT1323
* PLEASE ALLOW 12 1/2"
(MINIMUM) TO
ALLOW FOR FILTER
REPLACEMENT.
Ø2"
Ø1 3/4"
EDWARDIAN™ COLUMN SPOUT HOT WATER FAUCET, TANK
®
COLORS/FINISHES
Polished Chrome
•
Polished Nickel
•
Satin Nickel
•
English Bronze
•
English Gold*
•
Satin English Gold*
•
Unlacquered Brass**
•
TO HOT TANK
5 1/2"
Ø1 7/8"
houseofrohl.com
WARRANTY
• 5-year Limited Warranty on Faucet
• 3-year Limited Warranty on Tank
*5-year Limited Warranty
**No Warranty
2 3/8"
Ø1 1/4" HOLE
Advertisement
Table of Contents

Related Manuals for Perrin & Rowe EDWARDIAN U.KIT1323


Summary of Contents for Perrin & Rowe EDWARDIAN U.KIT1323
- Page 1 houseofrohl.com PERRIN & ROWE EDWARDIAN™ COLUMN SPOUT HOT WATER FAUCET, TANK ® AND FILTER KIT U.KIT1323 COLORS/FINISHES WARRANTY FEATURES Complete with the following items: Polished Chrome • 5-year Limited Warranty on Faucet • • — U.1998 Hot water tank Polished Nickel •...
-
Page 2: Important Warning
houseofrohl.com INSTALLATION INSTRUCTIONS id damaging the IMPORTANT WARNING!! uct for all warranty PLEASE ENSURE THAT THE RECOMMENDED HEATER TANK UNIT (U.1998) AND FILTER KIT (U.1106)IS USED. TO AVOID PRESSURISED BOILING WATER AND TO COMPLY WITH US REGULATIONS THIS IS AN OPEN VENTED PRODUCT. - Page 3 houseofrohl.com INSTALLATION INSTRUCTIONS The Mini Hot Dispensers Collection • • Installation & User Guide Congratulations on the purchase of your Perrin and Rowe Kitchen Product. Correctly installed and with sensible care, this product will give you many years of trouble free service. IMPORTANT INFORMATION Before you proceed...
- Page 4 houseofrohl.com INSTALLATION INSTRUCTIONS ct. Correctly installed Connections to the filter (U.1106) and heater tank U.1998: ree service. (See separate filter guide and heater tank installation for further installation instructions) • Mount the filter housing in an accessible location using lumber to install this either screws in the bracket or the adhesive pad, ensuring the AVOID TRAPPING mounting area is clean by using the wipe provided.
- Page 5 houseofrohl.com INSTALLATION INSTRUCTIONS BEFORE USE • Carefully check the installation for leaks. • If further building work is to be carried out in the vicinity, cover the mixer tap to avoid damaging the finish. • Please ensure that the installation complies with the local plumbing codes. ROHL WARRANTY POLICY All products supplied by ROHL carry warranties against manufacturing defects.
- Page 6 houseofrohl.com INSTALLATION INSTRUCTIONS Electronic Instant Hot Water Appliance Installation, Operation and Care Instructions Please read these instructions fully before commencing the installation and operation of the Electronic Instant Hot Water Appliance Consult your local House of Rohl showroom for additional information and specifications. For complete warranty details and a list of showrooms, go to houseofrohl.com...
-
Page 7: What You Need To Know Before You Start
houseofrohl.com INSTALLATION INSTRUCTIONS We are delighted that you have chosen the electronic instant hot water appliance to compli- ment your instant hot water Dispenser. This unique electronic instant hot water appliance will save you time and effort when requiring near boiling water for making tea and coffee and we are sure you will discover many new uses each day. -
Page 8: Components Included
houseofrohl.com INSTALLATION INSTRUCTIONS SAFETY INSTRUCTIONS PLEASE READ BEFORE YOU START The alert symbols displayed on the right point to important safety information to make you aware of potential hazards that can cause serious injury or death. Please pay special attention to the infor- mation following these warning alerts. -
Page 9: Important Safety Instructions
houseofrohl.com INSTALLATION INSTRUCTIONS IMPORTANT SAFETY INSTRUCTIONS PLEASE READ ALL INSTRUCTIONS CAREFULLY When using all electrical appliances, basic safety precautions should always be followed including the information below: To protect against electrical shock, do not place cord, plugs or unit near or in water or other liquids and do not operate the electronic instant hot water appliance controls or power socket with wet hands. -
Page 10: Installation Requirements
houseofrohl.com INSTALLATION INSTRUCTIONS INSTALLATION REQUIREMENTS Electrical Requirements A standard 120v electrical outlet is required under the sink. If possible, use a separate circuit dedicated to your Hot Tank. It is recommended that a separate circuit serving only your electronic instant hot water appliance be provided or use an outlet that can be turned on/off by a switch. -
Page 11: Installation
houseofrohl.com INSTALLATION INSTRUCTIONS PREPERATION FOR INSTALLATION Unlike other household hot water appliances, this electronic instant hot water appliance is Non Pressurised for safety reasons. For this electronic instant hot water appliance, the Instant Hot Dispenser is placed before the electronic instant hot water appliance, creating an “open vent”... - Page 12 houseofrohl.com INSTALLATION INSTRUCTIONS INSTALLATION CONTINUED Step 2 – Connect Dispenser The electronic instant hot water appliance inlet connection is a 3/8” BSP male threaded connector. The outlet connector is a 3/8” BSP male thread connector. Check the connections type and size on the instant hot water Dispenser for the inlet and outlet connections.
- Page 13 houseofrohl.com INSTALLATION INSTRUCTIONS INSTALLATION CONTINUED Step 4 – Electrical Connection Ensure that the installation area is dry and no water has spilled. Connect the plug to the power socket and turn on the power socket at the switch. The electronic instant hot water appliance display panel will now light up with the on / off button illuminated.
- Page 14 houseofrohl.com INSTALLATION INSTRUCTIONS MAINTENANCE AND CARE INSTRUCTIONS CONTINUED Flushing the Instant Hot Water Tank It is recommended that the user flushes through the system completely by drawing off the instant hot water and allowing to reheat and repeating the process for a further 2 or 3 times to ensure the system is fully operational.
-
Page 15: Troubleshooting
houseofrohl.com INSTALLATION INSTRUCTIONS TROUBLE SHOOTING PROBLEM POSSIBLE CAUSE WHAT TO DO Water and Steam is spitting Unit is boiling Turn instant hot water Dis- from the instant hot water penser handle on and release at Dispenser spout least 1 pint of water. Adjust the water temperature on the display to a lower setting. - Page 16 houseofrohl.com INSTALLATION INSTRUCTIONS TROUBLE SHOOTING CONTINUED PROBLEM POSSIBLE CAUSE WHAT TO DO Slow Flow from the spout Water Filter may be The water filter must be clogged from impurities changed every 6 months or this in the inlet mains water will void the guarantee Water does not flow straight The electronic instant hot...
- Page 17 houseofrohl.com INSTALLATION INSTRUCTIONS Customer Services : ROHL LLC 3 Parker Irvine, California 92618-1605 Phone 800-777-9762 www.rohlhome.com Guarantee Void Unless The Water Filter Is Replaced Every 6 Months Issue : PRV114112017 Rohl & Perrin & Rowe are Registered trade marks. Consult your local House of Rohl showroom for additional information and specifications. For complete warranty details and a list of showrooms, go to houseofrohl.com...
- Page 18 houseofrohl.com INSTALLATION INSTRUCTIONS • • Instant Hot Tap • ® • CARTRIDGE REPLACMENT The filter cartridge in your instant hot tap system needs to be changed every six months in order to ensure the system works at its optimum performance. Changing the filter cartridge is a simple matter: 1.
- Page 19 houseofrohl.com INSTALLATION INSTRUCTIONS • Instant Hot Tap • • ® • Filter Installation IT IS VERY IMPORTANT THAT BEFORE YOU START INSTALLING THIS Fixing Mounting Bracket FILTER SYSTEM YOU ENSURE YOU HAVE READ THE INSTALL GUIDES THAT CAME WITH THE TAP AND THE HEATER TANK. First you will need to remove the filter sump.
Need help?
Do you have a question about the EDWARDIAN U.KIT1323 and is the answer not in the manual?
Questions and answers