Advertisement
Quick Links
sauder.com
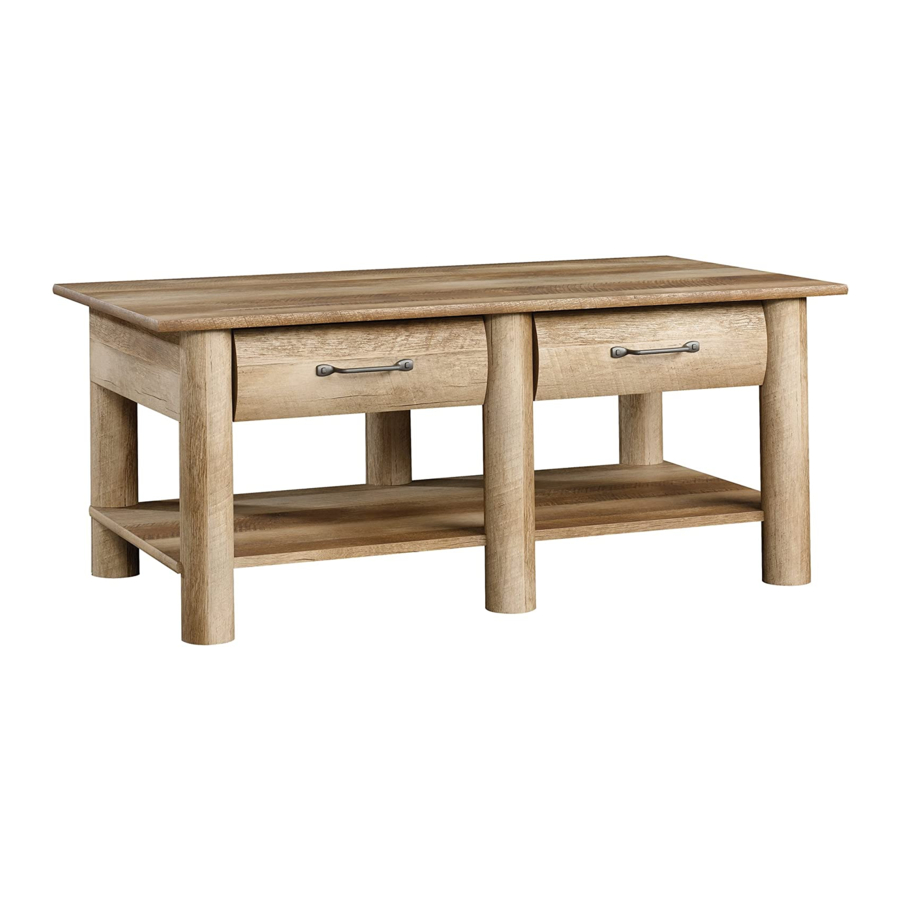
Coff ee Table
Boone Mountain Collection | 416562
Need help? Visit Sauder.com to view video assembly tips or chat with a live rep.
Prefer the phone? Call 1-800-523-3987.
Share your journey!
Guaranteed to hold
other beverages, too.
NOTE: THIS INSTRUCTION
BOOKLET CONTAINS IMPORTANT
SAFETY INFORMATION.
PLEASE READ AND KEEP FOR
FUTURE REFERENCE.
English pg 1-20
Français pg 21-24
Español pg 25-28
Lot # 366987
11/06/14
Purchased: __________________
Be sure to give us a ring before
making any returns. 1-800-523-3987
Advertisement

Related Manuals for Sauder Boone Mountain 416562


Summary of Contents for Sauder Boone Mountain 416562
- Page 1 Boone Mountain Collection | 416562 NOTE: THIS INSTRUCTION BOOKLET CONTAINS IMPORTANT SAFETY INFORMATION. Need help? Visit Sauder.com to view video assembly tips or chat with a live rep. PLEASE READ AND KEEP FOR FUTURE REFERENCE. Prefer the phone? Call 1-800-523-3987.
- Page 2 RIGHT UPRIGHT (2) INNER LEG (6) D258 DRAWER SIDE (4) LEFT UPRIGHT (2) FRONT LEG (3) D264 DRAWER BOX FRONT/BACK (4) TOP (1) SMALL INNER LEG (6) D598 DRAWER BOTTOM (2) SHELF (1) REAR LEG (3) Page 2 416562 www.sauder.com/services...
- Page 3 Now you know Part Identifi cation our ABCs. D264 D258 D598 D264 D258 D264 D258 D598 D264 D258 www.sauder.com/services 416562 Page 3...
- Page 4 3S GOLD 5/16" FLAT HEAD SCREW - 16 BLACK 1-1/8" PAN HEAD SCREW - 6 30S BLACK 1-9/16" FLAT HEAD SCREW - 16 LONG SILVER 1-5/8" MACHINE SCREW - 4 SILVER 1-1/2" MACHINE SCREW - 4 Page 4 416562 www.sauder.com/services...
- Page 5 Look for this icon. It means a Step 1 video assembly tip is available at www.sauder.com/services/tips Assemble your unit on a carpeted fl oor or on the empty å carton to avoid scratching your unit or the fl oor. Scan this QR code or go to this address: http://qr.sauder.com/?ID=1009...
- Page 6 Step 2 Turn sixteen CAM SCREWS (8F) into the LEGS (I and K). å NOTE: Use the exact holes shown. å (16 used) These holes are closer to this edge. These holes are further from this edge. Page 6 416562 www.sauder.com/services...
- Page 7 GOLD 5/16" FLAT HEAD SCREW (8 used in this step) Edges with CAM DOWELS Roller end Roller end Edge with CAM DOWELS Edges with CAM DOWELS Edge without CAM DOWEL Roller end Edge with CAM DOWELS Edge without CAM DOWEL www.sauder.com/services 416562 Page 7...
- Page 8 Step 4 Fasten the SHELF (F) to the REAR LEGS (K). Tighten six å HIDDEN CAMS. i t h f a c S u r D E N H I D These holes must be here. Page 8 416562 www.sauder.com/services...
- Page 9 å the SHELF (F). NOTE: You may need to use your hammer to gently tap the å I-BEAMS in. S u r f a c H I D D E N i t h o Arrow www.sauder.com/services 416562 Page 9...
- Page 10 Fasten the BACK (G) to the REAR LEGS (K) Use six å BLACK 1-1/8" PAN HEAD SCREWS (9S). NOTE: Start each SCREW a few turns before completely å tightening any of them. BLACK 1-1/8" PAN HEAD SCREW (6 used in this step) Edge with CAM DOWELS Page 10 416562 www.sauder.com/services...
- Page 11 Tighten Risk of damage or Arrow injury. HIDDEN CAMS must be completely Arrow Maximum tightened. HIDDEN 210 degrees CAMS that are not completely tightened may loosen, and parts may separate. To Minimum completely tighten: 190 degrees www.sauder.com/services 416562 Page 11...
- Page 12 These holes must be here. H I D i t h o f a c S u r D E N H I D Use the holes closer to the edge. Maximum Arrow 210 degrees Minimum 190 degrees Page 12 416562 www.sauder.com/services...
- Page 13 Rome. This can be built TOP (E). Tighten eleven HIDDEN CAMS. in a day. NOTE: Be sure to support the side of the SHELF (F) that is å not attached. Maximum Arrow 210 degrees Minimum 190 degrees www.sauder.com/services 416562 Page 13...
- Page 14 UPRIGHTS (C and D) and SHELF (F). Tighten ten HIDDEN CAMS. 5-1/4" Bottom of the LEG No CAM SCREW Bottom of the LEG The CAM SCREW is closer to this edge. The CAM SCREW is further from this edge. Page 14 416562 www.sauder.com/services...
- Page 15 Slide an I-BEAM (56M) into each set of LEGS. å NOTE: The arrows in the I-BEAMS should point å toward the SHELF (F). NOTE: You may need to use your hammer to gently tap å the I-BEAMS in. Arrow www.sauder.com/services 416562 Page 15...
- Page 16 Fasten two DRAWER FRONTS (L) and two å PULLS (103K) to the BACK (G). Use four LONG SILVER 1-5/8" MACHINE SCREWS (80S). LONG SILVER 1-5/8" MACHINE SCREW (4 used in this step) Curved edge 103K 103K Flat edge Page 16 416562 www.sauder.com/services...
- Page 17 Slide a DRAWER BOTTOM (D598) into the grooves in the å DRAWER SIDES (D258) and DRAWER BACK (D264). Repeat this step for the other drawer. å BLACK 1-9/16" FLAT HEAD SCREW (8 used in this step) D258 D264 D258 Groove D264 D258 D258 D598 www.sauder.com/services 416562 Page 17...
- Page 18 SILVER 1-1/2" MACHINE SCREWS (95S). Repeat this step for the other drawer. å SILVER 1-1/2" MACHINE SCREW (4 used in this step) D258 D598 D258 D264 BLACK 1-9/16" FLAT HEAD SCREW 103K (8 used in this step) Flat edge Page 18 416562 www.sauder.com/services...
- Page 19 LEFT (45BD) to the DRAWER SIDES (D258). Use four GOLD 5/16" FLAT HEAD SCREWS (3S) through holes #2 and #4. Repeat this step for the other drawer. å Roller end D258 Roller end D258 GOLD 5/16" FLAT HEAD SCREW (8 used in this step) www.sauder.com/services 416562 Page 19...
- Page 20 This completes assembly. Clean with your favorite å furniture polish or a damp cloth. Wipe dry. And to celebrate, why not share your success story? 60 lbs. 30 lbs. 10 lbs. each Page 20 416562 www.sauder.com/services...
- Page 21 élément et conserver le livret pour future référence. EXTRÉMITÉ ..............2 45BA ÉLÉMENT DROITE............2 Pour contacter Sauder MONTANT DROIT ............2 45BB ÉLÉMENT GAUCHE ..........2 en ce qui concerne cet MONTANT GAUCHE ..........2 45BC TIROIR DROIT ..............2 élément, faire référence...
- Page 22 REMARQUE : Il est préférable de donner quelques tours de GAUCHES (D). Utiliser huit VIS TÊTE PLATE 8 mm DORÉES (3S) tournevis à chaque VIS avant de les serrer toutes à bloc. à travers les trous nº 1 et nº 4. Page 22 416562 www.sauder.com/services...
- Page 23 REMARQUE : Veiller à supporter le côté de la TABLETTE (F) qui REMARQUE : Les fl èches sur les PROFILÉS EN I doivent être n’est pas attachée. dirigées vers la TABLETTE (F). REMARQUE : Il faut peut-être utiliser un marteau pour enfoncer délicatement les PROFILÉS EN I. www.sauder.com/services 416562 Page 23...
- Page 24 DU TIROIR (D264). Fixer une POIGNÉE (103K) et le DEVANT DE TIROIR (L) sur l'un des DEVANTS/ARRIÈRES DE CAISSON DU TIROIR (D264). Utiliser deux VIS À MÉTAUX 38 mm ARGENTÉES (95S). Répéter cette étape pour l'autre tiroir. Page 24 416562 www.sauder.com/services...
- Page 25 45BA GABINETE DERECHO ..........2 et conserver le livret pour future référence. PARAL DERECHO ............2 45BB GABINETE IZQUIERDO ..........2 Pour contacter Sauder PARAL IZQUIERDO ............2 45BC CAJÓN DERECHO .............2 en ce qui concerne cet PANEL SUPERIOR ............1 45BD CAJÓN IZQUIERDO ..........2 élément, faire référence...
- Page 26 PARALES IZQUIERDOS (D). Utilice ocho TORNILLOS NOTA: Comience a atornillar cada TORNILLO unas vueltas antes DORADOS DE CABEZA PERDIDA de 8 mm (3S) a través de apretar cualquier tornillo fi rmemente. de los agujeros No. 1 y No. 4. Page 26 416562 www.sauder.com/services...
- Page 27 Deslice un SOPORTE EN I (56M) entre cada juego de PATAS. está unido. NOTA: Las fl echas de los SOPORTES EN I deben apuntar hacia el ESTANTE (F). NOTA: Podría ser necesario utilizar su martillo para golpear suavemente los SOPORTES EN I para que entren. www.sauder.com/services 416562 Page 27...
- Page 28 Fije un TIRADOR (103K) y la CARA DE CAJÓN (L) a uno de los FRENTES / DORSOS DE CAJÓN (D264). Utilice dos TORNILLOS PLATEADOS PARA METAL de 38 mm (95S). Repita este paso para el otro cajón. Page 28 416562 www.sauder.com/services...
- Page 29 Les téléviseurs peuvent être un téléviseur. cet eff et. particulièrement lourds. De plus, le poids et l’emplacement du tube image ont tendance à rendre les téléviseurs instables et enclins à tomber vers l’ a vant. www.sauder.com/services 416562 Page 29...
- Page 30 Además, el peso y la ubicación del tubo de imagen tienden a causar la inestabilidad de televisores y son propensos a inclinarse hacia adelante. Page 30 416562 www.sauder.com/services...
- Page 31 à compter de la date d'achat la première fois et qui sont signalés à Sauder dans les limites de couverture de la contre tout défaut de matériaux ou de fabrication des composantes de mobilier Sauder.
- Page 32 Dear Valued Customer: So, how did it go? Thanks so much for choosing Sauder® furniture. I hope the Set a world record for speed? purchase and assembly process was a positive experience Feeling good about yourself? and you feel good about the furniture you just built. If you Nice.
Need help?
Do you have a question about the Boone Mountain 416562 and is the answer not in the manual?
Questions and answers