Table of Contents
Advertisement
Available languages
Available languages
Quick Links
π
H-1075
20" VACUUM SEALER
SAFETY PRECAUTIONS
To insure safe operation, the operator should be familiar
with the pinch points and a possible burn hazard near
the seal jaw area. Warning stickers mark the location of
these hazards.
Do not wear neckties, jewelry or loose clothing when
operating the sealer.
Do not operate, troubleshoot or maintain the sealer
under the influence of any drug or alcohol.
Always observe all safety warnings and notices on the
machine and in this manual.
DO NOT use flammable or toxic cleaning fluids such as
gasoline, benzene or ether.
CAUTION! Keep hands, fingers and flammable
objects out of the seal jaw area. If a foreign
object is caught between the jaws, turn main
power switch to OFF immediately to prevent
possible burns.
PAGE 1 OF 12
1-800-295-5510
uline.com
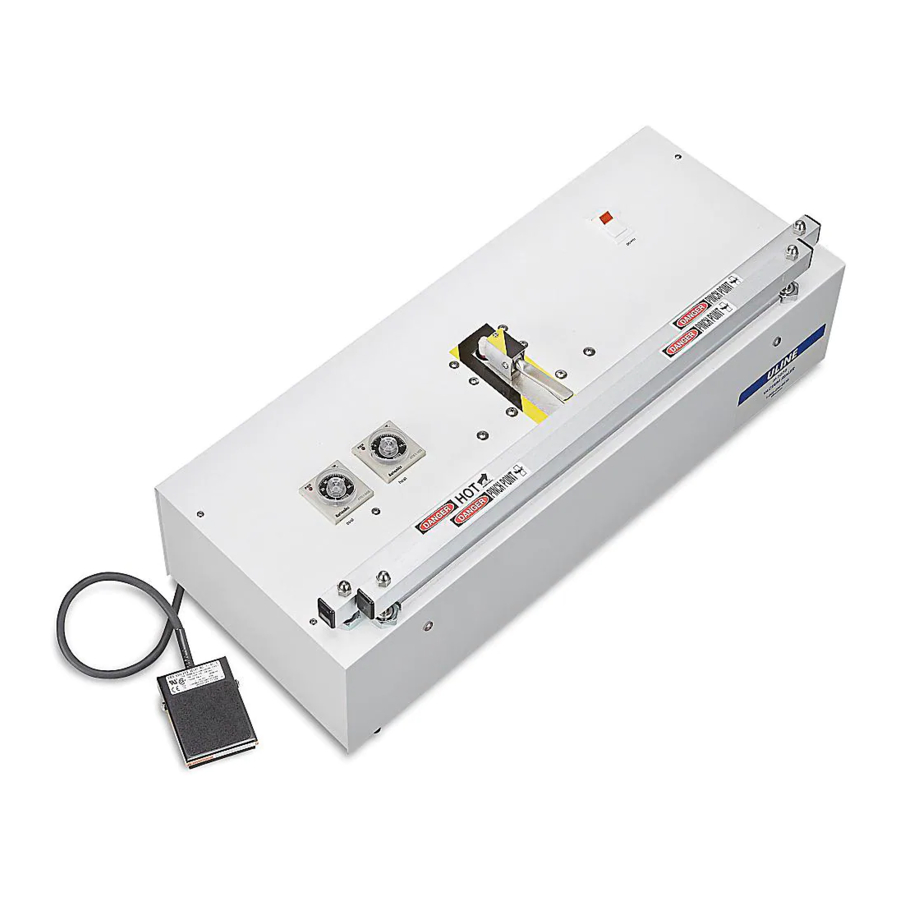
OVERVIEW
CONTROLS
MAIN POWER SWITCH – Turns power off and on.
FOOT SWITCH – Controls vacuum cycle and initiates
seal cycle.
HEAT TIMER – Controls heating time. To increase heat,
turn heat timer knob clockwise. To decrease, turn knob
counterclockwise. Timer is set in seconds – 10 seconds
maximum.
COOL TIMER – Controls amount of time that pressure
bar remains closed for cooling. To increase cool time,
turn cool timer knob clockwise. To decrease, turn knob
counterclockwise. Timer is calibrated in increments of
1/10 minute.
LED INDICATORS ON HEAT/COOL TIMERS:
Pour le français, consulter les pages 9-12.
• UNLIT: Timer is not active.
• SOLID COLOR: Timer is active.
• FLASHING: Timer has timed-out.
Para español, vea páginas 5-8.
0615 IH-1075
Advertisement
Table of Contents

Related Manuals for U-Line H-1075


Summary of Contents for U-Line H-1075
- Page 1 Para español, vea páginas 5-8. Pour le français, consulter les pages 9-12. π H-1075 1-800-295-5510 uline.com 20" VACUUM SEALER OVERVIEW SAFETY PRECAUTIONS CONTROLS To insure safe operation, the operator should be familiar MAIN POWER SWITCH – Turns power off and on.
- Page 2 OPERATING INSTRUCTIONS IMPORTANT! Read this section prior 7. At the end of each shift or production run, turn sealer to operation. OFF by pressing the Main Power Switch. NOTE: Sealing cycle may be aborted at any SETUP time by turning Main Power Switch to "OFF." Place the sealer on a flat working surface.
-
Page 3: Maintenance
MAINTENANCE INSPECTIONS 4. Also check the Pressure Bar for burns and replace if necessary. At the start of each shift or production run, inspect the CLEANING seal jaw area. 1. Check the Teflon tape covering the heating ® CAUTION! Prior to cleaning, always unplug the element for wrinkles, bumps or burn marks. -
Page 4: Troubleshooting
TROUBLESHOOTING OPERATING ISSUE ACTIONS RECOMMENDATIONS No Green Power Light Check Main Power Switch. Is Power Switch in the ON position? Check fuse. Replace fuse if necessary. Is the machine operating? If yes, green lamp is out on the Main Power Switch. Replace Power Switch. - Page 5 π H-1075 800-295-5510 uline.mx SELLADORA AL VACÍO - 20" DESCRIPCIÓN MEDIDAS DE SEGURIDAD CONTROLES Para garantizar un funcionamiento seguro, el operador INTERRUPTOR DE ALIMENTACIÓN PRINCIPAL - Enciende y deberá estar familiarizado con los puntos de riesgo y apaga la electricidad.
- Page 6 FUNCIONAMIENTO ¡IMPORTANTE! Lea esta sección antes de 6. Vigile la zona de sellado constantemente. Si la zona se sobrecalienta, reduzca el tiempo de poner la unidad en funcionamiento. calentamiento y aumente el tiempo de enfriamiento. CONFIGURACIÓN Después de cada turno o ciclo de producción, apague la selladora presionando el interruptor de Coloque la selladora sobre una superficie de trabajo energía principal.
-
Page 7: Mantenimiento
MANTENIMIENTO INSPECCIONES 4. Revise también si hay quemaduras en la barra de presión y reemplácela en caso de ser necesario. Al comienzo de cada turno o ciclo de producción, LIMPIEZA inspeccione la zona de la mordaza de sellado. Revise la cinta de Teflon que cubre la resistencia ®... -
Page 8: Solución De Problemas
SOLUCIÓN DE PROBLEMAS PROBLEMA DE ACCIONES RECOMENDACIONES FUNCIONAMIENTO La luz de encendido verde no Revise el interruptor de energía principal. ¿Está el Interruptor de Energía en la posición de encendido? se enciende Revise el fusible. Reemplace el fusible si es necesario. En caso de que sí, la lámpara verde del Interruptor Principal ¿La máquina funciona? de Energía está... -
Page 9: Vue D'ensemble
π H-1075 1-800-295-5510 uline.com SCELLEUSE SOUS VIDE DE 20 PO VUE D'ENSEMBLE MESURES DE SÉCURITÉ COMMANDES Pour un fonctionnement sécuritaire, l'opérateur doit INTERRUPTEUR D'ALIMENTATION PRINCIPAL – Éteint et connaître les zones présentant un risque de pincement allume l'appareil. et les risques de brûlure près des mâchoires de scellage. -
Page 10: Instructions D'utilisation
INSTRUCTIONS D'UTILISATION 5. Les mâchoires de scellage se relâchent IMPORTANT! Lisez cette section avant ARRÊT d'utiliser l'appareil. automatiquement lorsque les cycles de chauffage et de refroidissement sont terminés. L'appareil MISE EN PLACE revient ensuite aux cycles de chauffage et de refroidissement prédéfinis. -
Page 11: Entretien
ENTRETIEN INSPECTIONS 4. Vérifiez également la barre de pression pour toute brûlure et remplacez-la si nécessaire. Au début de chaque période de travail ou cycle de NETTOYAGE production, inspectez la zone de la mâchoire de scellage. MISE EN GARDE! Avant de procéder au Vérifiez le ruban en Teflon recouvrant l'élément nettoyage, débranchez toujours l'appareil. -
Page 12: Dépannage
DÉPANNAGE PROBLÈME ACTIONS RECOMMANDATIONS Aucun voyant d'alimentation Vérifiez l'interrupteur d'alimentation principal. L'interrupteur principal est-il en position « ON »? vert Vérifiez le fusible. Remplacez le fusible au besoin. L'appareil fonctionne-t-il? Si oui, l'ampoule verte de l'interrupteur d'alimentation principal est défectueuse. Remplacez l'interrupteur d'alimentation.
Need help?
Do you have a question about the H-1075 and is the answer not in the manual?
Questions and answers