
Related Manuals for Zenport INDUSTRIES LEP-858


Summary of Contents for Zenport INDUSTRIES LEP-858
-
Page 1: Zenport Lep-858 Lep-848 Long Reach Epruner
Zenport LEP-858 LEP-848 Long Reach ePruner User’s Manual Note: Please read this manual carefully before using the tool. -
Page 2: Table Of Contents
Contents Zenport LEP-858 LEP-848 Long Reach ePruner ............... 1 Contents ..........................2 Safety Precautions ......................... 4 Symbols Defined ........................4 The Symbols in the Manual ....................4 The Symbols on the Battery ....................4 The Symbols on the Charger ....................5 General Power Tool Safety Instructions .................. - Page 3 Sharpening ..........................16 Pruner Storage ........................16 Checking the Battery Charge Level ..................17 Reading LED Charge Indicator Levels ...................17 Audible Tone Notifications .....................18 Waste Disposal and Environmental Protection ..............19 Spare parts ..........................19 Troubleshooting ........................20 Warranty ..........................21 Warranty Terms .........................21 Warranty Validity Period .....................21 Warranty Validity Period Calculation ..................21 Warranty Range of Coverage .....................22 Not Covered Under Warranty .....................22...
-
Page 4: Safety Precautions
Safety Precautions In order to protect your safety and the safety of others, please read this manual carefully before using your Zenport ePruner for the first time. Keep this manual in a safe place. If ownership of your ePruner changes, please forward this manual and any updates to the new owner. Symbols Defined This section details the basic safety symbols on the machine. -
Page 5: The Symbols On The Charger
The Symbols on the Charger Warning! Use extreme caution to prevent damage or injury. Please read before operating Indoor use only Temperature Protection Class II Device Disposal: Please do not dispose of batteries in your household trash. Please take old or used batteries to your local recycling station General Power Tool Safety Instructions Warning! -
Page 6: Bodily Safety
Never use the cord to carry, pull or unplug the power tool. Keep the cord away • from heat, oil, sharp edges, or moving parts. Damaged or entangled cords increase the risk of electric shock. • Threading the power cord through a picking sleeve will prevent the cord tangling •... -
Page 7: Battery-Operated Tool Precautions
5) Do not allow the power tools to be operated by people unfamiliar with power tools or these instructions. Power tools are dangerous in the hands of untrained users. 6) Power tool maintenance: check that the moving parts are in place or stuck, check the damage of the parts and other conditions that affect the operation of the power tool. -
Page 8: Special Safety Instructions For Battery-Powered Tools
5) This product is designed to trim hedges and branches. Do not use for cutting hard wood and other items. 6) Do not attempt to remove the jammed blade until the power is turned off. 7) Before starting to trim, check the hidden items in the hedge and branches, such as wires, wires, etc. -
Page 9: Intended Use
injury, we recommend users who have implants in the body, consult the doctor and the manufacturer of the implant before using this product. Do not touch the blade while the ePruner is turned on to avoid personal injury. Intended Use This device can be used for trimming hedges, shrubs and branches. -
Page 10: Parts List
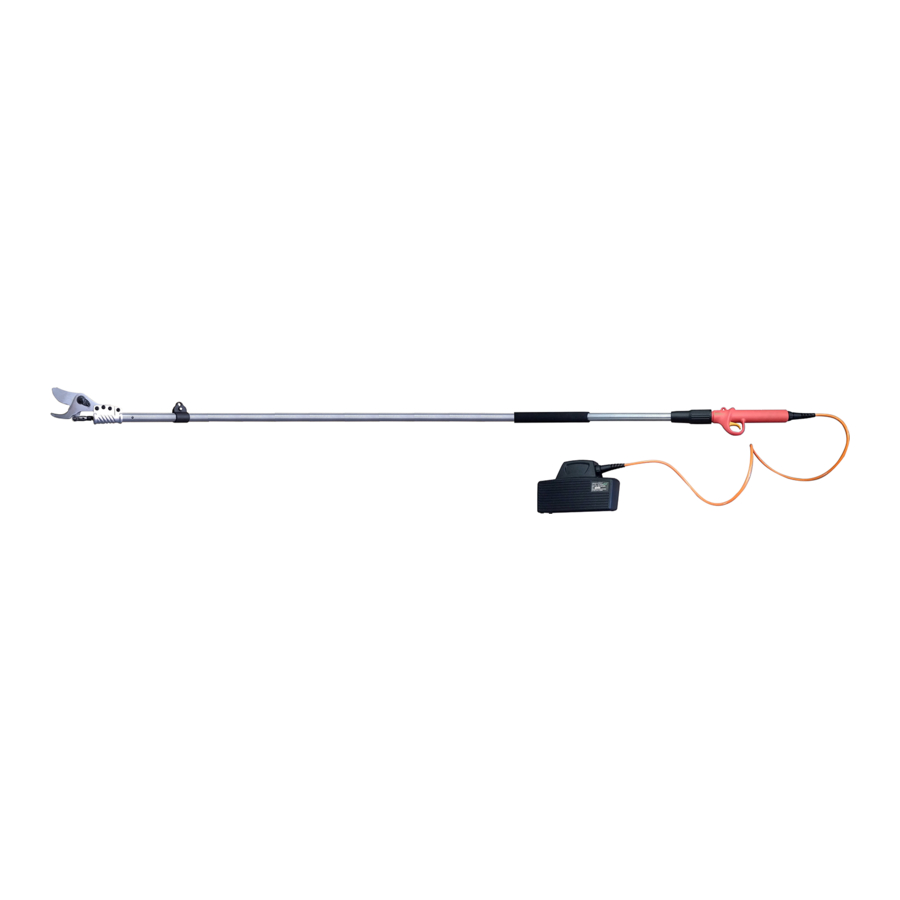
Parts List 1. Moving Cutting Blade 2. Fixed Counter Hook Blade 3. Blade Adjustment Gear-Nut/Clip-Lock and Center-Bolt 4. Rod locking mechanism 5. Trigger 6. Handle Grip 7. Connector for 6-Pin Battery Cable 8. 6-Pin Battery Cable 9. Battery Pack (Contains 20 x 18650 Lithium-Ion Cells) 10. -
Page 11: Technical Parameters
Technical Parameters Pruning Shears Maximum Shear 1.37-inch/35mm (live branches) . 1-inch/25mm ( d ead branches ) Rated Voltage DC 36V Rated Power 300 W Rated Current 10.0 A Current Protection Stop Point ≥35A Protection Level Ⅱ Weight 1.5 Kg Battery (lithium-ion) Capacity 2.0 Ah Voltage... -
Page 12: Working Conditions
Before charging, check that the battery surface is clean and dry. The battery of this product is not fully charged before delivery. Therefore, it must be fully • charged before first use. Charge the battery when the power indicator light is lit. •... -
Page 13: Assembly
4) Disconnect the charger from the power source before closing or opening the connection to the battery/power tool/device. 5) Keep the charger clean and away from humid environments and rain. Do not use the charger outdoors. The ingress of dirt or moisture will increase the risk of electric shock. 6) The charger can only be used to charge the original battery. -
Page 14: Operating Instructions
Operating Instructions When using this device, wear suitable clothing and work gloves. The risk of injury can be reduced by wearing a protective device and ensuring that the device is functioning properly. Make sure the device is functioning properly before each use. The start/off switch and safety switch must be in working use. -
Page 15: Trimming Tips
The blades of the pruner should not be moved around during while cutting, so as not to damage the blades. Never move the pruner side to side when wedged. Trimming Tips When the device is running, please keep your other hand at least 6-inces away from the •... -
Page 16: Sharpening
Sharpening This step is crucial because it determines the trimming quality, life of the blade and battery life. The harder it is to cut, the ePruner uses more power and strains the drivetrain. When you notice the cuts are slower or when you feel more resistance, check the blade •... -
Page 17: Checking The Battery Charge Level
8) In order to ensure the service life of the equipment and to prevent its degradation, it must be stored with enough battery power. 9) When not in use, charge the battery at least once a month. 10) Do not turn on the power switch while storing. Checking the Battery Charge Level To determine your ePruner battery charge level your ePruner is supplied with a simple to read LED readout which features 3 green and 1 red light. -
Page 18: Audible Tone Notifications
Audible Tone Notifications Beeps Interval Frequency Indication Description 1 time 0.3 seconds On and off, change in opening size of the blade. repeating Charging or ePruner is not connected. Please Repeat 10 2 times 0.3 seconds check if the ePruner and the connector plugs at times both ends of the battery are firmly connected. -
Page 19: Waste Disposal And Environmental Protection
Waste Disposal and Environmental Protection Remove the battery from the device and recycle the equipment, batteries, accessories and packaging in an environmentally friendly manner. The device is not to be discarded with common household waste. Metals and plastics in the device can be recycled after they have been filtered. -
Page 20: Troubleshooting
Troubleshooting Problem Possible Reason Corrective Action Battery dead Charge Battery Battery not connected Connect battery ePruner Will Not Start Safety switch cannot be Open by initiating safety initiated on switch On / off switch failure Send to repair service center Loose internal connections Intermittent Operation Send to repair service... -
Page 21: Warranty
Warranty The warranty of this product applies to after the sale is carried out in accordance with the "Regulations on the Responsibility for the Repair, Replacement and Return of Agricultural Machinery Products" jointly formulated by the general Administration of Suality Supervision, Inspection and Quarantine, the State Administration for Industry and Commerce, the Ministry of Agriculture and the Ministry of Industry and Information Technology. -
Page 22: Warranty Range Of Coverage
Warranty Range of Coverage 1) The product is used correctly according to the product specification during the warranty validity period. There are formal purchase invoices and warranty vouchers. The entire machine and main components are covered under the warranty. 2) For products that have been purchased and are still in the warranty validity period, users can continue to enjoy the warranty service with the original purchase invoice of the product and the warranty certificate.
Need help?
Do you have a question about the LEP-858 and is the answer not in the manual?
Questions and answers