Table of Contents
Advertisement
Advertisement
Table of Contents

Related Manuals for Lumitec Poco 3


Summary of Contents for Lumitec Poco 3
- Page 1 Specifications Installation Interface Setup Quick Start Updates TroubleShooting NAVIGATION MENU Poco 3 User Guide This document covers the Poco 3 module only. For information on all previous versions of Poco refer to the Poco Legacy document on our website. lumiteclighting.com...
-
Page 2: Table Of Contents
Specifications Installation Interface Setup Quick Start Updates TroubleShooting NAVIGATION MENU Table of Contents Quick Start: Quick Start Guide Specifications: Supported MFD Models Features Installation: Mounting Quick Tips System Configurations (Wiring Diagrams) Interface: Overview Widgets Scene Select Setup: Interface Setup Clans Switches Layout Automation... -
Page 3: Quick Start
B. For an MFD connect the network cable to a compatible display. For a list of compatible displays visit: http://lumiteclighting.com/poco-quick-start C. For mobile devices connect using the Lumitec Poco App available on Apple or Google Play stores. You will be prompted to connect to Poco on launching the app. - Page 4 Specifications Installation Interface Setup Quick Start Updates TroubleShooting NAVIGATION MENU QUICK START continued... Poco Quick Start Guide 4. Create Switches (configuration menu). Assign a default intensity and color to each switch. Example Simple Switch: Name: Aft Hardtop Target: LG_aft_hardtop Intensity: 50% Color: Red You can create lighting scenes by assigning multiple light groups to more than one target.
-
Page 5: Specifications
Specifications Installation Interface Setup Quick Start Updates TroubleShooting NAVIGATION MENU SPECIFICATIONS Supported MFD Models MANUFACTURE MODEL CONNECTION TYPE ADAPTER CABLES Garmin 8400, 8600, GPSAMAP 7-9X3, GPSMAP 8X10-24 WiFi/Ethernet Not Required Simrad NSO EVO3/S, NSO EVO2, NSS EVO3, IDS, GO Ethernet Only Required (Check MFD Manual) B&G Zeus3/S Glass Helm, Zeus3/S, Vulcan... -
Page 6: Features
40 Amps. Load on channel must be only one of the following: (Lumitec PLI enabled lighting/lighting capable of dimming (through PWM) / device requiring a standard ON-OFF circuit). (14 AWG 300V 16 inch long cable). - Page 7 Specifications Installation Interface Setup Quick Start Updates TroubleShooting NAVIGATION MENU SPECIFICATIONS continued... Features RESET MODES USER ACTION FUNCTION FEEDBACK Short-press while Poco is running. Reboot poco (no change to settings). No indication while holding down button. Must release before 5s. After release button, status LED turns solid ‘aqua’...
-
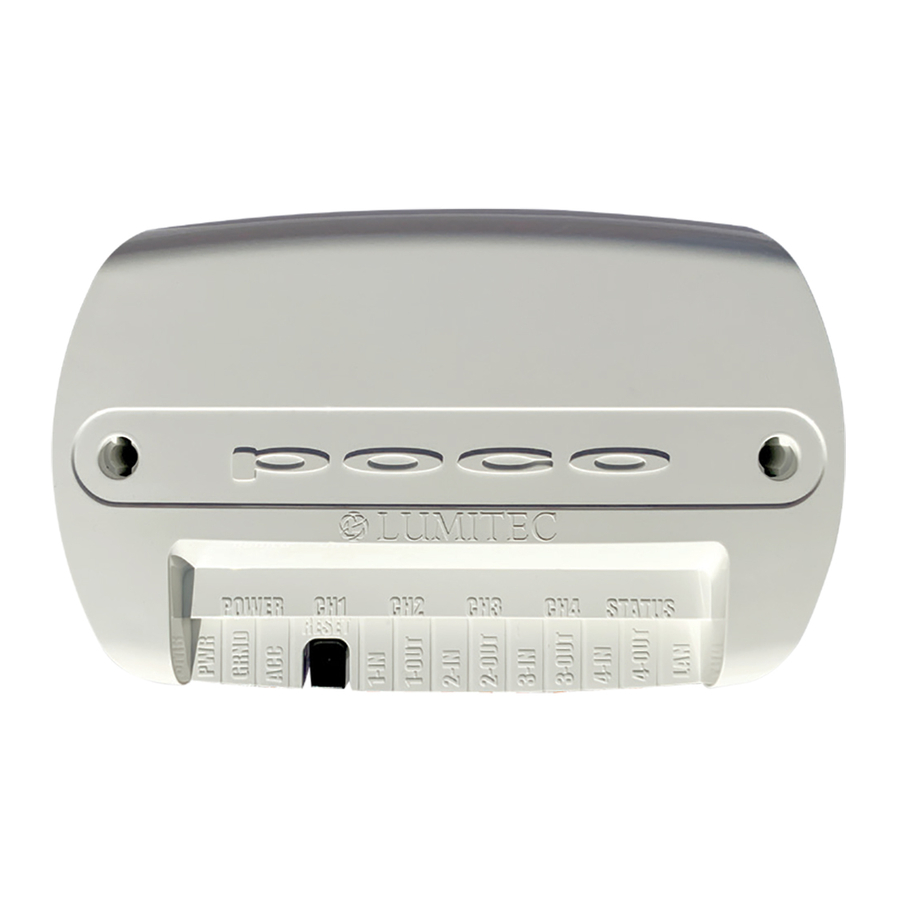
Page 8: Installation
Poco must be powered with a 10-30 VDC supply independently fused with a 3 Amp ATC blade fuse or equivalent (Not Provided). ACC - Poco Accessorty Bus Blue Wire Connect to blue accessory bus wire to multiple expansion moudles from Lumitec. Works with up to 4 Pico S8 Modules for expansion. INPUTS Notice: POCO is designed to switch DC voltages between 10 and 30 volts. -
Page 9: Quick Tips
“virtual circuits” where lighting on each PLI channel can be addressed with commands specific to each clan of lights. For example, SeaBlazeX2 or Typhoon lights can be attached to the same channel as Lumitec Mirage lighting and Caprera2 lighting as well as other clans of lights. -
Page 10: System Configurations (Wiring Diagrams)
Note: The Pico S8 module provides the easiest way to connect mechanical switches to your Poco 3 device. See Fig. 4 for wiring diagram. Fig. 1: Use of a single channel to control multiple light types within the lighting system Fig. - Page 11 Updates TroubleShooting NAVIGATION MENU INSTALLATION continued... Fig. 4: Use of a Lumitec Pico S8 module to allow POCO to read the state of mechanical switches and send corresponding digital commands to lights. SWITCH Fig. 7 PANEL 10 A 10 to 30 VDC Fig.
-
Page 12: Interface
Specifications Installation Interface Setup Quick Start Updates TroubleShooting NAVIGATION MENU INTERFACE Latching or momentary Omnillume switch with the User Interface Components ON/OFF switch with no ability to be modified from ability to modify. default intensity and color. Switch Panel: 1. Active switch page. 2. -
Page 13: Widgets
Specifications Installation Interface Setup Quick Start Updates TroubleShooting NAVIGATION MENU INTERFACE continued... Latching or momentary Omnillume switch with the Omnillume Widget ON/OFF switch with no ability to be modified from ability to modify. default intensity and color. Omnillume Widget: 1.Switch modification popup that appears when an Omnillume switch is pressed and held for greater than 1 second. 2. - Page 14 Specifications Installation Interface Setup Quick Start Updates TroubleShooting NAVIGATION MENU INTERFACE continued... Latching or momentary Omnillume switch with the Switch Folder Widget ON/OFF switch with no ability to be modified from ability to modify. default intensity and color. Switch Folder Widget: - Switch Folder popup appears when a Switch Folder button is pressed and held.
-
Page 15: Scene Select
Specifications Installation Interface Setup Quick Start Updates TroubleShooting NAVIGATION MENU INTERFACE continued... Latching or momentary Omnillume switch with the Scene Select ON/OFF switch with no ability to be modified from ability to modify. default intensity and color. Scene Select: 1. The Scene Select feature allows you to group multiple scenes within one switch. - Scene Select button contains multiple scenes. -
Page 16: Setup
Specifications Installation Interface Setup Quick Start Updates TroubleShooting NAVIGATION MENU SETUP Default Maintenance pin is set to “0000”. This can be changed but must be done by manually editing the configuration file. See exporting and importing User Interface SETUP configuration below. The Poco setup menu is accessible through the gear wheel icon in the upper right of the user interface window. - Page 17 Specifications Installation Interface Setup Quick Start Updates TroubleShooting NAVIGATION MENU SETUP continued... User Interface SETUP Add/Edit a Light Group: 1. User Configurable “Light Group” Name, Using a prefix like “LG” may help with future setup. 2. Hardware output channel on Poco. Gives the ability to send a command to all channels or each individual channel (1-4). 3.
-
Page 18: Clans
Specifications Installation Interface Setup Quick Start Updates TroubleShooting NAVIGATION MENU SETUP continued... Clans CLAN CLAN NAME FAMILY OF LIGHTS All PLI Lights All Lights that are PLI Enabled. Down Lights Mirage, Orbit, Shadow (1- color, 2-color, 4 color, Spectrum). Spreader Utility Lights Spreader Lights and Utility Lights (Capri, Caprera, Nevis, Ibiza, Perimeter Light) . -
Page 19: Switches
Specifications Installation Interface Setup Quick Start Updates TroubleShooting NAVIGATION MENU SETUP continued... Switches List of configured Switches 1. Second step in system configuration is to define the “Switches” and Scenes. 2. Select a row to edit or select “+ Add New Item” to create a new “Switch”. Switches continued... - Page 20 Specifications Installation Interface Setup Quick Start Updates TroubleShooting NAVIGATION MENU SETUP continued... Switches Add/Edit a Switch: 1. User Configurable “Switch” Name. 2. Type of Switch to define button action. See switch types in the list below. 3. Push to test commands in list, push again to issue off command to targets in list. 4.
- Page 21 Specifications Installation Interface Setup Quick Start Updates TroubleShooting NAVIGATION MENU SETUP continued... Scene Select Scene Select: The Scene Select switch type makes creating scenes easier. - Set other Virtual Switches as the scene of a Scene Select switch - Only one scene allowed “ON” at a time - Use a single button (on screen or physical switch) to index through scenes...
- Page 22 Omni-Llume button will be white and blue because the switch picks the least common color that the lights are capable of producing. In some instances, it may be desirable to define a simple PWM single color light such as Lumitec’s accent lights as an RGBW Spectrum light so that if it is attached to a switch that creates a lighting scene, the lighting scene color may be adjusted via an Omnillume switch.
-
Page 23: Layout
Specifications Installation Interface Setup Quick Start Updates TroubleShooting NAVIGATION MENU SETUP continued... Layout Add/Edit a Layout: 1. Layout configuration. 2. Switch page name (Press and hold to edit or delete name). 3. Add new switch page. 4. Press and hold to edit or delete switch. 5. -
Page 24: Automation
Specifications Installation Interface Setup Quick Start Updates TroubleShooting NAVIGATION MENU SETUP continued... Automation Startup Switch: 1. Defines a switch to be automatically activated when Poco is powered-on. This could be used to turn on some amount of lighting at power up like courtesy lighting or could be used to turn on all 4 channels as an ON/OFF switch when wired in series with SPST switches. - Page 25 Specifications Installation Interface Setup Quick Start Updates TroubleShooting NAVIGATION MENU SETUP continued... Automation The Pico S8 is an add-on expansion module designed be integrated into your Poco digital lighting control system to will add additional functionally, and allow you to assign Poco virtual switch command to up to 32 physical switches. Adding Pico S8 Module: 2.
- Page 26 Specifications Installation Interface Setup Quick Start Updates TroubleShooting NAVIGATION MENU SETUP continued... Automation Edit Interface Module Dialog Box: 4. To configure a Pico-S8 slot in the “Edit Interface Module dialog box” toggle “Enable Slot” switch to ON position. 5. Open the “Select Module Instance” dropdown menu and select the entry “Discover Modules” to begin a search for all Pico S8 modules connected to the Poco Accessory Bus (blue wire).
- Page 27 Specifications Installation Interface Setup Quick Start Updates TroubleShooting NAVIGATION MENU SETUP continued... Automation Creating Actions: An “Action” assigns one or more of the wires that are connected to physical switches to an exsisting Poco virtual switch. An Action can also select the single Blue Wire on poco if no Pico S8 modules are used. 1.
-
Page 28: Maintenance
4. Export current config file. This is a good way to backup and/or copy this configuration to another unit. You will recieve a pop up menu to confirm download, select “OK” to start download. 5. Upgrade Poco Firmware using a xxx_ota.bin file supplied by Lumitec. -
Page 29: Network Setup
Specifications Installation Interface Setup Quick Start Updates TroubleShooting NAVIGATION MENU NETWORK Network Setup As a WiFi access point The Poco by default serves as a WiFi access point (AP). This connection is good for updating firmware and importing and exporting con- figuration file as well as testing and configuration. -
Page 30: Updates
Firmware update must be completed with a WiFi or Ethernet connection from a device that contains the firmware file. Contact Lumitec for latest firmware file or download form Lumitec website. The device used for update can be a computer, tablet or phone with Chrome, Firefox or Safari browsers. - Page 31 Specifications Installation Interface Setup Quick Start Updates TroubleShooting NAVIGATION MENU UPDATES continued... Firmware Update Page Select “Choose File” (#1) and navigate to the location containing the new firmware file. The file naming format will be similar to “poco- esp32-ota_xxx-xxxx.bin”. The Poco contains 3 file system partitions. The first is the original file shipped with Poco under the “factory” partition.
-
Page 32: Troubleshooting
Specifications Installation Interface Setup Quick Start Updates TroubleShooting NAVIGATION MENU TROUBLESHOOTING Troubleshooting Poco Digital Lighting Controller PROBLEM CAUSE SOLUTION No lights on Poco. Poco is not receiving required power. - Check power for 10-30 VDC. - Check fuse is not blown. - Check GRND wire. - Page 33 Specifications Installation Interface Setup Quick Start Updates TroubleShooting NAVIGATION MENU TROUBLESHOOTING continued... Troubleshooting Pico S8 Module PROBLEM CAUSE SOLUTION Solid Green status light. Pico S8 is powered and enabled within No action needed. Poco. No Indicator Light on S8. Check 10-30 VDC is supplied to red wire - Check power for 10-30 VDC.
-
Page 34: Resources
Specifications Installation Interface Setup Quick Start Updates TroubleShooting NAVIGATION MENU RESOURCES Additional Resources Watch Training Videos > Download Poco App For Apple > Download Poco App For Android > Vist Lumitec Website > lumiteclighting.com... -
Page 35: Glossary
Multifunction Display. Typically a touch screen with graphical user interface connected to various vessel sensors and hardware. Power Line Instruction - Digital data sent from POCO over power wires to Lumitec lights to control color, intensity and displayed patterns. Pulse Width Modulation - Used to control the intensity of Non-PLI enabled lighting through the control of the power duty cycle.
Need help?
Do you have a question about the Poco 3 and is the answer not in the manual?
Questions and answers