Biogents BG-CO2 Timer Manual
Hide thumbs
Also See for BG-CO2 Timer:
- Manual (60 pages) ,
- Instruction manual (2 pages) ,
- Instructions for use manual (76 pages)
Table of Contents
Advertisement
Available languages
Available languages
Quick Links
Advertisement
Chapters
Table of Contents

Related Manuals for Biogents BG-CO2 Timer


Summary of Contents for Biogents BG-CO2 Timer
- Page 1 Status: December 2020...
- Page 2 Table of contents Introduction ......3 Product components ....4 Battery .
-
Page 3: Introduction
Introduction The daily activity patterns of a mosquito can differ depending on the spe- cies. In order to save CO , you can minimize the release of CO to two tar- geted release times using the BG-CO timer. Observe your local mosquito activity and then choose the appropriate start and stop times to correspond to when they are active. -
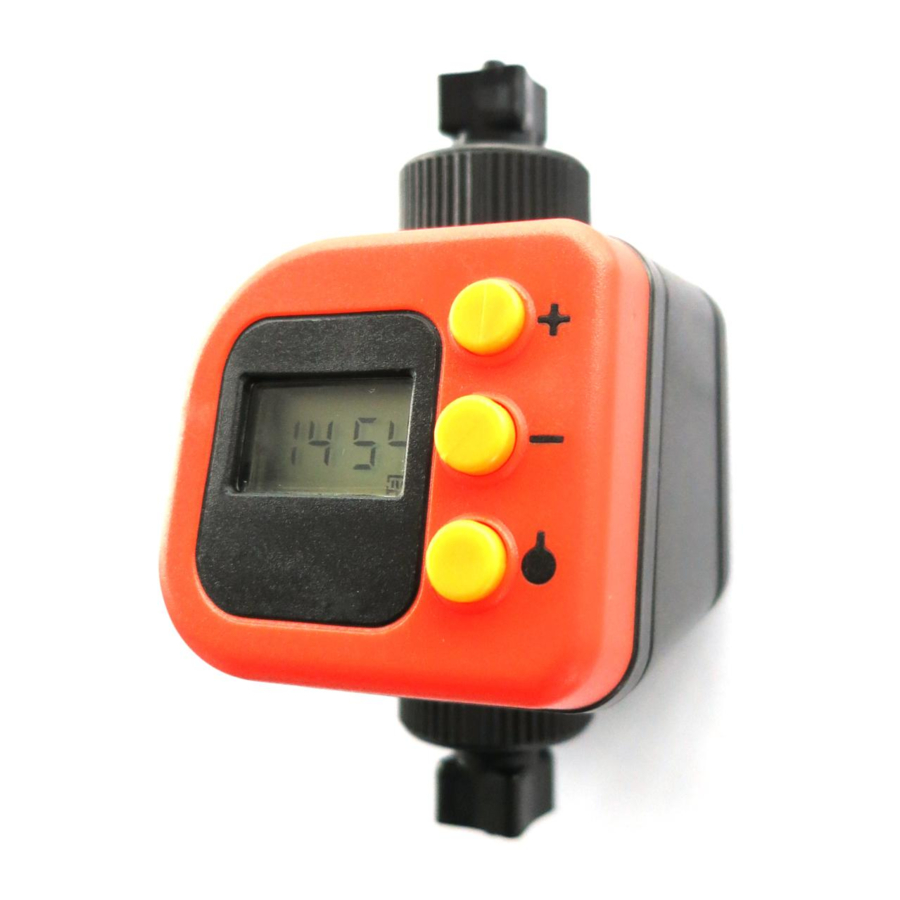
Page 4: Product Components
Product components The BG-CO timer consists of a body with a display, buttons to set up the release times, and two connections to the CO tubes. Connection to CO tube to CO source Buttons to set up release times Display Connection to CO tube to trap... -
Page 5: Battery
Battery The 9 V battery to run the timer is not included in the contents. It has to be inserted in the back of the body. To run the timer, remove the screws from the back of the body. Insert a 9 V battery and connect the connection plate to the battery. - Page 6 Opened back of the body Battery status 9 V battery Connection plate...
-
Page 7: Functions
Functions Button to increase time / switch on CO permanently Button to decrease time / switch off CO permanently Button to switch on display/ Set-up of time frames of CO release Down arrow indicates CO emission "A" indicates that the timer function is switched off... - Page 8 Switch on / Set current time short Switch on the display by pressing button 3. To set the current time, press button 3 for two seconds. 2 sec. To adjust the current time, use button 1 to increase and but- ton 2 to decrease the time.
- Page 9 Increase time Start time 1 Decrease time Start set-up of start time 1 After setting up the current time, press button 3. "S1" (Start time 1) appears in the display. Set the first start time with buttons 1 and 2 as described previously.
- Page 10 Increase time End time 1 Decrease time Start set-up of end time 1 After setting up the first start time, press button 3. "E1" (End time 1) appears in the display. Set the end time with buttons 1 and 2 as described previ- ously.
- Page 11 Start and end time 2 To set up a second start and end time, press button 3 after setting up the first end time. "S2" (Start time 2) appears in the display. Set the time with buttons 1 and 2 as described previously. To set the second end time, press button 3.
- Page 12 Switch on Option 1: permanently Permanent CO To run the CO continuously and not use the timer, change the mode to "Always CO ". Press button 1 for two seconds. 2 sec. With an audible click "A" will appear in the display along with a down arrow showing that CO is now emitted cont- inuously.
- Page 13 Option 2: Switch off CO Switch off CO permanently To switch off the CO permanently, press button 2 for two 2 sec. seconds. An "A" without a down arrow will appear in the dis- play to show that the CO flow is switched off permanently.
- Page 14 Attaching to CO tubes Install the BG-CO timer between the CO source and the mosquito trap. The tube coming from the CO source should be attached to connection Attach the tube to the trap to connection...
- Page 15 source Piece of tube (ca. 10 cm) Mosquito trap that can be cut off of the existing black CO tube Black CO tube...
-
Page 16: Table Of Contents
Inhaltsverzeichnis Einführung ......17 Produktkomponenten ....18 Batterie . -
Page 17: Einführung
Einführung Die Mückenaktivitäten sind zu verschiedenen Tageszeiten unterschiedlich hoch. Um CO zu sparen, können Sie die CO -Abgabe mit Hilfe des BG-CO Timers auf zwei verschiedene Zeitfenster pro Tag beschränken. Beobachten Sie die Mückenaktivitäten und wählen Sie dann für die Hauptzeiten zwei geeignete Zeitfenster aus. -
Page 18: Produktkomponenten
Produktkomponenten Der BG-CO -Timer besteht aus einem Korpus mit Display, Knöpfen zum Ein- stellen der Zeitfenster und zwei Anschlüssen an CO -Schläuche. Anschluss an CO -Schlauch zur CO -Quelle Knöpfe zum Einstellen der Zeitfenster Display Anschluss an CO -Schlauch zur Mückenfalle... -
Page 19: Batterie
Batterie Um den Timer zu betreiben, benötigen Sie eine 9-V-Blockbatterie, die im Lieferumfang nicht enthalten ist. Um den Timer anzuschalten, entfernen Sie die Rückseite des Timers, indem Sie die Schrauben lösen. Legen Sie eine 9-V-Blockbatterie ein und verbinden sie dann die Batterie mit der Batteriever- bindungsplatte. - Page 20 Geöffnete Rückseite des Timers Batteriestatus 9-V-Blockbatterie Batterieverbindungsplatte...
-
Page 21: Funktionen
Funktionen Knopf zum Erhöhen der Uhrzeit / für dauerhafte CO -Abgabe Knopf zum Verringern der Uhrzeit / dauerhaft CO ausschalten Knopf zum Anschalten des Displays/ Einstellen der Zeitfenster Pfeil nach unten zeigt an, dass CO abgegeben wird „A“ zeigt an, dass die Timer-Funktion ausgeschaltet ist... - Page 22 Display anschalten / Aktuelle Uhrzeit einstellen Schalten Sie das Display ein, indem Sie Knopf 3 drücken. kurz Um die aktuelle Uhrzeit einzustellen, drücken Sie 2 Sekun- 2 Sek. den lang Knopf 3. Passen Sie die Zeit mit Knopf 1 und 2 an, wobei Knopf 1 die Uhrzeit erhöht und Knopf 2 die Uhrzeit verringert.
- Page 23 Erhöhen der Uhrzeit Startzeit 1 Verringern der Uhrzeit Einstellen der Startzeit 1 Nach dem Einstellen der aktuellen Uhrzeit drücken Sie Knopf 3. Ein „S1“ für „Startzeit 1“ erscheint im Display. Passen Sie die Startzeit 1 mit den Knöpfen 1 und 2 wie vor- her beschrieben an.
- Page 24 Erhöhen der Uhrzeit Endzeit 1 Verringern der Uhrzeit Einstellen der Endzeit 1 Nach dem Einstellen der ersten Startzeit drücken Sie Knopf 3. Ein „E1“ für „Endzeit 1“ erscheint im Display. Passen Sie die Uhrzeit wie oben beschrieben mit den Knöp- fen 1 und 2 an.
- Page 25 Start- und Endzeit 2 Um eine zweite Start- und Endzeit einzustellen, drücken Sie, nachdem Sie die Endzeit 1 festgesetzt haben, Knopf 3. Ein „S2“ für Startzeit 2 erscheint im Display. Stellen Sie die Uhrzeit wie zuvor beschrieben ein. Legen Sie die zweite Endzeit fest, indem Sie Knopf 3 drücken und dann die Uhrzeit einstellen.
- Page 26 Dauerhafte CO -Abgabe Option 1: Dauerhaft CO Um die dauerhafte CO -Abgabe einzustellen und die Timer- funktion auszuschalten, drücken Sie Knopf 1 für 2 Sekun- 2 Sek. den. Mit einem hörbaren „Klick“ erscheinen ein „A“ und ein Pfeil im Display, die die dauerhafte Abgabe von CO anzei- gen.
- Page 27 Option 2: Ausschalten der CO Ausschalten der Abgabe Abgabe Um die CO -Abgabe dauerhaft auszuschalten, drücken Sie 2 Sek. Knopf 2 für 2 Sekunden. Ein „A“ ohne Pfeil im Display zeigt an, dass das CO dauerhaft ausgeschaltet wurde. Um zurück in den Timermodus zu schalten, drücken Sie kurz nochmals Knopf 2.
-
Page 28: Anschließen An Co 2 -Schläuche
Anschließen an CO -Schläuche Installieren Sie den BG-CO -Timer zwischen der CO -Quelle und der Mückenfalle mit CO -Schläuchen. Der von der CO -Quelle kommende Schlauch wird an den Anschluss angebracht. Der zur Mückenfalle füh- rende CO -Schlauch wird an Anschluss angebracht. - Page 29 -Quelle Mückenfalle Schlauchstück (ca. 10 cm), das Sie von dem vorhande- nen schwarzen CO -Schlauch abschneiden können Schwarzer CO -Schlauch...
- Page 30 Table des matières Introduction ........31 Composition du produit ..... . . 32 Pile .
-
Page 31: Introduction
Introduction L‘activité des moustiques varie durant journée. Afin d‘économiser du CO vous pouvez, grâce au BG-CO -Timer, limiter le débit de CO à deux plages horaires par jour. Observez l‘activité des moustiques et choisissez jusqu‘à deux plages horaires correspondant aux pics d‘activités des moustiques. Le BG-CO -Timer se fixe entre la source de CO et le piège à... -
Page 32: Composition Du Produit
Composition du produit Le BG-CO Timer est composé d’un boîtier avec écran, de touches de réglage des horaires d’émission de CO et de deux embouts de raccordement pour les conduits de CO Raccordement à la source de CO Touches de réglage des plages horaires Écran d’affichage Raccordement au piège à... -
Page 33: Pile
Pile Pour mettre l’appareil en service, dévisser le cache au dos de l’appareil, in- sérer une pile 9V carrée (non fournie avec l’appareil) et la brancher avec le raccord. Veillez à brancher la pile correctement: pôle hexagonal sur pôle ar- rondi (une mauvaise connexion, même de courte durée peut endommager l’appareil). - Page 34 Face arrière ouverte du boîtier Etat de la pile Pile plate 9V Raccord de pile...
-
Page 35: Fonctions
Fonctions Touche pour avancer l’heure / mode d’émission continue de CO Touche pour reculer l’heure / stopper l’émission de CO Touche de mise en marche de l’écran / Réglage des plages horaires La flèche vers le bas indique une émission de CO "A"... - Page 36 Allumage de l’écran / Réglage de l’heure Allumer l’écran en appuyant sur la touche 3. bref Pour le réglage de l’heure actuelle, rester appuyer 2 secon- 2 sec. des sur la touche 3. Ajuster l’heure avec la touche 1 pour l’avancer et 2 pour la reculer.
- Page 37 Avancer l’heure Heure de Reculer l’heure début 1 Réglage de l’horaire de début 1 Après avoir régler l’heure, appuyer sur la touche 3. "S1" (Start time 1) s’affiche à l’écran. Ajuster l’horaire de départ avec les touches 1 et 2 comme décrit précédemment.
- Page 38 Avancer l’heure Heure de fin 1 Reculer l’heure Réglage de l’ho- raire de fin 1 Après avoir régler l’heure, appuyer sur la touche 3. "E1" (End time 1) s’affiche à l’écran. Ajuster l’heure de fin avec les touches 1 et 2 comme décrit précédemment.
- Page 39 Heure de début et de fin 2 Afin de programmer une seconde plage horaire, appuyer sur la touche 3 (après avoir programmer la première plage horaire). "S2" apparait sur l’écran. Ajuster les horaires souhaités comme décrit précédemment. Régler la seconde heure de fin (E2) en appuyant sur la touche 3. "E2" apparait sur l’écran.
- Page 40 Emission continue Option 1: de CO2 en continu Pour pouvoir émettre du CO en continu, appuyer sur la touche 1 pendant 2 secondes jusqu’à entendre un bip. Sur 2 sec. l’écran s’affiche un "A" et une flèche vers le bas qui indique l’émission de CO Pour arrêter l’émission continue, appuyer de nouveau sur la bref...
- Page 41 Option 2: Arrêter durable- Couper l’émission ment l’émission de CO de CO Pour couper l’émission de CO de façon durable, appuyer 2 sec. sur la touche 2 pendant 2 secondes. Sur l’écran s’affiche un "A" (sans flèche), qui indique que l’émission de CO interrompue.
-
Page 42: Raccordement Aux Conduits De Co
Raccordement aux conduits de CO Installer le BG-CO Timer entre la source de CO et le piège à moustiques. Le conduit provenant de la source de CO doit se brancher avec la sortie Le conduit de CO menant au piège doit se brancher sur la sortie... - Page 43 Source de CO Conduit de CO (environ 10 cm de long) que vous Piège à moustiques obtenez en coupant un morceau du conduit de livré avec le piège. Conduit de CO noir...
- Page 44 Indice Introduzione ........45 Componenti del prodotto ..... . 46 Batteria .
- Page 45 Introduzione Il Biogents CO Timer consente di programmare l’erogazione della CO orari da Lei prefissi. Si possono impostare due tempi di inizio e di fine al giorno. Il BG-CO Timer viene montato fra la fonte di CO e la trappola, alla...
- Page 46 Componenti del prodotto Il Biogents CO Timer consiste di un corpo di plastica con display, pulsanti per programmare i tempi di erogazione della CO e due attacchi per tubi di raccordo. Attacco per il tubo di raccordo che porta alla fonte di CO...
- Page 47 Batteria Per far funzionare il Timer occorre una batteria da 9V. La batteria non è in- clusa nella confezione. Per attivare il Timer, la batteria va collegata. Quindi svitare il retro del Timer. Inserire una batteria da 9V e fissarla sul pezzo di raccordo.
- Page 48 Il retro del Timer aperto Stato di carica della batteria Batteria da 9V Pezzo di raccordo...
- Page 49 Funzioni Pulsante per aumentare il tempo/ per l’erogazione continua di CO Pulsante per diminuire il tempo/ disattivare l’erogazione della CO Pulsante per accendere il display/ per programmare i tempi di erogazione La freccia verso il basso indica che la CO viene rilasciata.
- Page 50 Accendere il display / Impostare l’ora Accendere il display premendo il pulsante 3. breve Per impostare l’ora premere il pulsante 3 per due secondi. 2 sec. Per aggiustare l’ora, premere il pulsante 1 per aumentarla e il pulsante 2 per diminuirla.
- Page 51 Aumentare l’ora di inizio Inizio tempo 1 Diminuire l’ora di inizio Programmare l’ora di inizio 1 Dopo aver impostato l’ora attuale premere il pulsante 3. Sul display si leggerà "S1" per "orario di inizio primo tempo" (tempo 1). Aggiustare l’orario di inizio 1 con i pulsanti 1 e 2 come de- scritto sopra.
- Page 52 Aumentare l‘ora Fine tempo 1 Diminuire l’ora Programmare la fine del tempo 1 Dopo aver programmato l’ora di inizio 1, premere il pulsante 3. Sul display apparirà "E1" (Fine tempo 1). Aggiustare la fine del tempo 1 con i pulsanti 1 e 2 come de- scritto sopra.
- Page 53 Inizio e fine del tempo 2 Per programmare l’inizio e la fine di un secondo tempo, premere il pulsante 3 dopo aver programmato la fine del primo tempo. Sul display apparirà "S2". Programmare l’ora con i pulsanti 1 e 2 come descritto sopra. Program- mare la fine del secondo tempo premendo il pulsante 3 e impostando poi l’ora.
- Page 54 Erogazione continuata Opzione 1: di CO continuata Per programmare l’erogazione continuata della CO e per disattivare la funzione Timer premere il pulsante 1 per 2 2 sec. secondi. Si udirà un ‘clic’ e sul display apparirà contempo- raneamente "A" per "Always CO ".
- Page 55 Opzione 2: Disattivare la funzione Disattivare l’ero- di erogazione continuata di CO gazione di CO Per disattivare permanentemente la funzione di erogazione 2 sec. della CO premere il pulsante 2 per 2 secondi. "A" per "Al- ways off" sul display indicherà che la funzione di erogazione della CO è...
- Page 56 Collegamento tubi per la CO Montare il BG-CO -Timer fra la fonte di CO e la trappola per zanzare. Il tubo proveniente dalla fonte di CO va montato all’attacco . Montare il tubo che porta verso la trappola all’attacco...
- Page 57 Fonte di CO Trappola Biogents Pezzo di tubo (ca. 10 cm), ricavabile dal presente tubo di CO Tubo di CO nero...
-
Page 58: Eg Konformitätserklärung (Englisch)
Product type: low pressure gas valve to decrease CO output The undersigned hereby declares, on behalf of Biogents AG company of Re- gensburg, Germany, that the above referenced product, to which this declarati- on relates, is in conformity with the directives and following norms of: •... - Page 59 • the “EMC Directive”, i.e. the DIRECTIVE 2014/30/EU • the “Ecodesign Directive”, i.e. the DIRECTIVE 2009/125/EC The required technical documents supporting this declaration are maintained at the Biogents AG corporate headquarters, address: Biogents AG, Weißen- burgstraße 22, 93055 Regensburg Regensburg, 13. March 2019 Dr.
-
Page 60: Kontakt
Contact / Kontakt / Contact / Contatto Biogents AG | Weißenburgstr. 22 | 93055 Regensburg | Germany www.biogents.com | Email: sales@biogents.com...
Need help?
Do you have a question about the BG-CO2 Timer and is the answer not in the manual?
Questions and answers