Advertisement
Available languages
Available languages
Quick Links
Quick Start Guide
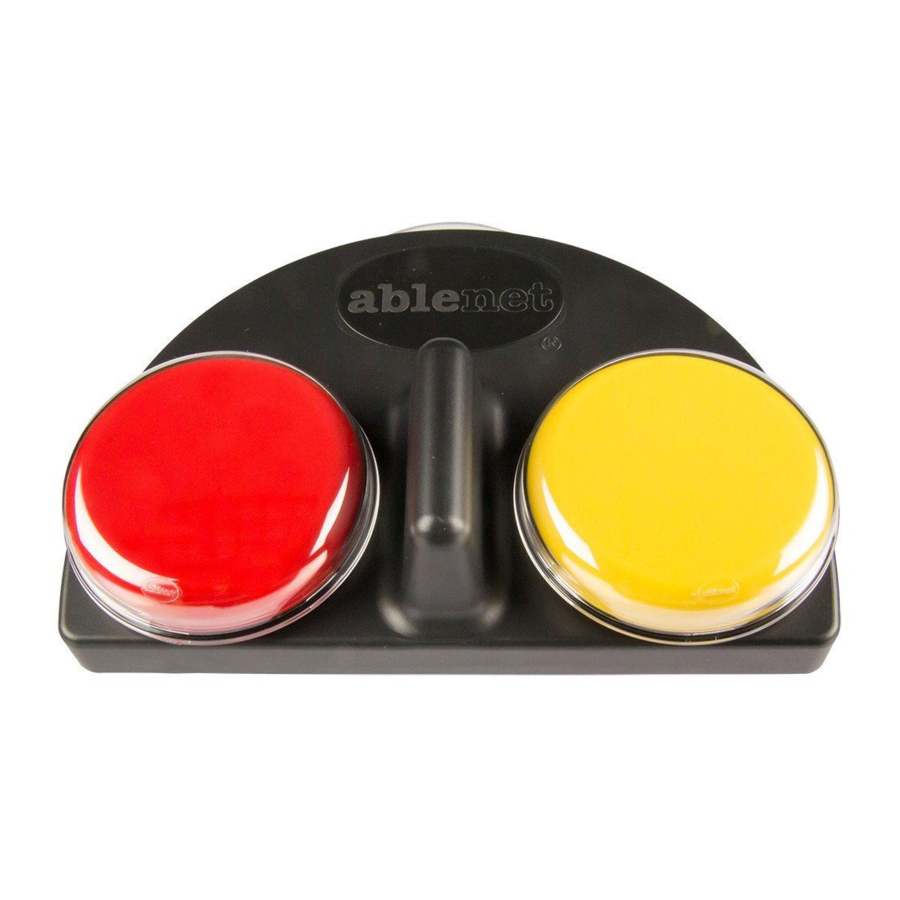
iTalk2™
communication device
www.ablenetinc.com
Updated: December 10, 2020 4:21 PM
Getting Started
1.
Add one alkaline 9-volt battery to device (battery
not included). To open battery door, rotate D-ring
counterclockwise and lift up. To lock battery door, rotate
D-rignt clockwise.
2.
Turn device on
3.
Select desired level
4.
Press and hold record button until recording indicator
light turns on
5.
Press and hold one colored switch top. Begin speaking
into microphone after you hear beep.
6.
When done recording message, release colored switch
top
7.
Repeat steps 5 and 6 for other colored switch top
8.
Press the record button to turn the recording indicator
light off
9.
Adjust volume as needed
10. Your device is ready to use
Colored switch top
activation surface
Levels
switch
Clear snap cap for
symbol overlays
Picture Symbol Overlays
A picture symbol can be placed under the clear snap cap to
give additional context to what will happen when the colored
switch top is activated. Symbol overlays should fit within a
2-in (5-cm) circle area.
Activate Switch Adapted Toys or
Appliances
By default, the accessibility switch input/output jacks of this
device will activate a switch adapted toy or appliance.
1.
Plug your toy or appliance into one or both of the 1/8-
in (3.5-mm) accessibility switch input/output jacks on
the device. Some toys or appliances may require the
included plug-to-plug adapter to be used to connect to
the device.
2.
The toy or appliance will activate as long as the message
is playing.
Note: Some electrical appliances will require a PowerLink to
be activated.
Recording indicator
Sound output speaker
light
Microphone
Record button
On/off and
volume control
#6-32 threaded inserts
for AbleNet Universal
Mounting Plate
attachment (mounting
plate not included)
Play Message With an Accessibility
Switch
By default, the accessibility switch input/output jacks of this
device will activate a switch adapted toy or appliance. The
following steps will change the accessibility switch input/
output jacks so that they can be used with an accessibility
switch.
1.
Turn device off
2.
Plug an AbleNet accessibility switch with 1/8-in (3.5-mm)
switch plug into the accessibility switch input/output
jacks on the device. One or two switches may be used.
3.
Activate the AbleNet accessibility while turning device on
Note: When the device is turned off, the accessibility
switch input/output jacks will revert to the toy/appliance
functionality. To use accessibility switches again, repeat the
above steps.
1/8-in (3.5-mm) accessibility
switch input/output jacks
Requires one
alkaline 9-volt
battery (battery
not included)
Advertisement

Related Manuals for AbleNet iTalk2


Summary of Contents for AbleNet iTalk2
- Page 1 Turn device off Press and hold one colored switch top. Begin speaking Plug an AbleNet accessibility switch with 1/8-in (3.5-mm) By default, the accessibility switch input/output jacks of this into microphone after you hear beep. switch plug into the accessibility switch input/output device will activate a switch adapted toy or appliance.
- Page 2 Apague el dispositivo. Mantenga presionada la parte superior del interruptor de Conecte un interruptor de accesibilidad AbleNet con Por defecto, las tomas de entrada/salida del interruptor color. Comience a hablar por el micrófono después de conector de 1/8 in (3,5 mm) en las tomas de entrada/...
- Page 3 Es können ein oder zwei Schalter verwendet werden. Stecken Sie Ihr Spielzeug oder Gerät in eine oder der Aufnahme fertig sind. Aktivieren Sie den AbleNet-Zugang beim Einschalten beide der 3,5 mm (1/8 in) Ein-/Ausgangsbuchsen des Wiederholen Sie die Schritte 5 und 6 für die andere des Geräts.
- Page 4 Éteindre l’appareil adaptés pour interrupteur Appuyer et maintenir enfoncé un des dessus du Brancher une commande d’accessibilité AbleNet dotée contacteur de couleur Commencer à parler dans le d’une prise de 1/8 po (3,5 mm) dans les prises d’entrée/ Par défaut, les prises d’entrée/sortie de la commande microphone après avoir entendu un bip.
- Page 5 Garantie et contact Garantie und Kontaktinformationen AbleNet manufactured products include a two-year limited Les produits fabriqués par AbleNet sont fournis avec une Für alle von AbleNet hergestellten Produkte gilt eine warranty. This warranty is against defects in materials and garantie limitée de deux ans. Cette garantie est applicable zweijährige beschränkte Garantie.
- Page 6 For private households: Pour les foyers particuliers : Für private Haushalte: Information on Disposal of Users of WEEE Renseignements quant à l’élimination des déchets d’équipements électriques et Informationen zum fachgerechten Entsorgen von Elektro- und Elektronik- électroniques (DEEE) Altgeräten This symbol on the product and/or accompanying documents means that used electrical and electronic equipment (WEEE) should not be mixed with Ce symbole...
- Page 7 Luftfeuchtigkeit: 10 % - 95 % (keine Kondensation auf dem Gerät) Montageplatte D (separat erhältlich, um es an einem der AbleNet-Montagesysteme zu befes- tigen iTalk2. Befestigungslöcher mit Gewinde befinden sich an der Unterseite von iTalk2. Das Gerät ist weder wasserdicht noch vollständig wasserbeständig. Tauchen Sie das Gerät nicht in Wasser oder eine andere Flüssigkeit ein.
Need help?
Do you have a question about the iTalk2 and is the answer not in the manual?
Questions and answers