Advertisement
Quick Links
Advertisement

Related Manuals for XpressFill XF4500C


Summary of Contents for XpressFill XF4500C
- Page 1 XpressFill XF4500C...
- Page 3 Do not use the can filler covered in this manual unless you are certain the electrical supply has been correctly installed and the can filler has been properly grounded. 265 Prado Road, Suite 1 | San Luis Obispo, CA 93401 | 805.541.0100 | xpressfill.com | sales@xpressfill.com...
- Page 4 Safety Warnings...
-
Page 5: Table Of Contents
The guarantee may be rendered invalid if the customer has made repairs or alteration to the machine without first consulting XpressFill Systems LLC. 265 Prado Road, Suite 1 | San Luis Obispo, CA 93401 | 805.541.0100 | xpressfill.com | sales@xpressfill.com... -
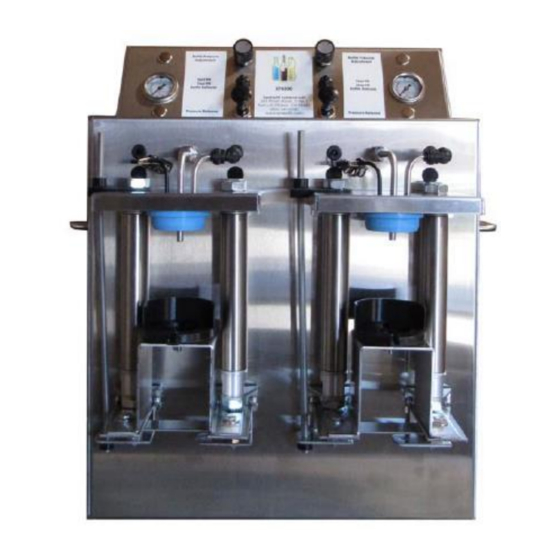
Page 6: Know Your Filler
∙ Start fill 10. Can neck filler stopper ∙ Stop fill 11. Pneumatic ram ∙ can release 12. Can foot rest 5. Top off button 265 Prado Road, Suite 1 | San Luis Obispo, CA 93401 | 805.541.0100 | xpressfill.com | sales@xpressfill.com... - Page 7 Do not put your hands between the can and the foot manually control a valve to release the pressure in to prevent injury. 265 Prado Road, Suite 1 | San Luis Obispo, CA 93401 | 805.541.0100 | xpressfill.com | sales@xpressfill.com...
- Page 8 Note: Some air/CO2 and liquid will come out of the vent in operation. The output labeled “Vent” should be connected to a container to collect any liquid. Figure 1 265 Prado Road, Suite 1 | San Luis Obispo, CA 93401 | 805.541.0100 | xpressfill.com | sales@xpressfill.com...
- Page 9 Warning: Follow the recommended settings of the equipment you are using. Exceeding manufacture recommended settings may result in injury to self and others, as well as damage and/or failure of the machine. 265 Prado Road, Suite 1 | San Luis Obispo, CA 93401 | 805.541.0100 | xpressfill.com | sales@xpressfill.com...
-
Page 10: Operating Procedures
5. Toggle the fill switches to the full up position (Start Fill Position). Wait a few seconds to verify that the green fill light illuminates. 265 Prado Road, Suite 1 | San Luis Obispo, CA 93401 | 805.541.0100 | xpressfill.com | sales@xpressfill.com... - Page 11 While pressing down on the Can Foot Rest, place a can on the can locator and lift the foot so the can slides snuggly over the stopper. 265 Prado Road, Suite 1 | San Luis Obispo, CA 93401 | 805.541.0100 | xpressfill.com | sales@xpressfill.com...
- Page 12 Knob can be adjusted to achieve an acceptable rate of fill as evidenced by the visual presence of limited foaming. 5. The inlet pressures can also be adjusted in conjunction with can pressures to change the filling rate and foaming characteristics. 265 Prado Road, Suite 1 | San Luis Obispo, CA 93401 | 805.541.0100 | xpressfill.com | sales@xpressfill.com...
-
Page 13: Troubleshooting
Troubleshooting If at any time you have issues with the setup or adjustment of your XF4500C can filling machine, or any other questions about filling your product, please contact us at the number listed at the front of this manual. We are always happy to assist you. -
Page 14: Cleaning And Sanitizing
Use the sanitizer with about 3 gallons of water, and follow the steps according to the manufacturer’s instructions. After sanitizing, flush your filler with 2 gallons of warm water. Before storing your XpressFill filler, make sure you get all water out of the flow path. Allow to run until pressurized keg with cleaning solution is empty and runs dry, blowing the remaining water out of the filler vent. - Page 15 10. This is the end of part one of the two part process for cleaning your machine. 265 Prado Road, Suite 1 | San Luis Obispo, CA 93401 | 805.541.0100 | xpressfill.com | sales@xpressfill.com...
- Page 16 7. When you are satisfied with the results turn off the spout switch and remove the cans. 8. Turn off the air/gas supply and remove all the hoses. 9. Turn off the machine. 265 Prado Road, Suite 1 | San Luis Obispo, CA 93401 | 805.541.0100 | xpressfill.com | sales@xpressfill.com...
-
Page 17: Additional Information
A tool is included with the filler and can be found inside the filler. Push collet in with tool to remove hosing 265 Prado Road, Suite 1 | San Luis Obispo, CA 93401 | 805.541.0100 | xpressfill.com | sales@xpressfill.com... - Page 18 (do not remove screws) and pop the spare fuse holder toward you, then replace the fuse. XpressFill Part No. 200002 - Bussmann Series by Eaton, Model BK/GDB-2A, 5mm x 20mm Delay-Timer Adjustment 265 Prado Road, Suite 1 | San Luis Obispo, CA 93401 | 805.541.0100 | xpressfill.com | sales@xpressfill.com...
- Page 19 The white plastic body is stamped #1 for output and #2 for input. The valve may leak if installed back- wards. 265 Prado Road, Suite 1 | San Luis Obispo, CA 93401 | 805.541.0100 | xpressfill.com | sales@xpressfill.com...
- Page 20 Reassemble and replace in the filler. Note: This maintenance is needed only when the filler is not performing properly. 265 Prado Road, Suite 1 | San Luis Obispo, CA 93401 | 805.541.0100 | xpressfill.com | sales@xpressfill.com...
- Page 21 21 | XpressFill Systems LLC Accessory Kit 265 Prado Road, Suite 1 | San Luis Obispo, CA 93401 | 805.541.0100 | xpressfill.com | sales@xpressfill.com...
Need help?
Do you have a question about the XF4500C and is the answer not in the manual?
Questions and answers