
Related Manuals for Maintronic CBA UP Casambi


Summary of Contents for Maintronic CBA UP Casambi
- Page 1 CBA UP Casambi blind actuator Manual EN Valid from version: (H=Hardware | F=Firmware) 10.750 CBA UP H2 | F2.5 10.752 CBA UP H1 | F2.5 10752_MA_en_A4_CBA-UP_20210310...
-
Page 2: Table Of Contents
Table of contents 1. General information 1.1 About this Document 1.2 Service and contact 1.3 Legals 1.4 Symbol explanation 2. Safety information 3. Product description 3.1 Intended Use 3.2 Functions 3.4 Operating notes 3.3 Installation and dimensions 3.5 Connections and elements 4. -
Page 3: General Information
The division building automation and all associ- maintronic product and the trust you have placed ated products are products of MTC maintronic® in us. We, the team of maintronic, wish you a lot GmbH (hereafter maintronic). All rights reserved, of fun with this product. -
Page 4: Symbol Explanation
1.4 Symbol explanation DANGER The signal word „DANGER“ indicates an imminent danger. If not avoided, death or serious injury will result. WARNING The signal word „WARNING“ indicates a possibly imminent danger. If it is not avoided, death or very serious injuries may result. CAUTION The signal word „CAUTION“... -
Page 5: Safety Information
The devices comply with the EU directives appli- • if the device has been dropped or has a bro- cable at the time they are placed on the market. ken housing. For cleaning only use a dry, soft cloth, by no me- ans liquids. www.maintronic.de... -
Page 6: Product Description
3.2 Functions The blind actuator CBA UP Casambi has a Blu- As soon as the device is added to your network, etooth Casambi interface and can be opera- it can be operated. Groups can be formed, scenes ted via smartphone with the Casambi APP. -
Page 7: Operating Notes
3.4 Operating notes There are different methods to operate the blind actuator. Driving over driving time Slat adjustment In the case of driving over the driving time, a sin- A slider can be used to adjust the angle of the slats gle impulse (e.g. -
Page 8: Installation And Dimensions
30 mm of additional installation space is required. For installation in cavity or switch boxes, the side flaps have to be removed. Install the device with the labeling, LED and device buttons facing for- wards. 30 mm 55 mm removeable flaps www.maintronic.de... -
Page 9: Connections And Elements
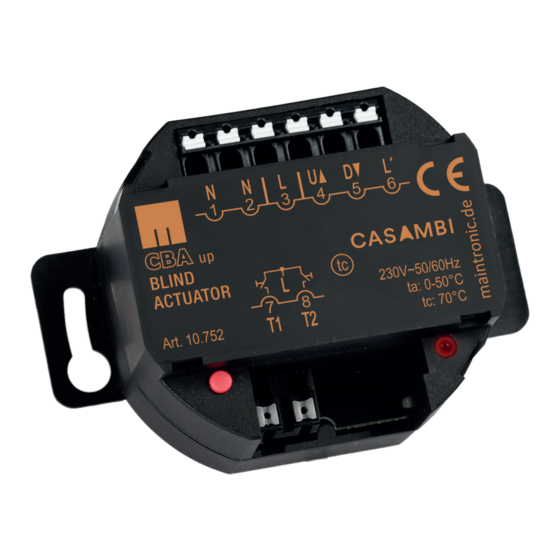
3.5 Connections and elements Figure: CBA UP - 10.750 1 N Neutral conductor Relay up 2 N Neutral conductor Relay down 3 L Input Voltage 230V AC 6 L‘ Release phase for standard blind button 7 T1 Pushbutton input 1 8 T2 Pushbutton input 2 Pushbutton inputs T1 / T2 only item no.: 10.752 Devicebutton... -
Page 10: Commissioning
Select a suitable profile for your application on • Move roller blind to absolute position the following pages. CBA Shutter • Move roller blind to absolute position + Buttons • Additional controls for activation via external pushbuttons or scenes www.maintronic.de... -
Page 11: Select Profile And Learn Into A Network
Device must be unpaired Tap on the menu item „Change Select the desired operating profile) mode (profile) After the profile selection ... Tap on the menu item The selected profile is now Start update „Add to ... Network“ loaded www.maintronic.de... -
Page 12: Profile A: Cba Blind
4.3.1 Profile A: CBA Blind Drive blind | Adjust slats Casambi profile name Fixture Id Control element name Function Control element type CBA Blind 17801 Position Position Slider (0% - 100%) Angle Slat angle Slider (0% - 100%) Profile view in the APP Operating elements in the APP Informations and parameter Profile parameter... -
Page 13: Profile B: Cba Blind + Buttons
Angle Time Drive time for slat adjustment 0 ... 65535ms (milliseconds) 2000ms default Swap Controls Up/ Logical invert of drive direction No | Yes Reverse driving direction Down Push Button mode Behavior of the pushbutton inputs Description see 5.3 www.maintronic.de... -
Page 14: Profile C: Cba Shutter
4.3.3 Profile C: CBA Shutter Roller blind drive Casambi profile name Fixture Id Control element name Function Control element type CBA Shutter 17803 Position Position Slider (0% - 100%) Profile view in the APP Operating elements in the APP Informations and parameter Profil Parameter Parameter Casambi Description parameter... -
Page 15: Profil D: Cba Shutter + Buttons
Drive Time Drive time for roller blind operation 0 … 255s (seconds) 60s default Swap Controls Up/ Logical invert of drive direction No | Yes Reverse driving direction Down Push Button mode Behavior of the pushbutton inputs Description see 5.3 www.maintronic.de... -
Page 16: Profil E: Cba Buttons
4.3.5 Profil E: CBA Buttons Roller blind drive | with buttom operation elements in App Casambi profile name Fixture Id Control element name Function Control element type CBA Buttons 14343 Single drive Up ON/OFF Toggle Down Single drive Down ON/OFF Toggle Function A Function for button A Push Button... -
Page 17: Calibration
4.4 Calibration Once the device is added into a Casambi network, a calibration can be performed.. Perform calibration drive (Drive time) Setting the slat position (Angle time) To ensure proper operation, a calibration drive The „Angle Time“ is the aperture angle of the must be performed during initial startup. -
Page 18: Operation
If several blind actuators are combined as a group, one device of the group must be defined as the master. For the desired master, the push button style must be set to Group Button. The other maintronic devices in the group are automatically slaves and the function of the master takes place. Switch... -
Page 19: Configure Pushbutton Inputs
5.4 Configure pushbutton inputs Pushbutton inputs can be individually assigned with desired functions. In order to do this, the following steps are necessary: 1. Open Casambi app and tap on „... More“ 2. Open item „Switch“ 3. Select device 4. For example program switch with single function a) Select not active b) Select not active c) Select controls an element... -
Page 20: Operation With Pushbutton Over L' Release Phase
As soon as a travel command or an automation object is sent, the manual travel is inter- rupted. If the device is operated in automated mode, the key inputs T1 and T2 (only 10.752) must be used. Carl-Zeiss-Str. 10-14 Tel. +49(0)9721-7766 0 www.maintronic.de 97424 Schweinfurt / Germany Fax. +49(0)9721-7766 18 info@maintronic.de www.maintronic.de...
Need help?
Do you have a question about the CBA UP Casambi and is the answer not in the manual?
Questions and answers