
Subscribe to Our Youtube Channel
Related Manuals for Link4 iPonic 624


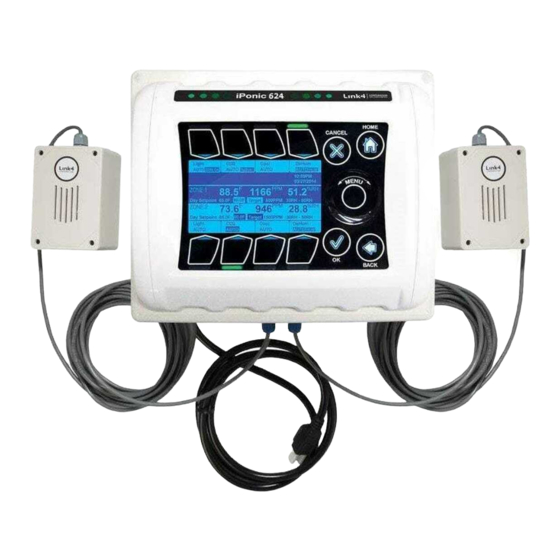
Summary of Contents for Link4 iPonic 624
-
Page 1: Iponic 624 User Manual Index
® iPonic YDROPONIC NVIRONMENTAL ONTROLLER INSTALLATION AND USER’S GUIDE September 2019 v2.0 Edition ® Copyright © 2019 Corporation... -
Page 2: Table Of Contents
3.1.1 Quick Setup ..................37 3.1.2 Advanced ..................... 38 3.1.2.1 Equipment Settings — Timed Override ........39 3.1.2.2 Equipment Settings — Initial Settings ........41 3.1.2.2.1 Equipment Settings — Set Name ........... 41 iPonic 624® Manual PN 995-1124-00 2| Page... - Page 3 3.8 SYSTEM SETUP Menu ─ Measurement Units ........64 4.0 Main Menu — SAVE/RESTORE CONFIGURATION ......64 5.0 Main Menu — STAGES ................66 Appendix A — CO Fuzzy Logic ............... 68 ® iPonic 624 User Manual Index ................1 iPonic 624® Manual PN 995-1124-00 3| Page...
-
Page 4: Gold Package Customers
Terms and Conditions Limited Warranty Link4 warrants that the goods sold will be free from defects in material and workmanship for a period of 12 months after the date of purchase. This warranty will be limited to the repair and replacement of parts and the necessary labor and services required to repair the goods. -
Page 5: Return, Exchange Or Refund
No affirmation of fact or promise made by Link4, whether or not in this Installation and User’s Guide, will constitute a warranty that the goods will conform to the affirmation or promise. -
Page 6: Install The Iponic® 624 Controller
Mounting the iPonic 624 Controller There are four (4) mounting holes on the outside of the iPonic 624 enclosure to help you attach it to a suitable surface. Make sure you use appropriate tools. The iPonic 624 controller comes with a 115 VAC power cord. Make sure there is an outlet within approximately six (6) feet of the controller. -
Page 7: Connect The Indoor Sensor Modules
SAFETY WARNING The iPonic 624 controller supports a maximum of 15 amps at 115 VAC. It is recommended that the total current for both rooms be no more than 12 amps. To avoid electric shock, always keep the hinged door closed and locked when the controller is powered on. - Page 8 Wiring the iPonic® 624 At the base of the iPonic 624 controller are the two sensor plugs and the Ethernet cable grommet for internet access. Adding extra holes elsewhere on the enclosure can result in condensation or moisture inside the unit and cause irreparable damages to your iPonic 624 controller.
-
Page 9: Connecting To The Internet
Internet via a standard CAT 5 cable linked to your router. Note: The Ethernet port for the Internet is inside the iPonic 624 controller. Before proceeding, make sure the Ethernet cable is functioning properly. - Page 10 Close and lock the controller door Power up the controller Once you are connected to the Internet, the iPonic 624 controller will automatically link up to the iPonic Cloud server at https://iponic.link4cloud.com and the Server Setup screen connection status will display “Check Account.”...
- Page 11 To set up your iPonic 624 controller for remote access through your computer or smartphone, follow these 3 steps: Step 1 – Login to your account and click on “My iPonic Cloud” Step 2 – Click on “Add a Controller Your Account”...
-
Page 12: Firmware Update
Firmware Update To update the firmware on your iPonic 624 controller, please follow the instructions below: From the Home screen of your Link4’s iPonic Cloud account, click on the Support tab and select Firmware Download... - Page 13 A status message will appear, and the iPonic 624 controller will restart WARNING: The iPonic 624 controller is equipped with a USB port (use the slot on top). For your safety, please shut down and unplug your iPonic 624 controller before inserting the USB drive.
- Page 14 Soft Buttons – The buttons at the top and bottom of the screen correspond to the equipment being controlled. Below the name of the equipment is the current status iPonic 624® Manual PN 995-1124-00 14| Page...
- Page 15 An alternative to forcing the equipment ON or OFF is to use the manual override switches that are inside the controller. These switches are shown in the figure of the internal layout on pages 17 and 20. iPonic 624® Manual PN 995-1124-00 15| Page...
-
Page 16: Internal Layout
Communication Module with an Ethernet port, and a USB slot (use the slot on top). Make sure the power is turned off before opening your iPonic 624 controller to avoid electric shock or irreparable damages. -
Page 17: Before You Begin - Some Basics
2, the night start time. Then fill in the data for the two setpoints. Temperature Control With the iPonic 624 controller, you can set a normal temperature range for your cooling and heating equipment by programing a cooling temperature target (Cool Setpoint) and a heating temperature target (Heat Setpoint), respectively. The temperature-control equipment will not be activated when the grow room temperature is within the normal range. -
Page 18: Deadbands
By default, the Ramp time is set to 0 and in this case, there will be an immediate step transition in the setpoints. If you enter a Ramp time, it will always occur at the beginning of the Set Point time period. Example of temperature ramping is illustrated below: iPonic 624® Manual PN 995-1124-00 18| Page... -
Page 19: Programming Instructions
Setpoint 2 is set to 6:00 p.m. with a 30 minutes Ramp, Temp is set as 67 to 70.5F Programming Instructions efore programming the iPonic 624 controller, make sure the equipment has been properly connected and tested with the Manual Override Switches. After all equipment is tested, the switches must be placed back to the AUTO position. -
Page 20: Control Panel
Control Panel The iPonic 624 controller has a Navigation Menu and four (4) Soft Buttons (HOME, CANCEL, OK, and BACK). Their functions are as follows: MENU Use the Navigation Menu to highlight a selection. Press OK to confirm the selection. The center... -
Page 21: Soft Button Shortcuts
Equipment Settings without using the Main Menu. By default, your iPonic 624 controller has four outputs assigned for Room 1 and four outputs assigned for Room 2. If Room 1 needs more outputs than Room 2 or... - Page 22 Soft Buttons are: Once you have gone through the program you can make most of your changes by selecting the settings option from the Soft buttons on the front (Home) screen. iPonic 624® Manual PN 995-1124-00 22| Page...
- Page 23 Program Screens Flow Chart This chart gives you a breakdown of all the major screens of the iPonic 624 program and how you access them. To Level Menu iPonic 624® Manual PN 995-1124-00 23| Page...
-
Page 24: Main Menu - Setpoints
HE FOLLOWING PAGES WILL COVER THE PROGRAMMING DETAIL FOR EACH OF THE FIVE OPTIONS LEASE BE ADVISED THAT MANY SETTINGS ARE ROOM SPECIFIC EITHER ROOM OR ROOM AND SOME ARE SHARED SETTINGS BOTH ROOM AND ROOM iPonic 624® Manual PN 995-1124-00 24| Page... -
Page 25: Setpoints Menu ─ Temperature Setpoint
5 setpoint options: 1.Temperature Setpoint 2.Humidity Setpoint 3.CO2 Setpoint 4.Light Setting 5.Setpoint Times 1.1 SETPOINTS Menu ─ Temperature Setpoint Select the Temperature Setpoint option. By pressing OK you will get the next screen. iPonic 624® Manual PN 995-1124-00 25| Page... - Page 26 If the temperature in the room rises above the Cool Setpoint, the cooling equipment will be activated. Pressing button 8, takes you to the next screen. iPonic 624® Manual PN 995-1124-00 26| Page...
-
Page 27: Setpoints Menu ─ Humidity Setpoint
Dehumidify Setpoints by pressing the appropriate button. If the humidity goes above your Dehumidify setpoint, the dehumidification equipment will be activated. If the humidity goes below the humidify setpoint, the humidification equipment will be activated. iPonic 624® Manual PN 995-1124-00 27| Page... -
Page 28: Setpoints Menu ─ Co2 Setpoint
See page 19 for a more detailed discussion. 1.3 SETPOINTS Menu ─ CO2 Setpoint The CO Setpoint option is where you set your target CO level. Selecting this option takes you to the next screen. iPonic 624® Manual PN 995-1124-00 28| Page... - Page 29 CO tank. In this case, by controlling the On Time and Off Times, you can cycle the injection so as to limit its overshoot. Pressing button #6, takes you to the next screen. iPonic 624® Manual PN 995-1124-00 29| Page...
- Page 30 Time can be set to hours, minutes and seconds. You will have this screen, where you select the “Switch to Generator” Option. If you are on this screen and are using a CO2 Tank then Select Button iPonic 624® Manual PN 995-1124-00 30| Page...
-
Page 31: Setpoints Menu ─ Light Setting
The start time determines: When the Day setting begins and similarly, the End Time determines when the night setting begins. Note 2: During the Night time period the lights will automatically be OFF. iPonic 624® Manual PN 995-1124-00 31| Page... -
Page 32: Setpoints Menu ─ Setpoint Times
Menu and select Setpoints. In the Set NIGHT Start Time screen, you can program your nighttime settings. Note: Setting the Day and Night Start times here applies to the temperature, humidity, CO2, and light control. iPonic 624® Manual PN 995-1124-00 32| Page... -
Page 33: Main Menu - Reports
Room 1 or Room 2 with the Navigation Menu. 2.1 Reports – Sensor Report In the Reports Menu screen, highlight the Sensor Report option to instantly review all data collected by the sensor module in numerically summarized formats. iPonic 624® Manual PN 995-1124-00 33| Page... -
Page 34: Reports - Graphs
CO2 levels. In the Temperature Graph Menu, you can view graph illustrations showing data collected by the sensor modules for the Inside Temperature the Heat Setpoints and the Cool Setpoints for the Room selected. iPonic 624® Manual PN 995-1124-00 34| Page... -
Page 35: Main Menu - System Setup
Last Hour. 3.0 Main Menu — SYSTEM SETUP System Setup in the Main Menu enables you to set up the grow room equipment, the sensors and the alarms and other features as listed below: iPonic 624® Manual PN 995-1124-00 35| Page... - Page 36 7. Communication Setup lets you set up Internet access. 8. Measurement Units allows you to set the desired units of measurement for temperature and lighting. iPonic 624® Manual PN 995-1124-00 36| Page...
-
Page 37: System Setup Menu ─ Equipment Setup
Soft Button #3. You have a maximum of 8 boxes you can check between the 2 rooms. This corresponds to the 8 outlets of the iPonic. iPonic 624® Manual PN 995-1124-00 37| Page... -
Page 38: Advanced
By default, your iPonic 624 controller has 4 outputs assigned for Room 1 and 4 outputs assigned for Room 2. If Room 1 needs more outputs than Room 2 or vice versa, you can change the outputs room assignment as well as the type of equipment used as described above. -
Page 39: Equipment Settings - Timed Override
Button 6 – set the override duration. Note: You can get to this Button 7 – select either a daily same screen from the Home override or a one-time override. screen by pressing Soft Button #1. iPonic 624® Manual PN 995-1124-00 39| Page... - Page 40 Override will default to Disabled at the end of the duration. Once the output has been overridden, the indicator on the front screen will change from AUTO to either ON or OFF depending on your selection. iPonic 624® Manual PN 995-1124-00 40| Page...
-
Page 41: Equipment Settings - Initial Settings
3.1.2.2.1 Equipment Settings — Set Name For this example, we will name the output Light Bank. Select OK to confirm the change and return to the Initial Settings screen. Press Home and save your settings. iPonic 624® Manual PN 995-1124-00 41| Page... -
Page 42: Equipment Settings - Set Type
AC - to be utilized for Temperature and relative Humidity control. Alarm - this output can be programmed to trigger an onsite Alarm if High/Low CO2, Temperature, Relative Humidity values go beyond your set alarm thresholds. iPonic 624® Manual PN 995-1124-00 42| Page... - Page 43 You then need to press Home to save your On/Off selection. Then go back to the System Setup, Equipment setup, Advanced and select the highlighted Channel. You will then get the following screen: iPonic 624® Manual PN 995-1124-00 43| Page...
- Page 44 As we saw above, if you select the “Initial Settings” button #3, you can change the name for your output which will then appear on your front screen. iPonic 624® Manual PN 995-1124-00 44| Page...
-
Page 45: Equipment Setttings - Assign Stage
Room 1. In other words, which stage you want which equipments to be ON. Note: You will get the same screens by going to 5. Stages on the Main Menu which is covered in section 5. iPonic 624® Manual PN 995-1124-00 45| Page... -
Page 46: System Setup Menu ─ Sensor Setup
Pressing buttons 1, 2 and 3 bring up screens similar to the Room 1 Sensor Module screen shown here. If you have the sensor module and it is connected, select the Enable option. Otherwise, leave it disabled. iPonic 624® Manual PN 995-1124-00 46| Page... - Page 47 This is an analog temperature sensor that can be used for outdoor temperature readings. You will need to wire the Link4 to this sensor to one of the controller’s Analog inputs. When you press button 4 of the Sensor Setting screen (Advanced...
- Page 48 Main Home screen. The Previous and Next buttons let you navigate up and down through the sensors. Use the Edit button when you want to manually calibrate the highlighted sensor. iPonic 624® Manual PN 995-1124-00 48| Page...
-
Page 49: System Setup Menu ─ Alarms Setup
An Alarm Delay (button 4) is the amount of time an undesirable condition must persist before the alarm is triggered. Pressing button #8 takes you to the light off Delay. iPonic 624® Manual PN 995-1124-00 49| Page... -
Page 50: System Setup Menu ─ Time/Date Setup
3.4 SYSTEM SETUP Menu ─ Time/Date Setup The Time/Date Setup lets you change the time and date of your iPonic 624 controller. From this screen you can Set Time, Set Date, and set it up with the Internet Time Server. -
Page 51: System Setup Menu ─ Advanced
Internet. This can only be done after you manually set the time and date. 3.5 SYSTEM SETUP Menu ─ Advanced There are 3 Advanced screens: Room 1, Room 2, and Shared. iPonic 624® Manual PN 995-1124-00 51| Page... -
Page 52: Advanced Room 1 Or Room 2 - Humidity Settings
The Deadband can be set to prevent frequent humidity stage changes. The smaller the deadband, the tighter the control, but the more frequent switching on and off of the equipment. iPonic 624® Manual PN 995-1124-00 52| Page... -
Page 53: Advanced Room 1 Or Room 2 - Temperature Settings
CO2 Fan Cut Off option is enabled and the fan goes on. The Fan Cut Off feature only responds if your fan is a Vent Fan equipment type. iPonic 624® Manual PN 995-1124-00 53| Page... -
Page 54: Advanced Room 1 Or Room 2 - Light Settings
Yes, you can program your lights to run independently from the Day setpoints. Separate Light Bank (Button 4). If you are using a separate Light Controller from the iPonic, then you will want to indicate such. iPonic 624® Manual PN 995-1124-00 54| Page... -
Page 55: Advanced Room 1 Or Room 2 - Air Exchange Settings
Otherwise, you might have a static pressure problem/ To achieve this, program the vents and dampers in the first stage of cooling and the fans in a higher stage. iPonic 624® Manual PN 995-1124-00 55| Page... -
Page 56: Advanced Room 1 Or Room 2 - Adv. Setpoint Settings
Enabling CO2 Fuzzy Settings is when the user modifies CO2 levels based on the needs of the room rather than a fixed setpoint. (See Appendix A for a more detailed explanation.) iPonic 624® Manual PN 995-1124-00 56| Page... -
Page 57: Advanced Shared
Light Threshold. To minimize turning on and off the lights, you can set a Light Deadband (button 4). 3.5.2 Advanced Shared From the System Setup Menu → select Advanced screen. iPonic 624® Manual PN 995-1124-00 57| Page... -
Page 58: Display Setting
On the Room Select screen, select Shared. This Advanced Setup screen lets you configure a variety of settings on your iPonic 624 controller. They are: • Display Settings • Controller Version • Clear Data • Boot load • Password •... -
Page 59: Controller Version
Advanced Setup — Button #2 The Controller Version is the same screen that appears when your unit is activated. It contains important information about your iPonic 624 controller, including: Firmware Version Serial Number and Mac Address 3.5.2.3 Clear Data Advanced Setup — Button #3... -
Page 60: Password
Advanced Setup — Button #7 In the Diagnostics option (button 7), you can perform tests and receive diagnostic information for troubleshooting. Using this screen would be most helpful with a call to the Link4 customer service helpline. iPonic 624® Manual PN 995-1124-00 60| Page... -
Page 61: System Setup Menu ─ Save/Restore
You will need to insert a USB drive. When you go to Save Configuration (button 1), you can enter a file name by pressing the corresponding letters with the Soft Buttons. Press OK when you are done. iPonic 624® Manual PN 995-1124-00 61| Page... - Page 62 .csv and .xml. The Set Data Logging Period can be set for a specific time. Here is an example of what data logging produces using .csv format viewable from an excel spreadsheet: iPonic 624® Manual PN 995-1124-00 62| Page...
-
Page 63: System Setup Menu ─ Communication Setup
3.7 SYSTEM SETUP Menu ─ Communication Setup Communication Setup allows you to configure your iPonic 624 controller to connect to the Internet for remote access through the iPonic Cloud. From the Communication Setup Menu, you can configure your iPonic 624 controller to be... -
Page 64: System Setup Menu ─ Measurement Units
Fahrenheit or Celsius for temperatures and W/m or klux for light units. 4.0 Main Menu — SAVE/RESTORE CONFIGURATION When saving and restoring Configurations, you will need to insert a USB drive into the top USB port: iPonic 624® Manual PN 995-1124-00 64| Page... - Page 65 The Configuration setting allows you to save different files and programs that can easily be restored. From the Save and Restore Configuration menu, you can select specific files to store and recall. iPonic 624® Manual PN 995-1124-00 65| Page...
-
Page 66: Main Menu - Stages
You can set up to a maximum of 6 cooling and 2 heating stages. These numbers of stages are set in the Advanced Stage Settings screen described above. iPonic 624® Manual PN 995-1124-00 66| Page... - Page 67 No Change. If the humidity is below the desired threshold, then you may want to shut the Vent Fans and the Dehumidifier OFF as shown. Use the arrows Soft Button 5,6,7,8 to navigate the highlight cursor. iPonic 624® Manual PN 995-1124-00 67| Page...
-
Page 68: Appendix A - Co Fuzzy Logic
Appendix A — CO Fuzzy Logic Employing “Fuzzy Logic” with your iPonic 624 controller’s advanced settings will allow your CO target to be met based on the amount of CO needs, rather than treating every situation where the CO falls below your setpoint target as equal. - Page 69 You can change the values by pressing Edit; and to navigate by pressing 5,6,7,8 buttons. Setting Your Fuzzy Logic Cycle Period You can set up the Fuzzy Cycle Period from the Home screen CO Soft Button settings or the Advance CO2 settings. iPonic 624® Manual PN 995-1124-00 69| Page...
- Page 70 Map Sensors, 48 ® iPonic 624 User Measurement Setup, 61 Manual Index Navigation Menu, 11, 13, 20, 21, 25, 34 AC, 30, 43 Normal, 27, Advanced, 39, 46, 54, 56, 57, 58, On/Off, 29, 43, 44, 45 67, 68 OutTemp Ovr Threshold, 28...
Need help?
Do you have a question about the iPonic 624 and is the answer not in the manual?
Questions and answers