GBC ULTIMA 35 Start Here Manual
Hide thumbs
Also See for ULTIMA 35:
- Owner's manual (11 pages) ,
- Operating instructions manual (12 pages) ,
- User manual (12 pages)

Related Manuals for GBC ULTIMA 35


Summary of Contents for GBC ULTIMA 35
- Page 1 U LT I M A 3 5 Roll Laminator start here starten sie hier démarrez ici iniziare qui empieza aquí begin hier...
- Page 2 English Deutsche Français Italiano Español Nederlands...
- Page 3 fig. 1 fig. 2 fig. 3...
-
Page 5: Product Specifications
• Avoid placing laminator near sources of heat or Document Widths Supported: Maximum - 292mm cold. Avoid locating the laminator in the direct path of forced, heated or cooled air. Media Weight: 65-220 GSM Caring for Ultima 35 Dimensions: Machine: Shipping: The only maintenance required by the operator is to periodically clean the heatshoe. -
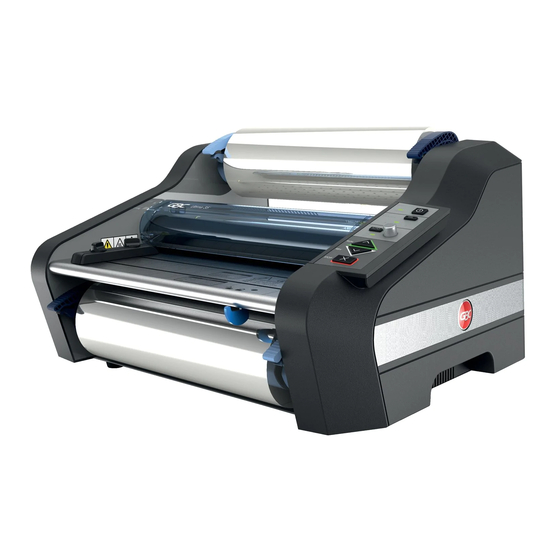
Page 6: Feature Guide
Feature Guide g. HEAT SHOES: i.) Teflon coated heat shoes melt the adhesive on GETTING TO KNOW YOUR LAMINATOR (FIGURE 1): the laminating film before the nip rollers compress it. a. POWER SWITCH (FIGURE 2): h. IDLER BARS: i.) Located at the back of the machine, applies power to the laminator. -
Page 7: Film Loading And Threading
9 and 11. 9. Press the RUN button. Slide the threading card (provided with new rolls of GBC laminating film) on the feed table, gently pushing the film into the nip rollers. The Threading card should now be guiding both rolls of film through the laminator. -
Page 8: Operation
Operation HELPFUL LAMINATING TIPS • Do not attempt to laminate abrasive or metal items CAUTION: MAKE SURE HEAT SHIELD AND FEED such as staples or paper clips as they will damage TABLE ARE IN THE PROPER POSITION TO OPERATE the heat shoes and rollers. THE UNIT. -
Page 9: Technische Daten
Technische Daten Aufstellungsfläche stehen. • Das Netzkabel an eine geeignete Stromquelle Modell: Ultima 35 anschließen. An den Stromkreis des Laminiergeräts sollten keine weiteren Geräte Laminiergeschwindigkeit: Variabel angeschlossen werden, da es ansonsten Aufwärmzeit: <2 min zu einer überhäuften Auslösung des Schutzschalters bzw. - Page 10 Gerätekomponenten Einstellen der Kantenführung den Knopf auf der Oberseite aufdrehen, die Führung an die ÜBERBLICK (ABBILDUNG 1): gewünschte Position schieben und den Knopf dann a. BETRIEBSSCHALTER (ABBILDUNG 2): entgegen dem Uhrzeigersinn festdrehen. i.) Befindet sich an der Geräterückseite und dient g.
- Page 11 Gerät ausführen. Anschließend das Gerät einschalten und vor Ausführen der Schritte 9–11 aufwärmen lassen. 9. Die Taste RUN drücken. Die mit neuen GBC- Laminierfolienrollen gelieferte Einführkarte auf dem Zufuhrtisch nach vorn schieben und die Folie vorsichtig zwischen die Andruckwalzen schieben.
-
Page 12: Betrieb
Betrieb TIPPS ZUM LAMINIEREN • Abrasive Objekte oder solche aus Metall VORSICHT: SICHERSTELLEN, DASS DIE (Heftklammern, Büroklammern) nicht laminieren, SCHUTZABDECKUNG UND DER ZUFUHRTISCH IN da sie die Heizzylinder und Walzen beschädigen. BETRIEBSPOSITION SIND. • Keine Objekte mit Gewalt in den Walzenspalt 1. -
Page 13: Spécifications Du Produit
Spécifications du produit tous se trouver sur la surface de support. • Branchez le cordon d’alimentation à une prise Modèle : Ultima 35 secteur appropriée. Évitez de brancher un autre Vitesse de fonctionnement : Variable appareil sur le circuit de dérivation sur lequel est branchée la plastifieuse pour ne pas faire... - Page 14 Guide des fonctions plastifier et d’alimenter les supports plus longs bien droit dans l’appareil. Cette butée peut également APPRENDRE À CONNAÎTRE VOTRE PLASTIFIEUSE servir à bien alimenter de plus petits supports côte à (FIGURE 1) côte. Pour positionner la butée, desserrez la molette a.
- Page 15 Suivez la procédure ci-dessous pour retirer la table les nouvelles bobines de film de plastification d’alimentation et le capot de protection. GBC) sur la table d’alimentation, en poussant 1. Faites glisser le loquet de table d’alimentation vers doucement le film dans les rouleaux de pression.
- Page 16 Fonctionnement 7. Enfilez le film selon les instructions données à la rubrique « CHARGEMENT ET ENFILAGE DU MISE EN GARDE : AVANT DE FAIRE FONCTIONNER FILM » du manuel. L’APPAREIL, VÉRIFIEZ QUE LE CAPOT DE CONSEILS UTILES DE PLASTIFICATION PROTECTION ET LA TABLE D’ALIMENTATION SONT CORRECTEMENT POSITIONNÉS.
-
Page 17: Specifiche Del Prodotto
Altezza = 290 mm Altezza = 381 mm o fredda. Profondità = 427 mm Profondità = 533 mm Cura della Ultima 35 Peso = 18,1 kg Peso = 20,1 kg L’unico intervento di manutenzione richiesto da Spegnimento automatico: 60 minuti di inattività... - Page 18 Guida funzioni l’elemento di bloccaggio e sollevando il piano verso l’alto, allontanandolo dalla plastificatrice. PARTI E FUNZIONI DELLA PLASTIFICATRICE f. GUIDA DI ALLINEAMENTO REGOLABILE (FIGURA 1) i.) La guida di allineamento regolabile consente a. INTERRUTTORE DI ALIMENTAZIONE (FIGURA 2) di allineare i documenti da plastificare e viene i.) Posizionato nella parte posteriore della utilizzata per assicurare che i documenti più...
- Page 19 Caricamento e inserimento del film bobine di film di plastificazione GBC) nel piano di alimentazione, spingendo delicatamente il film nei Seguire le procedure riportate di seguito per rimuovere il rulli di pressione. La scheda di inserimento film piano di alimentazione e lo schermo di protezione.
-
Page 20: Funzionamento
Funzionamento del film e tirarle dritte verso l’esterno per estrarre il film dalla plastificatrice. ATTENZIONE - CONTROLLARE CHE LO SCHERMO DI 6. Quando il film è passato oltre gli elementi PROTEZIONE E IL PIANO DI ALIMENTAZIONE SIANO riscaldanti, premere il pulsante “STOP”. NELLA POSIZIONE CORRETTA PRIMA DI UTILIZZARE 7. -
Page 21: Especificaciones Del Producto
Altura = 381 mm procedente de un ventilador. Profundidad = 427 mm Profundidad = 533 mm Cuidado de la Ultima 35 Peso = 18,1 kg Peso = 20,1 kg El único mantenimiento que debe realizar el Apagado automático: 60 minutos de inactividad operador es la limpieza periódica del elemento... -
Page 22: Guía De Funciones
Guía de funciones f. GUÍA DE BORDES AJUSTABLE: i.) La guía de bordes ajustable alinea los artículos FAMILIARÍCESE CON SU PLASTIFICADORA (FIGURA que van a plastificarse y se utiliza para asegurar que los artículos largos entran rectos en la a. INTERRUPTOR DE ALIMENTACIÓN (FIGURA 2): plastificadora. - Page 23 9. Presione el botón RUN. Deslice la tarjeta de introducción (suministrada con las bobinas de Siga los procedimientos descritos a continuación para película de plastificación GBC nuevas) sobre la retirar la mesa de alimentación y la pantalla de seguridad. mesa de alimentación, empujando suavemente 1.
- Page 24 Funcionamiento exterior de la plastificadora. 6. Cuando la película haya salido de los elementos PRECAUCIÓN: ASEGÚRESE DE QUE LA PANTALLA de calentamiento, pulse el botón «STOP». DE SEGURIDAD Y LA MESA DE ALIMENTACIÓN SE 7. Introduzca la película como se indica en la ENCUENTREN EN LA POSICIÓN CORRECTA PARA sección «CARGA E INTRODUCCIÓN DE LA UTILIZAR LA UNIDAD.
- Page 25 Diepte = 533 mm Gewicht = 18,1 kg Gewicht = 20,1 kg Verzorging van de Ultima 35 Het enige onderhoud dat de operator hoeft uit te Automatische uitschakeling: na 60 minuten zonder voeren is regelmatig de hot shoes reinigen. Wacht tot...
- Page 26 Overzicht van functies f. VERSTELBARE RANDGELEIDER: i.) De verstelbare randgeleider lijnt items die KENNISMAKING MET DE LAMINEERMACHINE moeten worden gelamineerd uit en zorgt ervoor dat (Afbeelding 1): langere items recht in de lamineermachine worden a. STROOMSCHAKELAAR (Afbeelding 2): ingevoerd. De verstelbare randgeleider kan ook i.) Deze bevindt zich op de achterkant van worden gebruikt om kleinere items naast elkaar in te de machine en zorgt voor voeding van de...
- Page 27 9 - 11. 9. 9. Druk op de knop ‘RUN’. Schuif de doorvoerkaart (geleverd met nieuwe rollen lamineerfilm van GBC) op de invoertafel en duw de film voorzichtig in de aandrukrollen. De doorvoerkaart leidt beide rollen film nu door de...
- Page 28 Bediening hot shoes is verwijderd. 7. Voer de film door de machine zoals beschreven LET OP: ZORG ERVOOR DAT DE BESCHERMKAP in het gedeelte ‘Film plaatsen en doorvoeren’ van EN INVOERTAFEL ZICH IN DE JUISTE POSITIE deze handleiding. BEVINDEN, ANDERS WERKT DE LAMINEERMACHINE NIET.
- Page 30 ACCO UK Limited Oxford House Aylesbury HP21 8SZ United Kingdom www.accobrands.com...
Need help?
Do you have a question about the ULTIMA 35 and is the answer not in the manual?
Questions and answers