Table of Contents
Advertisement
Available languages
Available languages
Quick Links
Istruzioni per l'uso
IT
GB
English,11
Italiano, 1
NL
DE
Nederlands, 31 Deutsch, 41
B 40 L/CS... F
Sommario
Avvertenze, 2
FR
Français, 21
PIANO
IT
Advertisement
Chapters
Table of Contents

Related Manuals for SCHOLTES B 40 L CS F Series


Summary of Contents for SCHOLTES B 40 L CS F Series
-
Page 1: Table Of Contents
Istruzioni per l’uso PIANO Sommario Avvertenze, 2 Descrizione del piano di cottura, 3 Istruzioni per l'uso, 4 Pulizia e manutenzione, 5 English,11 Français, 21 Italiano, 1 Istruzioni per l'installatore, 6 Installazione dei piani, 7 Collegamento gas, 8 Collegamento elettrico, 9 Nederlands, 31 Deutsch, 41 Caratteristiche dei bruciatori ed ugelli, 10 B 40 L/CS... -
Page 2: Avvertenze
Avvertenze Complimenti! Complimenti! Complimenti! Complimenti! Complimenti! Avete acquistato un elettrodomestico costruito con tecnologie avanzate e materiali di qualità. Utilizzandolo avre- te modo di apprezzarne la funzionalità e la sicurezza, caratteristiche costanti della nostra produzione. QUESTE ISTRUZIONI SONO VALIDE SOLO PER I PAESI DI DESTINAZIONE I CUI SIMBOLI FIGURANO SUL QUESTE ISTRUZIONI SONO VALIDE SOLO PER I PAESI DI DESTINAZIONE I CUI SIMBOLI FIGURANO SUL QUESTE ISTRUZIONI SONO VALIDE SOLO PER I PAESI DI DESTINAZIONE I CUI SIMBOLI FIGURANO SUL QUESTE ISTRUZIONI SONO VALIDE SOLO PER I PAESI DI DESTINAZIONE I CUI SIMBOLI FIGURANO SUL... -
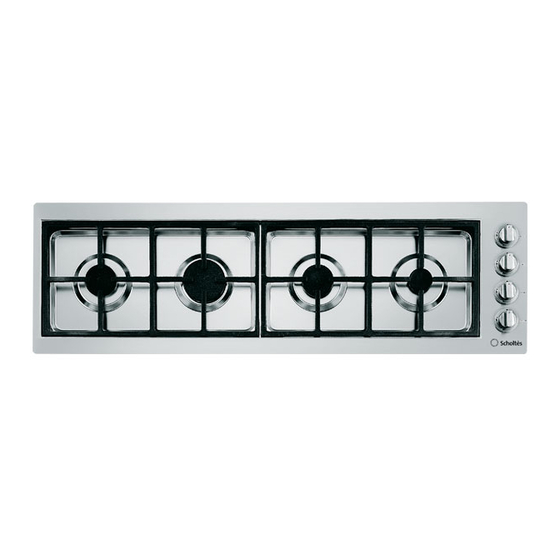
Page 3: Descrizione Del Piano Di Cottura
Descrizione del piano di cottura H H H H H B B B B B B B B B B C C C C C A A A A A G G G G G A Bruciatore gas Ausiliario Bruciatore gas Ausiliario Bruciatore gas Ausiliario Bruciatore gas Ausiliario Bruciatore gas Ausiliario... -
Page 4: Istruzioni Per L'uso
Istruzioni per l'uso Bruciatori gas Bruciatori gas Bruciatori gas Bruciatori gas Bruciatori gas Uso dei bruciatori Uso dei bruciatori Uso dei bruciatori Uso dei bruciatori Uso dei bruciatori Sono di diverse dimensioni e potenze. Scegliete quel- Per ottenere dai bruciatori il massimo rendimento si lo più... -
Page 5: Pulizia E Manutenzione
Pulizia e manutenzione Per una lunga durata dell’apparecchiatura è • Dopo la pulizia è possibile eseguire eventuali indispensabile eseguire frequentemente una accurata trattamenti per risaltare la lucentezza dell' acciaio e prevenire eventuali ingiallimenti; a tal proposito si pulizia generale, tenendo conto che: L’apparecchiatura deve essere disinserita L’apparecchiatura deve essere disinserita consiglia l'utilizzo dell'apposita "crema specifica per... -
Page 6: Istruzioni Per L'installatore
Istruzioni per l'installatore (fig.2A): Le istruzioni che seguono sono rivolte all’installatore qualificato • avere una sezione libera totale netta di passaggio di almeno affinché compia le operazioni di installazione, regolazione e 6 cm² per ogni kW di portata termica nominale manutenzione tecnica nel modo più... -
Page 7: Installazione Dei Piani
Installazione dei piani È necessario prendere le opportune precauzioni al fine 1-Piani da incasso (Classe 3) di tipo a filo (vedi figura 1-Piani da incasso (Classe 3) di tipo a filo (vedi figura 1-Piani da incasso (Classe 3) di tipo a filo (vedi figura 1-Piani da incasso (Classe 3) di tipo a filo (vedi figura 1-Piani da incasso (Classe 3) di tipo a filo (vedi figura di assicurare una installazione rispondente alle norme... -
Page 8: Collegamento Gas
Collegamento gas Collegamento alimentazione gas Collegamento alimentazione gas Collegamento alimentazione gas Collegamento alimentazione gas Collegamento alimentazione gas • Il collegamento dell’apparecchio alla tubazione o alla bombola del gas deve essere effettuato secondo le prescrizioni delle norme in vigore (UNI-CIG 7129 e 7131) solo dopo... -
Page 9: Collegamento Elettrico
Collegamento elettrico I piani sono predisposti per il funzionamento con corrente alternata alla tensione e frequenza di alimentazione indicate sulla targhetta caratteristiche (posta sotto il piano o alla fine del libretto istruzioni). Accertarsi che il valore locale della tensione di alimentazione sia lo stesso di quello indicato sulla targhetta. -
Page 10: Caratteristiche Dei Bruciatori Ed Ugelli
Caratteristiche dei bruciatori ed ugelli Tabella 1 Gas liquido Gas naturale Diametro Potenza By-pass Ugello Portata * Ugello Portata * (mm) termica 1/100 1/100 1/100 BRUCIATORE kW (H.s.*) Nomin. Ridot. (mm) (mm) (mm) C. Rapido 3.00 B. Semirapido 1.65 A. Ausiliario Nominale (mbar) 28-30 Pressioni di alimentazione... - Page 11 Operating Instructions Contents Recommendations, 12 Hob description, 13 Instructions for use, 14 Français, 21 Cleaning and maintenance, 15 Italiano, 1 English,11 Instructions for the installer, 16 Hobs installation, 17 Gas supply connection, 18 Electrical connection, 19 Nederlands, Deutsch, 41 Burners and nozzles specifications, 20 B 40 L/CS...
-
Page 12: Recommendations
Recommendations Congratulations! You have just purchased an electrical household appliance that has been made using advanced technology and quality materials. As time passes, you will appreciate its practicality and safety, which are constant features of our production. THESE INSTRUCTIONS ARE ONLY VALID FOR THE COUNTRIES OF DESTINATION WHOSE SYMBOLS ARE SHOWN IN THE BOOKLET AND ON THE APPLIANCE RATING PLATE. -
Page 13: Hob Description
Hob description A Auxiliary burner B Semi-rapid gas burner C Rapid gas-burner E Ignitor for gas burners F Safety device Activates if the flame accidentally goes out (spills, drafts, etc.), interrupting the delivery of gas to the burner. G Control knobs for gas burners H Pan supports... -
Page 14: Instructions For Use
Instructions for use Adjusting the flame level Using the burners The flame level is adjusted by pressing the control knob and To obtain maximum efficiency from the burners, it is advisable turning it anticlockwise to the following positions: to only use pans with a diameter suitable for the burner being used, so that the flame does not extend beyond the pan base Black circle = off (see following table). -
Page 15: Cleaning And Maintenance
Cleaning and maintenance To ensure long life of the appliance, it is essential to carry out • Avoid leaving acid liquids (vinegar, lemon juice, aggressive a thorough general clean frequently, taking into account that: detergents, etc.) on enamelled or painted parts. •... -
Page 16: Instructions For The Installer
Instructions for the installer · total free cross section of passage of at least 6 cm² for The following instructions are provided for qualified installers every kW of rated heating capacity of the appliance, with a so that they may accomplish installation, adjustment and minimum of 100 cm²... -
Page 17: Hobs Installation
Hobs installation fig.5 2-Built-in hobs (Class 3) with edges lower than 82 mm (see figure 4, detail H2). To install this type of hob, a hole large enough to accommodate the whole lower casing of Fig.3 the appliance must be made on the worktop intended to be under the hob. -
Page 18: Gas Supply Connection
Gas supply connection Gas supply connection • Check that the appliance is set for the type of gas available and then connect it to the mains gas piping or the gas cylinder in compliance with current regulations and standards. • This appliance is designed and set to work with the gas indicated on the label situated on the actual hob. -
Page 19: Electrical Connection
Electrical connection THE APPLIANCE MUST BE EARTHED The hobs are designed to work with alternating current at the supply voltage and frequency indicated on the rating plate (situated under the hob or at the end of the instruction booklet). Make sure that the local supply voltage corresponds to the voltage indicated on the rating plate. -
Page 20: Burners And Nozzles Specifications
Burners and nozzles specifications Table 1 Liquid gas Natural gas Diameter Thermal power By-pass Injector Flow * Injector Flow* (mm) kW (H.s.*) 1/100 1/100 1/100 BURNER Nomin. Reduc. (mm) (mm) (mm) C.Rapid 3.00 B. Semi-rapid 1.65 A. Auxiliary 1.00 Nominal 28-30 Supply pressure Minimum... - Page 21 Mode d’emploi TABLE DE CUISSON Sommaire Avertissements, 22 Description du plan de cuisson, 23 Instructions pour l'utilisation, 24 Nettoyage et entretien, 25 Italien, 1 English,11 Français, 21 Instructions pour l'installation, 26 Installation des tables de cuisson, 27 Instructions pour l'installation, 28 Branchement électrique, 29 Nederlands, Deutsch, 41...
-
Page 22: Avertissements
Avertissements Félicitations! Félicitations! Félicitations! Félicitations! Félicitations! Vous venez d’acheter un électroménager construit avec des matériaux de qualité et des processus technologiques avancés. En l’utilisant, vous aurez l’occasion d’en apprécier la fonctionnalité et la sécurité, caractéristiques constantes de notre production. CES INSTRUCTIONS NE SONT VALABLES QUE POUR LES PAYS DE DESTINATION DONT LES CES INSTRUCTIONS NE SONT VALABLES QUE POUR LES PAYS DE DESTINATION DONT LES CES INSTRUCTIONS NE SONT VALABLES QUE POUR LES PAYS DE DESTINATION DONT LES CES INSTRUCTIONS NE SONT VALABLES QUE POUR LES PAYS DE DESTINATION DONT LES... -
Page 23: Description Du Plan De Cuisson
Description du plan de cuisson H H H H H A A A A A B B B B B B B B B B C C C C C G G G G G Auxiliaire Brûleur Auxiliaire Brûleur A Auxiliaire Brûleur Auxiliaire Brûleur Auxiliaire Brûleur B Brûleur gaz Semi rapide... -
Page 24: Instructions Pour L'utilisation
Instructions pour l'utilisation barrage principal de la canalisation d’alimentation Brûleurs gaz Brûleurs gaz Brûleurs gaz Brûleurs gaz Brûleurs gaz du gaz. Ils ont des dimensions et des puissances différentes. Choisissez-en un en fonction du diamètre de la casserole Utilisation des brûleurs Utilisation des brûleurs Utilisation des brûleurs Utilisation des brûleurs... -
Page 25: Nettoyage Et Entretien
Nettoyage et entretien Afin de garantir une longue durée de votre plan de cuisson, nous vous conseillons d’exécuter fréquemment un minutieux nettoyage général en respectant les règles suivantes: • Débranchez l’alimentation électrique du plan Débranchez l’alimentation électrique du plan Débranchez l’alimentation électrique du plan Débranchez l’alimentation électrique du plan Débranchez l’alimentation électrique du plan de cuisson... -
Page 26: Instructions Pour L'installation
Instructions pour l'installation ² Les instructions qui suivent s’adressent à l’installateur qualifié • avoir une section libre totale nette de passage de 6 cm afin qu’il exécute les opérations d’installation, réglage et moins pour chaque kW de débit thermique nominal de entretien technique conformément aux normes en vigueur. -
Page 27: Installation Des Tables De Cuisson
Installation des tables de cuisson Il faudra veiller à prendre toutes les précautions 1- Tables à encastrer (Classe 3) pour type 1- Tables à encastrer (Classe 3) pour type 1- Tables à encastrer (Classe 3) pour type 1- Tables à encastrer (Classe 3) pour type 1- Tables à... -
Page 28: Instructions Pour L'installation
Instructions pour l'installation Raccordement à la canalisation du gaz Raccordement à la canalisation du gaz Raccordement à la canalisation du gaz Raccordement à la canalisation du gaz Raccordement à la canalisation du gaz • Le raccordement de l’appareil à la canalisation du gaz ou à... -
Page 29: Branchement Électrique
Branchement électrique L’APPAREIL DOIT NECESSAIREMENT ÊTRE RELIÉ A LA TERRE. Toutes les plans sont prédisposés pour fonctionner en courant alternatif à la tension et fréquence d’alimentation indiquées sur la plaquette signalétique (située en dessous du plan ou aux dernière page du livret). Assurez-vous que la tension d’alimentation du réseau corresponde bien à... -
Page 30: Caractéristiques Des Brûleurs Et Des
Caractéristiques des brûleurs et des injecteurs Tableau 1 Gaz liquides Gaz naturels Diamètre Puissance By-pass Injecte- Débit * Injecteur Débit * brûleur thermique 1/100 1/100 BRûLEUR (mm) kW (H.s.*) (mm) 1/100 (mm) (mm) Nom. Red. C. Rapide 3.00 B. Demi-rapide 1.65 A. - Page 31 Gebruiksaanwijzing KOOKPLAAT Samenvatting Algemene aanwijzingen, 32 Omschrijving van de kookplaat, 33 Instructies voor het gebruik, 34 Schoonmaken en onderhoud, 35 Italiano, 1 English,11 Français, 21 Instructies voor de installateur, 36 Het installeren van kookplaten, 37 Instrukties voor de installatie, 38 Elektrische aansluiting, 39 Kenmerken van de branders en Deutsch, 41...
-
Page 32: Algemene Aanwijzingen
Algemene aanwijzingen Onze complimenten! Onze complimenten! Onze complimenten! Onze complimenten! Onze complimenten! U heeft een huishoudelijk apparaat gekocht waarbij voor het vervaardigen ervan geavanceerde technologiëen gehanteerd zijn en dat gemaakt is van kwaliteitsmateriaal. Tijdens het gebruik van dit apparaat zult u merken dat u er steeds meer plezier van zult hebben. DEZE GEBRUIKSAANWIJZING GELDT UITSLUITEND VOOR DIE LANDEN WAARVAN HET SYMBOOL DEZE GEBRUIKSAANWIJZING GELDT UITSLUITEND VOOR DIE LANDEN WAARVAN HET SYMBOOL DEZE GEBRUIKSAANWIJZING GELDT UITSLUITEND VOOR DIE LANDEN WAARVAN HET SYMBOOL... -
Page 33: Omschrijving Van De Kookplaat
Omschrijving van de kookplaat H H H H H A A A A A B B B B B B B B B B C C C C C G G G G G A. Drioevoudige ring Drioevoudige ring Drioevoudige ring Drioevoudige ring Drioevoudige ring B Halfsnelle gasbrander... -
Page 34: Instructies Voor Het Gebruik
Instructies voor het gebruik Gasbranders Gasbranders Het gebruik van de branders Het gebruik van de branders Gasbranders Gasbranders Gasbranders Het gebruik van de branders Het gebruik van de branders Het gebruik van de branders Deze verschillen in afmeting en sterkte. Kies de brander De branders zullen het beste resultaat leveren als die het beste past bij de doorsnede van de pan die u uitsluitend pannen met een voor de gebruikte brander... -
Page 35: Schoonmaken En Onderhoud
Schoonmaken en onderhoud Om ervoor te zorgen dat het apparaat lang mee gaat • Laat op de geëmailleerde of gelakte delen geen zure moet het apparaat regelmatig grondig schoongemaakt vloeistoffen achter (azijn, citroenzuur, agressieve worden, waarbij u rekening moet houden met het schoonmaakproducten enz.). -
Page 36: Instructies Voor De Installateur
Instructies voor de installateur De onderstaande instructies zijn bestemd voor de erkende installateur • een totale volledig onbelemmerde doorgangssectie van om hem in staat te stellen de handelingen met betrekking tot de tenminste 6 cm² voor iedere kW nominale warmtecapaciteit van installatie op de meest correcte wijze en in overeenstemming met de het apparaat, met een minimum van 100 cm²... -
Page 37: Het Installeren Van Kookplaten
Het installeren van kookplaten 1- Inbouwkookplaten (Klasse 3) die op één lijn 1- Inbouwkookplaten (Klasse 3) die op één lijn In dit geval is het noodzakelijk om de nodige 1- Inbouwkookplaten (Klasse 3) die op één lijn 1- Inbouwkookplaten (Klasse 3) die op één lijn 1- Inbouwkookplaten (Klasse 3) die op één lijn voorzorgsmaatregelen te treffen om er zeker van te zijn staan met het meubel (zie afbeelding 4... -
Page 38: Instrukties Voor De Installatie
Instrukties voor de installatie Aansluiting van de gastoevoer Aansluiting van de gastoevoer Ombouw van het apparaat op een andere Ombouw van het apparaat op een andere Aansluiting van de gastoevoer Aansluiting van de gastoevoer Aansluiting van de gastoevoer Ombouw van het apparaat op een andere Ombouw van het apparaat op een andere Ombouw van het apparaat op een andere gassoort... -
Page 39: Elektrische Aansluiting
Elektrische aansluiting HET APPARAAT MOET OP EEN RANDGEAARD STOPCONTACT WORDEN AANGESLOTEN. De units zijn bestemd om te worden gebruikt met wisselstroom met een spanning en frequentie zoals vermeld op het plaatje met de technische gegevens (geplaatst aan de onderzijde van de kookplaat of op het eind van de gebruiksaanwijzing). -
Page 40: Kenmerken Van De Branders En Inspuiters
Kenmerken van de branders en inspuiters TABEL 1 (voor Nederland) Vloeibaar gas Aardgas Brander Brander Warmtecapaciteit By-pas- Inspuiter Debiet * Inspuit- Debiet * doorsnee kW (H.s.*) 1/100 1/100 (mm) 1/100 (mm) (mm) (mm) Nom. Ger. G30/G31 C. Sterk 3.00 B. Normaal 1.65 A. - Page 41 Bedienungsanleitung KOCHMULDE Inhaltsverzeichnis Hinweise, 42 Beschreibung der Kochplatte, 43 Bedienung der Brennköpfe, 44 Anweisungen für den installateur, 45-46 English,11 Français, 21 Italiano, 1 Installation der kochmulde, 47 Gasanschluß, 48 Elektroanschluß, 49 Merkmale der Brenner und Düsen, 50 Nederlands, Deutsch, 41 B 40 L/CS...
-
Page 42: Hinweise
Hinweise Herzlichen Glückwunsch! Herzlichen Glückwunsch! Herzlichen Glückwunsch! Herzlichen Glückwunsch! Herzlichen Glückwunsch! Sie haben ein Haushaltsgerät gekauft, das unter Anwendung zeitgemäßer Technologien und hochwertiger Materialien hergestellt wurde. Während des Gebrauchs werden Sie die Funktionalität und die Sicherheit, konstante Merkmale unserer Produktion zu schätzen wissen. DIESE INSTRUKTIONEN SIND NUR FÜR DIE BESTIMMUNGSLÄNDER GÜLTIG, DEREN SYMBOL DIESE INSTRUKTIONEN SIND NUR FÜR DIE BESTIMMUNGSLÄNDER GÜLTIG, DEREN SYMBOL DIESE INSTRUKTIONEN SIND NUR FÜR DIE BESTIMMUNGSLÄNDER GÜLTIG, DEREN SYMBOL... -
Page 43: Beschreibung Der Kochplatte
Beschreibung der Kochplatte H H H H H A A A A A B B B B B B B B B B C C C C C G G G G G mit Dreifachkrone mit Dreifachkrone mit Dreifachkrone mit Dreifachkrone mit Dreifachkrone B Schnellkochbrenner Schnellkochbrenner... -
Page 44: Bedienung Der Brennköpfe
Bedienung der Brennköpfe Einstellung der Brennköpfe Einstellung der Brennköpfe Einstellung der Brennköpfe Einstellung der Brennköpfe Einstellung der Brennköpfe Gebrauch der Brenner Gebrauch der Brenner Gebrauch der Brenner Gebrauch der Brenner Gebrauch der Brenner Zur Einstellung auf den Drehschalter drücken und Um eine maximale Brennerleistung zu erzielen, ist es gleichzeitig entgegen dem Uhrzeigersinn drehen, bis die empfehlenswert, nur Töpfe mit einem für den Brenner... -
Page 45: Anweisungen Für Den Installateur
Anweisungen für den installateur Die nachstehenden Anweisungen wenden sich an den gemeinsame Belüftungssammelschächte qualifizierten Installateur, so daß er die Installations-, Übereinstimmung mit den geltenden Normen erfolgen. Einstell- und technischen Wartungsarbeiten auf korrekte Die Luft muß direkt von draußen kommen, und zwar in Weise in Übereinstimmung mit den geltenden Normen einem Bereich weit entfernt von Quellen, die diese durchführen kann. - Page 46 durch Erhöhung Ansaugleistung Elektroventilators, falls dieser vorhanden ist. Petroleumflüssiggase, die schwerer als Luft sind, stauen sich nach unten. Daher müssen Räume, in denen sich Gasflaschen mit Flüssiggas befinden, Öffnungen ins Freie auf Fußbodenhöhe aufweisen, um auf diese Weise das Entweichen eventueller Gaslecks nach unten zu ermöglichen.
-
Page 47: Installation Der Kochmulde
Installation der kochmulde 1-Einbaukochmulden 1-Einbaukochmulden (Klasse (Klasse Es ist notwendig, geeignete Vorsichtsmaßnahmen zu 1-Einbaukochmulden 1-Einbaukochmulden 1-Einbaukochmulden (Klasse (Klasse (Klasse ergreifen, um eine Installation gemäß den geltenden flächenbündigen Installation (siehe Abbildung flächenbündigen Installation (siehe Abbildung flächenbündigen Installation (siehe Abbildung flächenbündigen Installation (siehe Abbildung flächenbündigen Installation (siehe Abbildung Unfallverhütungsvorschriften für den Elektro- und 4, Detail H1) -
Page 48: Gasanschluß
Gasanschluß • die Düsen “A A A A A ” (Abb.8) mit Hilfe eines 7 mm • Der Anschluß des Gerätes an die Gasleitung bzw. an die Gasflasche muß entsprechend den Vorschriften Steckschlüssels ausschrauben und durch die Düsen der geltenden Normen erfolgen, und zwar erst ersetzen, die einen geeigneten Durchmesser nachdem sichergestellt ist, daß... -
Page 49: Elektroanschluß
Elektroanschluß ES IST UNERLÄSSLICH, DAS GERÄT ZU ERDEN. Die Kochplatten sind für den Betrieb mit Wechselstrom bei der auf dem Typenschild (unter dem Kochfeld bzw. am Ende der Bedienungsanleitung) angegebenen Zufuhrspannung und Frequenz eingerichtet. Es ist sicherzustellen, daß die bauseitige Anschlußspannung dem auf dem Typenschild angegebenen Wert entspricht. -
Page 50: Merkmale Der Brenner Und Düsen
Merkmale der Brenner und Düsen Tabelle 1 (DEUTSCHLAND) Flüssiggas Erdgas ø By-pass Düsen Leistung Durchfluß* Düsen Durchfluß* Brenner 1/100 1/100 kW (H.s.*) 1/100 (mm) Brenner Nom. Min. G30/G31 G25 (1) G25 (1) (mm) (mm) (mm) D.mit Dreifachkrone 3.25 C.Blitz 3.00 B.Schnell 1.65 Zufuhrdruck (mbar) - Page 52 04/2011 - 195059115.02 XEROX FABRIANO...
Need help?
Do you have a question about the B 40 L CS F Series and is the answer not in the manual?
Questions and answers