Table of Contents
Advertisement
Available languages
Available languages
7085-K_Gour Elec_Eng-SP.qxd
11/1/07
2:28 PM
Page 2
OWNER'S MANUAL / MANUAL DEL PROPIETARIO
ASSEMBLY AND OPERATING INSTRUCTIONS
INSTRUCCIONES DE ARMADO Y OPERACIÓN
SAVE THIS MANUAL FOR FUTURE REFERENCE
GUARDE ESTE MANUAL PARA REFERENCIA FUTURA
WARNING/ADVERTENCIA
HAZARDOUS EXPLOSION MAY RESULT IF THESE WARNINGS AND INSTRUCTIONS
ARE IGNORED. READ AND FOLLOW ALL WARNINGS AND INSTRUCTIONS IN THIS
MANUAL TO AVOID PERSONAL INJURY, INCLUDING DEATH OR PROPERTY DAMAGE.
SE PUEDE PRODUCIR UNA EXPLOSIÓN PELIGROSA SI SE HACE CASO OMISO A
ESTAS ADVERTENCIAS E INSTRUCCIONES. LEA Y SIGA TODAS LAS ADVERTENCIAS
E INSTRUCCIONES EN ESTE MANUAL PARA EVITAR LESIONES PERSONALES,
INCLUSO LA MUERTE, O LOS DAÑOS MATERIALES.
NOTICE TO INSTALLER:
LEAVE THESE INSTRUCTIONS
WITH THE GRILL OWNER FOR
FUTURE REFERENCE.
AVISO PARA EL
INSTALADOR:
ENTREGUE ESTAS
INSTRUCCIONES AL PROPIETARIO
DE LA PARRILLA PARA
REFERENCIA FUTURA.
Advertisement
Table of Contents

Related Manuals for Brinkmann 140-7085-K


Summary of Contents for Brinkmann 140-7085-K
- Page 1 7085-K_Gour Elec_Eng-SP.qxd 11/1/07 2:28 PM Page 2 OWNER’S MANUAL / MANUAL DEL PROPIETARIO ASSEMBLY AND OPERATING INSTRUCTIONS INSTRUCCIONES DE ARMADO Y OPERACIÓN SAVE THIS MANUAL FOR FUTURE REFERENCE GUARDE ESTE MANUAL PARA REFERENCIA FUTURA WARNING/ADVERTENCIA HAZARDOUS EXPLOSION MAY RESULT IF THESE WARNINGS AND INSTRUCTIONS ARE IGNORED.
-
Page 2: Important Safeguards
• This smoker is to be used outdoors only. Do not operate this smoker indoors or in an enclosed area. • Do not use this smoker in the rain or on wet surfaces. Do not immerse cord, plug or electric element in water or other liquids. - Page 3 • When lifting the dome lid, keep hands, face and body safe from hot steam or possible flame flare-ups. Always lift the dome lid off the smoker by tilting the dome lid toward you to allow hot steam to escape away from your face. Should a flame flare-up occur, replace dome lid and unplug smoker to smother flame.
-
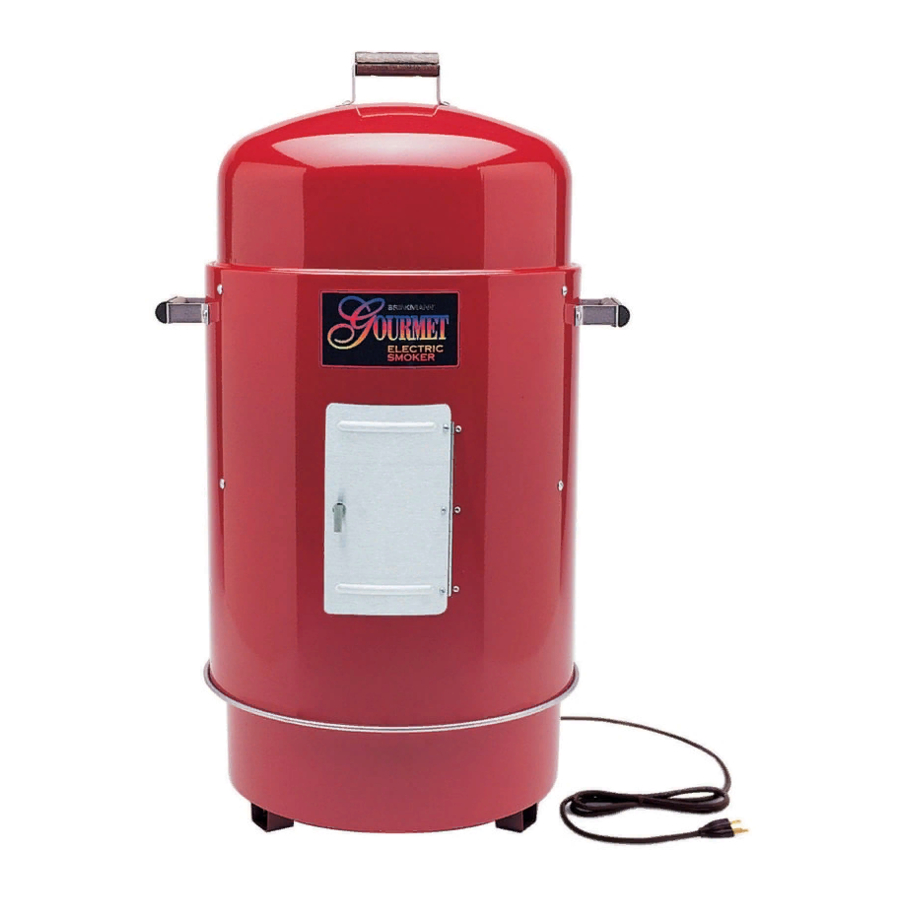
Page 4: Parts List
12 10-24 x s" Screws and Square Nuts 6 6-32 x 4" Screws and Nuts (for Door) 6 8-32 x w" Screws and Nuts (for Handles) Wood Chunk (sample) 2:28 PM Page 5 BEFORE ASSEMBLING OR OPERATING YOUR SMOKER. (Proof of purchase will be required.) - Page 5 Attach hinge to inside of smoker body as illustrated. Use 6-32 x 4" screws and nuts to attach hinge to smoker body. NOTE: Attach the hinge so pin is facing out of smoker as illustrated. b. Attach door to hinge using the remaining 6-32 x 4" screws and nuts.
- Page 6 STEP 4 a. Place water pan inside smoker body on top of lower support brackets. Position water pan so the rim is resting securely on notched out step of all three support brackets.
-
Page 7: Operating Instructions
AWAY FROM ROOF OVERHANG OR ANY COMBUSTIBLE MATERIAL. NEVER USE ON WOODEN OR OTHER SURFACES THAT COULD BURN. PLACE THE SMOKER AWAY FROM OPEN WINDOWS OR DOORS TO PREVENT SMOKE FROM ENTERING YOUR HOUSE. IN WINDY WEATHER, PLACE THE SMOKER IN AN OUTDOOR AREA THAT IS PROTECTED FROM THE WIND. - Page 8 Before each use, check handles and support brackets to make sure they are securely fastened. 4. Place the smoker body on base pan, making sure the water pan is still in place. 5. Carefully, fill water pan with warm water or marinade to 1" below the rim.
- Page 9 2:28 PM Page 10 Grilling 1. Remove dome lid and smoker body from base pan. 2. Place a cooking grill on the base pan. 3. Place food on the cooking grill in a single layer with space between each piece.
- Page 10 OPTION 1: Adding Water Through Top of Smoker 1. Unplug the smoker from electric outlet. 2. Lift the dome lid off the smoker body by tilting the dome lid toward you to allow heat and steam to escape away from your face. Use caution since flames can flare-up when fresh air suddenly comes in contact with fire.
-
Page 11: Cooking Tips
Fill water pan to 1" below the rim. Pour slowly to avoid splashing or overfilling. 4. Close side door and plug smoker back into electric outlet. Allow food to continue cooking. -
Page 12: After-Use Safety
11/1/07 AFTER-USE SAFETY • There is no ON/OFF control switch. Always turn the smoker “OFF” by unplugging cord from electric outlet when adding water and wood, or when finished cooking. • Always allow the smoker and all components to cool completely before handling. -
Page 13: Medidas De Precaución Importantes
Si el ahumador tiene cualquier daño. (Devuelva el ahumador tras la previa obtención del Número de Autorización de Devolución a The Brinkmann Corporation para su examen, reparación o reemplazo.) f. Si el interruptor de circuito de falla conectado a tierra (GFCI, por sus siglas en inglés) se activa cuando el elemento eléctrico es conectado al tomacorriente. - Page 14 • Cuando no lo esté usando, guarde el ahumador adentro en un lugar seco—fuera del alcance de los niños. • El uso de accesorios no fabricados por The Brinkmann Corporation para este ahumador no se recomienda y podría resultar en lesiones personales o daños a la propiedad.
-
Page 15: Instrucciones De Ensamblaje
7085-K_Gour Elec_Eng-SP.qxd 11/1/07 INSTRUCCIONES DE ENSAMBLAJE LEA TODAS LAS ADVERTENCIAS DE SEGURIDAD E INSTRUCCIONES DE ENSAMBLAJE CUIDADOSAMENTE ANTES DE ENSAMBLAR U OPERAR SU AHUMADOR. PARA PIEZAS FALTANTES, POR FAVOR LLAME A SERVICIO AL CLIENTE AL 800-527-0717. Inspeccione el contenido de la caja para asegurarse que todas las partes estén incluidas y sin daños. - Page 16 7085-K_Gour Elec_Eng-SP.qxd 11/1/07 PASO 1 a. Fije las mitades de la manija de madera a los soportes de metal utilizando tornillos y tuercas de 8-32 x w" como se ilustra. b. Fije dos conjuntos de manijas a los lados de la unidad principal del ahumador usando tornillos y tuercas cuadradas de 10-24 x s"...
- Page 17 7085-K_Gour Elec_Eng-SP.qxd 11/1/07 2:28 PM Page 18 PASO 3 a. Coloque la bandeja para piedras volcánicas dentro de la bandeja de base y alinee el agujero en el lado de cada bandeja. b. Trabaje desde adentro de la bandeja para piedras volcánicas alimentando el cable del elemento eléctrico a través de los agujeros ya alineados hasta que la placa trasera del elemento eléctrico esté...
-
Page 18: Instrucciones De Uso
Prior to first use, cure your smoker to minimize damage to the exterior finish as well as rid the smoker of paint odor that can impart unnatural flavors to the first meal prepared. Cure your smoker periodically throughout the year to protect against rust. - Page 19 7085-K_Gour Elec_Eng-SP.qxd 11/1/07 L T R P O U L A M E L L B E E P O R V E A E D . B E E F R A B E E K E D C O O 2:28 PM Page 20 PRECAUCIÓN:...
- Page 20 7085-K_Gour Elec_Eng-SP.qxd 11/1/07 1. Quite la tapadera de domo y la unidad principal de la bandeja de base. 2. Coloque una rejilla para cocinar sobre la bandeja de base. 3. Coloque la comida sobre la rejilla para cocinar en una sola capa dejando espacios entre cada pieza.
- Page 21 7085-K_Gour Elec_Eng-SP.qxd 11/1/07 Para Agregar No debiera tener que agregar madera saborizante adicional durante el proceso de cocción, sin embargo, podría ser necesario cuando esté cocinando pedazos de carne muy grandes. Siga las instrucciones y precauciones que aparecen abajo para evitar lesiones cuando agregue madera. Leña Mientras 1.
-
Page 22: Consejos De Cocina
7085-K_Gour Elec_Eng-SP.qxd 11/1/07 4. Ponga la rejilla para cocinar en los soportes de apoyo superiores y coloque la comida de nuevo sobre la rejilla para cocinar. 5. Coloque la tapa de domo sobre la unidad principal del ahumador. Conecte de nuevo el ahumador al tomacorriente y permita que la comida continúe cocinándose. -
Page 23: Mantenimiento
óxido. • Siempre mantenga cubierto su ahumador cuando no esté en uso para protegerlo del óxido excesivo. La cubierta Smoke’N Grill puede ser encargada directamente de Brinkmann llamando al 800-468-5252. 2:28 PM Page 24 ADVERTENCIA... -
Page 24: One Year Limited Warranty
Department at 800-527-0717 for a Return Authorization Number and further instructions. A receipt will be required. A Return Authorization Number must be clearly marked on the outside of the box. The Brinkmann Corporation will not be responsible for any smokers forwarded to us without a Return Authorization Number.
Need help?
Do you have a question about the 140-7085-K and is the answer not in the manual?
Questions and answers