Advertisement
Jack Richeson & Co., Inc.
Bag contents:
1st Step; figure A-1
2 - black knobs w/2
bolt & metal washer
4 - black plastic feet
8 - dowels (wooden pegs)
4 - 1
1
/
" screws
2
4 -
1
/
" screws*
2
Bag contents:
2nd Step; figure A-2
2 - black knobs w/2" bolt
& metal washer
12 - dowels (wooden pegs)
6 - 1
1
/
" screws
2
6 - 1
1
/
" screws
4
1 - black knob w/ 2
attached to wooden
wedge block w/spring
16 - plastic plugs
/
* The 4-
1
" screws included in
2
the 1st package are not used
until the end of assembly.
On all pieces, the larger holes
are for the dowels, the smaller
for the screws/bolts.
Warning!! Step 1 is the most
important part of the assembly.
When this is done properly,
the rest of the assembly goes
easily. This kit is designed to
give the user a professional
furniture quality easel. That
means glued parts. Please
assemble the easel completely
before adding glue. After you
are sure of the assembly steps,
then reassemble, using wood
glue on all of the wood plugs.
Also, wait until you are
finished gluing the entire
easel before inserting the
black plastic plugs that
cover the screws. They
are difficult to remove
once they are in place.
How to Assemble the
ACADEMY DULCE EASEL
#840200
P.O. Box 160, Kimberly, WI 54136-0160
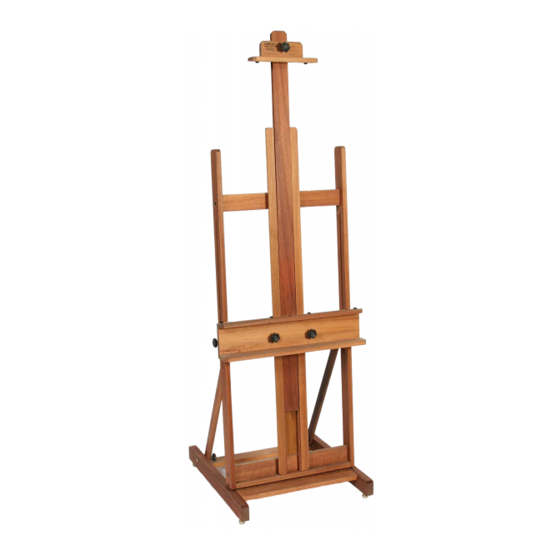
Check and Organize all Parts
1
/
"
2
H
TOP
TOP
1
/
" bolt
2
E
E
side legs
(Detailed instructions on reverse side.)
1-800-233-2404
mast
F
top cross brace
G
bottom cross brace
I
bottom cross brace
B
rear base
C
D
D
front base
side braces
lower canvas holder
top canvas holder
Fax:1-800-233-2545
richesonart.com
TOP FRONT
A
base
rev. 9/2005
A
Advertisement
Table of Contents

Related Manuals for Jack Richeson ACADEMY DULCE EASEL


Summary of Contents for Jack Richeson ACADEMY DULCE EASEL
- Page 1 How to Assemble the ACADEMY DULCE EASEL #840200 rev. 9/2005 Jack Richeson & Co., Inc. P.O. Box 160, Kimberly, WI 54136-0160 1-800-233-2404 Fax:1-800-233-2545 richesonart.com Check and Organize all Parts Bag contents: 1st Step; figure A-1 2 - black knobs w/2 "...
- Page 2 How to Assemble the ACADEMY DULCE EASEL #840200 Jack Richeson & Co., Inc. P.O. Box 160, Kimberly, WI 54136-0160 1-800-233-2404 Fax:1-800-233-2545 richesonart.com For best results and maximum stability, secure all wood dowels with wood glue. braces Be careful to lay out and identify all parts before gluing.
Need help?
Do you have a question about the ACADEMY DULCE EASEL and is the answer not in the manual?
Questions and answers