Table of Contents
Advertisement
Quick Links
NOTICE TO INSTALLER:
LEAVE THESE INSTRUCTIONS
WITH THE GRILL OWNER FOR
FUTURE REFERENCE.
OWNER'S MANUAL
ASSEMBLY AND OPERATING INSTRUCTIONS
SAVE THIS MANUAL FOR FUTURE REFERENCE
WARNING
HAZARDOUS EXPLOSION MAY
RESULT IF THESE WARNINGS AND
INSTRUCTIONS ARE IGNORED. READ
AND FOLLOW ALL WARNINGS AND
INSTRUCTIONS IN THIS MANUAL TO
AVOID PERSONAL INJURY, INCLUDING
DEATH OR PROPERTY DAMAGE.
0
Advertisement
Table of Contents

Subscribe to Our Youtube Channel
Related Manuals for Brinkmann Backyard Kitchen


Summary of Contents for Brinkmann Backyard Kitchen
- Page 1 NOTICE TO INSTALLER: LEAVE THESE INSTRUCTIONS WITH THE GRILL OWNER FOR FUTURE REFERENCE. OWNER’S MANUAL ASSEMBLY AND OPERATING INSTRUCTIONS SAVE THIS MANUAL FOR FUTURE REFERENCE WARNING HAZARDOUS EXPLOSION MAY RESULT IF THESE WARNINGS AND INSTRUCTIONS ARE IGNORED. READ AND FOLLOW ALL WARNINGS AND INSTRUCTIONS IN THIS MANUAL TO AVOID PERSONAL INJURY, INCLUDING DEATH OR PROPERTY DAMAGE.
-
Page 2: Important Safety
IMPORTANT SAFETY WE WANT YOU TO ASSEMBLE AND USE YOUR GRILL AS SAFELY AS POSSIBLE. THE PURPOSE OF THIS SAFETY ALERT SYMBOL ATTENTION TO POSSIBLE HAZARDS AS YOU ASSEMBLE AND USE YOUR GRILL. WHEN YOU SEE THE SAFETY ALERT SYMBOL PAY CLOSE ATTENTION TO THE INFORMATION WHICH FOLLOWS! READ ALL SAFETY WARNINGS AND INSTRUCTIONS CAREFULLY BEFORE ASSEMBLING AND OPERATING YOUR GRILL. - Page 3 Never use natural gas in a unit designed for liquid propane gas. • Never use charcoal briquets or lighter fluid in a gas grill. • Leak test all connections before first use, even if grill was purchased fully assembled and after each tank refill.
-
Page 4: Installation Information
DO NOT connect to a cylinder that uses any other type of valve connection device. CYLINDER SPECIFICATIONS: When purchasing or exchanging a cylinder for your gas grill, it must be constructed and marked in accordance with the specifications for LP gas cylinders of the U.S. Department of Transportation (DOT) or the National Standard of Canada, CAN/CSA-B339 as applicable with a listed over-filling prevention device (OPD). - Page 5 The cylinder must also be equipped with: • A shut-off valve terminating in a Type 1 gas cylinder valve outlet. • A Type 1 valve that prevents gas flow until a positive seal is obtained. • An arrangement for vapor withdrawal. •...
-
Page 6: Filling The Lp Gas Cylinder
300°F (115°C and 150°C). If this should happen, remove the entire regulator assembly and throw it away. A replacement regulator assembly can be purchased by contacting Brinkmann at 1-800-527-0717. The cause of the excessive heat should be determined and corrected before using your grill again. - Page 7 Never use your grill without leak testing all gas connections and hoses. See the section on "Leak Testing" in this manual for proper procedures. The pressure regulator and hose assembly supplied with your gas grill is designed to work with an LP gas supply cylinder.
-
Page 8: Leak Testing
LEAK TESTING: To prevent fire or explosion hazard: • DO NOT smoke or permit ignition sources in the area while conducting a leak test. • Perform test OUTDOORS only in a well ventilated area. • Never perform a leak test with a match or open flame. •... -
Page 9: Pre-Start Checklist
6. Check each place listed (A -M) for growing bubbles which indicates a leak. 7. Turn OFF gas supply at cylinder valve. 8. Turn on control knobs to release gas pressure in hose. 9. Turn control knobs to “off” position. 10. -
Page 10: Lighting Instructions
Read, understand and follow all warnings and instructions contained in this manual. DO NOT skip any of the warnings and instructions contained in the preceding sections of this manual. LIGHTING INSTRUCTIONS: Follow the instructions exactly. 1. OPEN THE GRILL LID before attempting to light the burner so that fumes do not accumulate inside the grill. -
Page 11: Lighting The Side Burner
LIGHTING THE SIDE BURNER: 1. Open or remove the lid to the side burner before lighting. 2. Turn on the side burner by pressing in and rotating the control knob to the HIGH position. 3. Press and hold the igniter button on the main control panel until the burner ignites. -
Page 12: Operating The Grill
CONTROLLING FLARE-UPS: • Flare-ups are a part of cooking meats on a gas grill. This adds to the unique flavor of cooking on a gas grill. Excessive flare-ups can over-cook your food and cause a dangerous situation for you or your grill. -
Page 13: Rotisserie Cooking
(unlit) side of the grill. ROTISSERIE COOKING: • Your grill was pre-drilled from the factory to include mounting holes for a Brinkmann rotisserie (sold separately). Do not use a rotisserie not specifically manufactured for this grill. • Read and follow all instructions provided with the rotisserie. Save instructions for future reference. -
Page 14: Transporting And Storage
THE SINK: • Attach a standard garden hose to the supply line and a spigot to provide water for the faucet. Turn on the water supply to the garden hose. The faucet handle turns on and off the water flow. NOTE: Do not leave water supply to garden hose on when not in use. -
Page 15: Cleaning And Maintenance
• If storing the grill outdoors, cover the grill with a grill cover for protection from the weather. A grill cover can be purchased by contacting: The Brinkmann Corporation at 1-800-527-0717. CLEANING AND MAINTENANCE: • For safe grilling and peak performance of your grill, perform these checks at least twice per year or after extended periods of storage. -
Page 16: Troubleshooting
COOKING GRILLS • Clean with mild soap detergent and water. A brass bristled brush or a nylon cleaning pad can be used to remove residue from the cast iron cooking surface. Do not use steel wire bristles to clean the cast iron cooking grills. -
Page 17: Proper Care And Maintenance
• To protect your grill from excessive rust, the unit must be kept clean and covered at all times when not in use. A grill cover may be ordered directly from Brinkmann by calling 1-800-468-5252 or 1-800-527-0717. • Wash cooking grill and briquet grate with hot, soapy water, rinse well and dry. Lightly coat cooking grill with vegetable oil or vegetable oil spray. -
Page 18: Assembly Instructions
READ ALL SAFETY WARNINGS & ASSEMBLY INSTRUCTIONS CAREFULLY BEFORE ASSEMBLING OR OPERATING YOUR GRILL. WE RECOMMEND TWO PEOPLE WORK TOGETHER WHEN ASSEMBLING THIS UNIT. The following tools are required to assemble this Brinkmann Stainless Steel Backyard Kitchen: • Pliers •... - Page 19 FOR MISSING PARTS, PLEASE CALL CUSTOMER SERVICE AT 1-800-527-0717. Inspect contents of the box to ensure all parts are included and undamaged. (Proof of purchase will be required.)
-
Page 20: Parts Bag Contents
PARTS BAG CONTENTS Make sure you have all items listed under PARTS LIST and PARTS BAG CONTENTS before you begin the installation process. Your Parts Bag will include: PARTS BAG CONTAINS: 10 #8 X 3/8” sheet metal screws Stainless steel sheet metal screws M6 X 12 bolts 34 M6 X 35 bolts Plastic inserts... - Page 21 Grill - Bottom Frame NOTE: Wider flange indicates top edge of frame. NOTE: End caps indicate top of legs. Kitchen - Bottom Frame Kitchen - Bottom Frame Studs Choose a good, cleared assembly area and get a friend to help you put your grill together.
- Page 22 Step 4 Attach tank support bracket to open end of grill bottom frame using two M6 X 35 bolts and M6 X 5 hex nuts. NOTE: Securely tighten all bolts at this time. Step 5 Attach locking casters to bottom of right straight legs and plain casters to bottom of middle straight legs).
- Page 23 NOTE: Four small holes in frame. Trim Panel Kitchen - Upper Support Frame Step 9 Attach kitchen upper support frame using eight M6 X 35 bolts. Four small holes in frame should be positioned on left side and face up. Step 10 Add face panel using four stainless steel sheet metal screws.
- Page 24 Step 13 Slide baskets into slots located on inside of doors. Step 14 Attach right side panel between straight legs using four #8 X 3/8" sheet metal screws. Panel should be mounted with louvers toward bottom of panel. Then add four plastic inserts into holes on straight legs.
- Page 25 NOTE: Inside view of Lower Grill Housing Inside view of Lower Grill Housing Bottom - Outside view of Lower Grill Housing Step 18 Mount lower grill housing onto upper grill frame using four M6 X 35 bolts and M6 X 5 hex nuts. Step 19 Remove four bolts from burner supports on bottom of burner.
- Page 26 Step 21 Place hood on top of lower grill housing and insert hinge pins through upper and lower hinges, then secure with cotter pins. Bend ends of cotter pin around hinge pin to secure. Step 22 Attach one handle stand using two M6 X 12 bolts and M6 X 5 hex nuts.
- Page 27 Orifice inserted into Venturi Tube NOTE: Locate faucet hole towards backside of grill. Step 25 Slide side burner frame onto burner legs. Align holes in frame with holes in leg. Secure using three stainless steel sheet metal screw. Step 26 Place side burner grid over burner.
- Page 28 Step 29 Install drain by placing rubber gasket around opening in bottom of basin. Insert drain through opening. Place second gasket under bottom side of the basin and over the drain. Secure using large plastic nut provided with drain. Hand tighten. Step 30 Place faucet through the hole in the basin with one washer above...
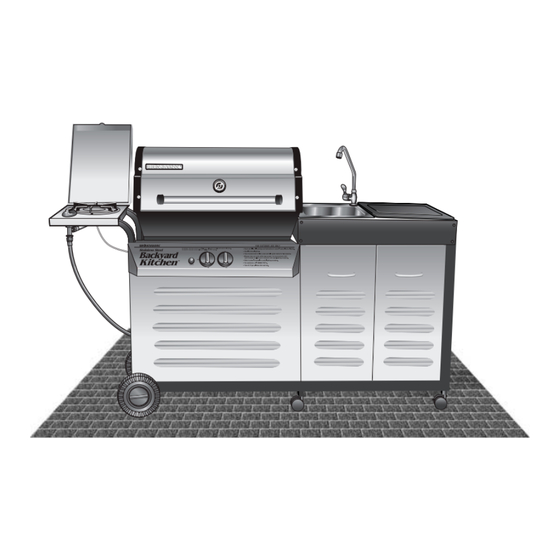
- Page 29 Bottom - Outside view of Lower Grill Housing Brinkmann Stainless Steel Backyard Kitchen (Assembled) Your grill is covered with a plastic film to protect the stainless steel finish during shipment and assembly. This plastic film must be removed Center hole for Grease Cup before operating your grill.
- Page 30 ACCESSORIES BACKYARD KITCHEN COVER Our heavy-duty, durable vinyl cover with felt backing provides years of protection for Brinkmann Backyard Kitchen. This top-of-the-line cover comes with closure strips at both ends to prevent cover from slipping or blowing off. Black. 812-3500-0 PROFESSIONAL SHISH-KABOB SKEWERS These heavy-duty, 18"...
- Page 31 Restaurant-style aluminum fry pan with nickel plated wire straining basket is an essential tool for frying fish, chicken, french fries, onion rings and more. Strainer basket holder helps drain excess oil. Use outdoors with the Brinkmann Backyard Kitchen and avoid the mess and odor of frying indoors.
-
Page 32: One-Year Limited Warranty
• This warranty does not cover ceramic briquets, surface scratches, rust or heat damage to the finish, which is considered normal wear. • The Brinkmann Corporation may elect to repair or replace damaged units covered by the terms of this warranty. • This warranty extends to the original purchaser only and is not transferable or assignable to subsequent purchasers.
Need help?
Do you have a question about the Backyard Kitchen and is the answer not in the manual?
Questions and answers