Table of Contents
Advertisement
Advertisement
Table of Contents

Related Manuals for Satlink ST-5150


Summary of Contents for Satlink ST-5150
- Page 1 SATELLITE FINDER ST-5150 User's Manual...
-
Page 3: Table Of Contents
English CONTENTS 1. GUIDE ......................1 IMPORTANT SAFETY INSTRUCTIONS ........... 1 1.2 UNPACKING ....................1 1.3 PRODUCT OVERVIEW& ILLUSTRATION ..........2 2. OUTLINE ....................5 3. THE MENU OSD INSTRUCTION .............6 3.1 DVB-S2 ......................6 3.2 DVB-T2 ......................9 3.3 DVB-C ......................12 3.4 LOOP SEARCH ....................13 3.5 ANGLE CALCULATION ................13 3.6 OTHERS ......................13 3.7 MULTIMEDIA ....................17... -
Page 5: Guide
English 1. GUIDE 1.1 IMPORTANT SAFETY INSTRUCTIONS Thank you for choosing our product. Before installation, we would like to remind you some notes, which is very important for operating safely and properly, as follows: • Be sure to read this user manual before starting your operation. -
Page 6: Product Overview& Illustration
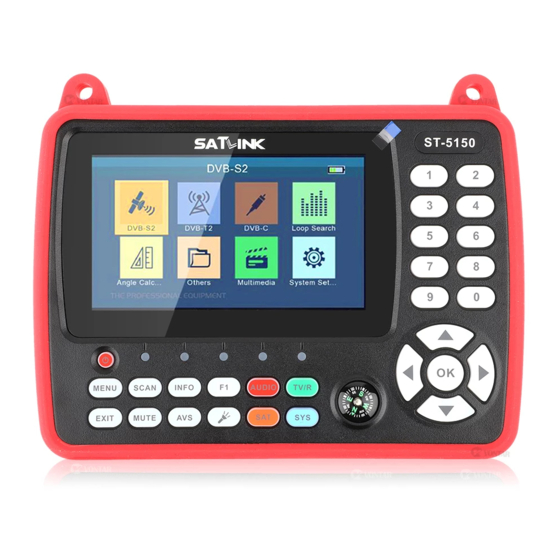
1.3 PRODUCT OVERVIEW& ILLUSTRATION NO Description FUNCTION Turn on/off meter Power indicator light Power 22kHz 22kHz indicator light Vertical /Horizontal polarization voltage output light LOCK Signal lock indicator light Charge Charger indicator light Show the main menu on the screen or jump back to MENU previous menu in sub-menu setting conditions... - Page 7 English NO Description FUNCTION AV-S AV IN/OUT switch key Auxiliary function key Turn on/off Torch Audio type selection / Red AUDIO Shortcut key for Sat Installation menu TV/R TV/Radio switch key Shortcut key for System Setting menu Compass Mechanical compass Volume Control or move NAVIGATION KEY cursor, channel or change,...
- Page 8 NO Description FUNCTION USB port for software upgrading or multimedia playing DC IN Connect to power adaptor Battery Battery Speaker Speaker integrated...
-
Page 9: Outline
English 2. OUTLINE • 4.3 Inch High Definition TFT LCD Screen • Fully DVB-S/S2/T/T2/C compliant • MPEG2, MPEG4, H.264/MPEG4 AVC, H.265/HEVC hardware decoding • Digital meter for signal strength and quality • Supports Auto Scan and Manual Scan • Sound and Light Alarm for Locking Signal •... -
Page 10: The Menu Osd Instruction
3. THE MENU OSD INSTRUCTION If you have installed and connected the cables to the finder, pressing MENU to display the Main Menu. • DVB-S2 • DVB-T2 • DVB-C • Loop Search • Angle Calculation • Others • Multimedia • System Setting Press the keys of YZAB to move the cursor up or down in the menu interface, then use OK to confirm a selection. - Page 11 English 3.1.1 SATELLITE Press AB key into the satellite list. Use YZ key to move the cursor, then press OK to select the satellite you want. 3.1.2 LNB TYPE There are 4 types you can select: C Band/Ku Band/Unicable I/ Unicable II.
- Page 12 3.1.9 DISEQC MODE Press AB key to set the type of port as None/DiSEqC1.0/1.1. 3.1.10 DISEQC TYPE & INPUT In C/Ku Band mode: we can press AB key to set DiSEqC 1.0/1.1 as A/B port, and set Tone Burst Mode as NONE/Tone Burst A/B. In Unicable mode: we can press AB key to switch IF Index from 1 to 8, or use number key to modify IF Freq, and then press AB key to select...
-
Page 13: Dvb-T2
English • Scan: Press the ENTER key to search the current TP. • Au to S c an: P re s s t he re d key to auto blind search the current satellite. 3.2 DVB-T2 Select DVB-T2, then press OK into the Scan Setup. - Page 14 3.2.3 FREQUENCY Frequency of the current channel, input the value by using the number keys. 3.2.4 BANDWIDTH Press AB key to change the bandwidth, we can select 5, 6, 7 or 8M. 3.2.5 MODE Press AB key to change the DVB standard, we have there types including T/T2/T+T2, you can select one you want.
- Page 15 English 3.2.10 QUICK SEARCH When parameters have been set done, press OK into quick search. There will have some signal information displayed on the screen. • Scan: Press OK or red key to search current channel. • Auto Scan: Press green key to auto search the current channel.
-
Page 16: Dvb-C
3.3 DVB-C Select DVB-C, then press OK into the Scan Setup. 3.3.1 COUNTRY Press AB key to change the default country. 3.3.2 CHANNEL NO. Press AB key to change the channel number. 3.3.3 FREQUENCY Frequency of the current channel, input the value by using the number keys. -
Page 17: Loop Search
English 3.4 LOOP SEARCH We can see 8 TP or channels w h e n w e e n t e r i n t o t h i s interface, and press OK to edit. T here are 3 modes we c an choose: DVB-S2,DVB-T2 and DVB-C. - Page 18 3.6.1 CHANNEL LIST • SAT Press F1 key to switch different channel list. • Lock Press YZ key to select programs we want to lock, then press the red key to lock them. • Del Press the green key to delete current channel. • Move Select a channel first, then press the orange key to move to other position.
- Page 19 English Press the red key to add a new satellite. Press the green key to edit current satellite. Press the orange key to delete current satellite. Press the blue key to sc an current satellite. 3.6.3 TRANSPONDER LIST All the transponders under the current satellite will be displayed on the screen, and press AB key to switch satellite.
- Page 20 Press the red key to add a new transponder. Press the green key to edit current transponder. P r e s s t h e o r a n g e ke y t o delete current transponder. Press the blue key to scan current transponder.
-
Page 21: Multimedia
English • Set West Limit Move motor to west. • Disable Limits Unlimited movement. Press the red key to save setting. Press the green key to reset setting. 3.6.5 EPG P r e s s Y Z k e y t o c h a n g e program. -
Page 22: System Setting
3.8 SYSTEM SETTING • Language Press AB key to change the OSD language, default is English. • Country Press AB key to change the country. • Aspect Ratio Press AB key to change the aspect ratio: 4:3 LB/4:3 PS/16:9/ full screen. • Video Resolution Press AB key to change the video output resolution: 480p/576p/720p/1080i/1080p. - Page 23 English • Upgrade Will upgrade the file into the USB, then insert the machine. Press OK to upgrade interface, use the direction key to select update file, and press OK to mupgrade. Warning: Please don’t turn power off or pull out the USB, otherwise it will damage the machine’s software, and can’t boot again.
-
Page 24: Technical Specification
4. TECHNICAL SPECIFICATION TRANSMISSION STANDARDS DVB-S2/S, DVBT/T2, DVB-C SATELLITE INPUT/DEMODULATION Connector Type F Type Input Frequency 950 to 2150 MHz Signal Input Level - 65 to -25 dBm Band Switch Control 22KHz LNB Supply 13V/18V, IMax 400mA Demodulation Type QPSK,8PSK,16APSK,32APSK Symbol Rate 2<Rs<45Mband(SCPC/MCPC) DVB-T/T2/C INPUT/DEMODULATION... - Page 25 English HDMI output connecter Format HDMI 1.4 AV input interface Connector Type 3.5 mm jack Video Input CVBS Audio Input Stereo Audio L/R input AUDIO/VIDEO PROCESSING MPEG-2 MP@HL, MPEG-1 Decoding,MPEG‐4 ASP@L5 HD Video decompression resolution,H.264 MP&HP@L4, H.265/HEVC,HW JPEG decoding Resolving rate PAL-25 frame@720*576,NTSC-30 frame@720*480 Support conversion for different video...
- Page 26 Adapter OUTPUT :DC12V/1.2A, INTUPT :100~240VAC 50/60Hz(Will be subject to actual configuration) Power Consumption Max. 10W PHYSICAL CHARACERSTICS Size (W x D x H) 17 x 12 x 4 (cm Net Weight...
-
Page 27: Trouble Shooting
English 5. TROUBLE SHOOTING Problem Possible Causes What To Do Power switch is not Check to make sure No display light on Run out of power on. Even on batteries adapter No sound or picture,but the AV IN jack insert, but front panel Pull out AV IN cable no video input... - Page 28 The system is Check the UHF channel AV out No connected by SCART fixed in your system and picture(Video) cable and TV is not tune the UHF properly. in AV mode. Out of battery Even on adapter The key is not make sure no blocks working Key blocks...
Need help?
Do you have a question about the ST-5150 and is the answer not in the manual?
Questions and answers
satlink 5150 showing short circuit on lnb s2 input
When the Satlink ST-5150 shows a short circuit on the LNB S2 input, it means there is an electrical short in the connection between the device and the LNB. This could be due to a damaged cable, connector, or a faulty LNB, and it prevents proper signal transmission. The issue should be resolved before continuing use to avoid damage to the device.
This answer is automatically generated