
Related Manuals for AVANT A35676


Summary of Contents for AVANT A35676
- Page 1 English Cutter bar mower 2017 1 Operator's Manual for Attachment Cutter bar mower Cutter bar mower A35676 www.avanttecno.com...
- Page 2 Cutter bar mower 2017 1...
-
Page 3: Table Of Contents
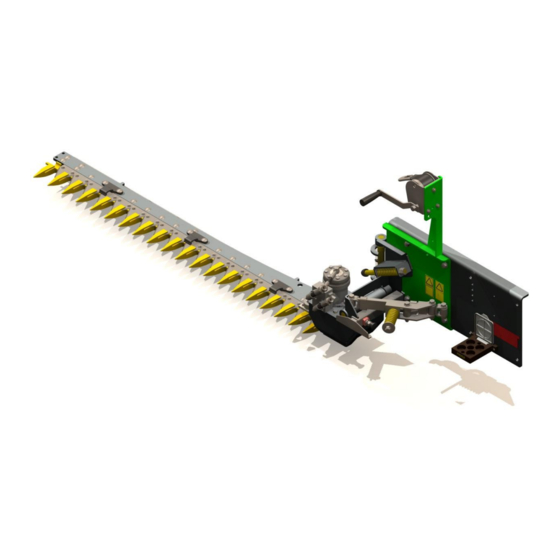
Cutter bar mower 2017 1 CONTENTS 1. FOREWORD ............................4 Warning symbols used in this manual ........................... 5 2. DESIGNED PURPOSE OF USE......................6 3. SAFETY INSTRUCTIONS FOR USING THE ATTACHMENT ............7 4. TECHNICAL SPECIFICATIONS ....................... 10 4.1.1 Hydraulic flow and operating speed......................11 Safety labels and main components of the attachment .................. -
Page 4: Foreword
If you sell or transfer the equipment, be sure to hand over this manual to the new owner. If the manual is lost or damaged, you can request a new one from your Avant dealer or from the manufacturer. -
Page 5: Warning Symbols Used In This Manual
5 (28) Warning symbols used in this manual The following warning symbols are used throughout this manual. They indicate factors that must be taken into account to reduce the risk of personal injury or damage to property: WARNING: SAFETY ALERT SYMBOL This symbol means: “Warning, be alert! Your safety is involved!”... -
Page 6: Designed Purpose Of Use
2. Designed purpose of use The AVANT Cutter bar mower is an attachment suitable for use with AVANT multi purpose loaders shown in Table 1. The mower is a very effective attachment for cutting hay from fields, meadows and road shoulders. It makes cutting and easy collecting of even long hay possible, while it allows to easily collect the cut hay. -
Page 7: Safety Instructions For Using The Attachment
7 (28) 3. Safety instructions for using the attachment Please bear in mind that safety is the result of several factors. The loader-attachment combination is highly powerful and improper or careless use or maintenance may cause serious personal injury or property damage. - Page 8 8 (28) Survey the operating area before starting the mower. Observe and mark, as necessary, any obstructions at the area, such as rocks, posts, or stay wires. Keep the limits of the machine in mind and remove obstacles or larger trees beforehand. ...
- Page 9 Prevent starting of the machine, remove ignition key. Observe the local regulations concerning the use of the equipment on public roads. The loader may need to be registered for road use. Contact your local Avant dealer or local authorities for more information.
-
Page 10: Technical Specifications
Compatible Avant loaders: See Table 1 The following options can be fitted to the attachment. Ask for the availability of the options from your dealer. For installation services, contact your nearest Avant service point as needed. Optional extras: Electric blade bar control... -
Page 11: Hydraulic Flow And Operating Speed
11 (28) 4.1.1 Hydraulic flow and operating speed It is important to operate the attachment with the recommended hydraulic oil flow. Too high flow can cause quick wear of the attachment and its blades. The reciprocating connecting rod assembly can also be damaged permanently, if the attachment is operated at too high speed. - Page 12 Follow safe stopping procedure before going near the attachment. A418332 Attachment identification plate Table 4 - Cutter bar mower - Main components Frame with Avant quick coupling system Multiconnector holder Blade bar, 19 blades Blade bar lowering winch (or optional electric actuator)
-
Page 13: Attaching The Attachment
13 (28) 5. Attaching the attachment Attaching the attachment to the loader is quick and easy, but it must be done carefully. The attachment is mounted to the loader boom by using the quick attach plate on the loader boom and the counterpart on the attachment. - Page 14 On Avant loaders the hydraulic hoses are connected using the multi connector system. If you have an Avant 300-700 series loader with the conventional quick couplers and wish to change to the multi connector system, contact your Avant dealer or service point for instructions or installation services.
- Page 15 15 (28) The lever should move easily all the way to its locking position. If the lever does not slide smoothly, check the alignment and position of the connector and clean the connectors. Also shut down the loader and release the residual hydraulic pressure.
-
Page 16: Electric Connection
16 (28) 5.1 Electric connection The mower can be equipped with an electric actuator, that replaces the manual winch for lowering the blade bar. To operate the electric selection valve on the Cutter bar mower, the electric harness must be connected to the loader. - Page 17 17 (28) Correct storage position: At the front of the mower, there is a support stand, which must be extended to prevent the mower from tipping forward. Uncoupling the mower: 1. Select a level and firm storage area that can support the mower standing upright.
-
Page 18: Instructions For Use
18 (28) 6. Instructions for use Check the attachment and the operating environment once more before starting to work, and that all obstacles have been removed from the operating area. Quick inspection of the equipment and the operating area before use are parts of ensuring safety and the best performance of the equipment. -
Page 19: Checks Before Use
19 (28) Risk of collisions - Ensure good visibility. Never lift this attachment to a height where visibility is obstructed. Ensure unobstructed visibility to all directions. Keep all windows clean and free of dirt, ice, snow etc. WARNING 6.1 Checks before use ... -
Page 20: Blade Spring Release System
20 (28) Turning the blade bar to operating position: Before handling the manual winch, stop the attachment following safe stopping procedure. Lower the blade bar with controlled motion, holding the winch handle throughout lowering. When using the electric blade bar lowering, the actuator is controlled with switch number 2 of the attachment control switch pack, or by using the 2-way switch delivered with the attachment. - Page 21 21 (28) Risk of injuries related to sudden stop - Drive slow and always stay alert for possible obstacles. For the safety of the operator, the blade is equipped with safety mechanisms to reduce the risk of sudden stopping of the machine and the possibility of WARNING injuries that could follow.
-
Page 22: Long Hay Mowing Kit (Optional Equipment)
22 (28) 6.4 Long hay mowing kit (optional equipment) If you cut long hay repeatedly, the mower can be equipped with a long hay mowing kit. The kit reduces entangling of hay onto the blade bar, and will guide the clippings for more even performance. The kit also protects the end of the blade bar, making it recommendable to install the kit whenever the blade may hit the ground often. -
Page 23: Maintenance And Service
Repair all leaks immediately after detecting them; a small leak can quickly grow into a big one. Operate the attachment only with type of hydraulic oil that is accepted for use in Avant loaders. -
Page 24: Inspection Of Metal Structures
Finding any fault means that the hydraulic hose or component must be replaced and the equipment must not be used until it is repaired. Spare parts are available from your nearest AVANT retailer or authorised service point. Leave the repair work to professional service technicians, if you don’t have adequate knowledge and experience about hydraulic assemblies and how to perform the repairing safely. -
Page 25: Lubrication
25 (28) 7.4 Lubrication There are a total of 3 lubrication points at the joints of the attachment. A small amount of grease should be added regularly. The lubrication points are located in vertical joint of the blade bar ... -
Page 26: Warranty Terms
26 (28) 8. Warranty terms Avant Tecno Oy grants a warranty of one year (12 months) from the date of purchase for the attachment it manufactures. The warranty covers repair costs as follows: Work costs are covered, if the repair is not performed at the factory. - Page 27 Hydraulisk slåtterbalk; arbetsredskap för Avant lastare Hydraulisk fingerslåmaskin; redskap for Avant minilastere A35676 Hydraulisk fingerklipper; redskab til Avant Minilæssere Hydraulic cutter bar mower;; attachment for Avant loaders 22.2.2017 Ylöjärvi, Finland Risto Käkelä, Toimitusjohtaja / Verkställande direktör / Administrerende direktør /...
Need help?
Do you have a question about the A35676 and is the answer not in the manual?
Questions and answers