Table of Contents
Advertisement
Advertisement
Table of Contents

Related Manuals for PetSpy XPro


Summary of Contents for PetSpy XPro
-
Page 3: Important Safety Information
You may find after some time that your dog is very tolerant of the collar. If so, you may relax some of these precautions. Nevertheless, it is important to continue daily checks of the con- tact area. Copyright © 2015-2020 PetSpy Inc. All rights reserved. -
Page 4: Warranty
You can download it at www.petspy.com - it is absolutely free. If you have any questions, please visit our website or contact PetSpy Customer Service at support@petspy.com - we will be happy to assist you. - Page 5 Testing Light Kit Charger and USB Cable with Silicone Caps Note: PetSpy has 2 models of XPro Dog Training Collars: XPro (for 1 dog) and XPro-3 (for 3 dogs). This manual is designed for both models. Visit www.petspy.com to download this guide.
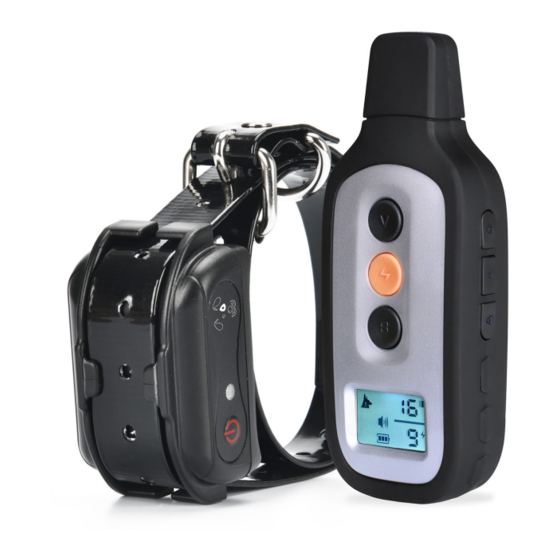
- Page 6 REMOTE TRANSMITTER - BUTTONS AND INDICATORS 1. Power Button - press and hold the button to turn the remote on and off. 2. Channel Switch - press the button to choose which collar is being controlled. Keep in mind that one collar can only work with one channel at the time. Please refer to Synchronizing Remote Transmitter with Receiver Collar para- graph to learn how you can reprogram the system.
-
Page 7: Important Notes
Shock, Vibration, or Tone. By using PetSpy XPro consistently you can train your dog to eliminate any undesired behavior (jumping up, digging, chasing, etc.) and teach your dog understand many obedience commands (sit, come, stay, voice, etc). -
Page 8: Remote Transmitter Operation
PREPARING REMOTE TRANSMITTER FOR YOUR FIRST USE Make sure that Remote Transmitter is charged before proceeding to the train- ing: 1. The charging port is located on the bottom side of the remote. Plug one end of the charging cable into the charging port on the remote. Plug another end of the charging cable into the power source. - Page 9 4. The system is now paired - try to send any command to test it. If you have 2 or 3 collars, repeat the above steps for each collar on channels 1-3. TESTING PETSPY DOG TRAINING SYSTEM Shock Test: •Take the included Test Light and put its metal wire on the Receiver’s Contact Points.
-
Page 10: Fitting The Collar
Even if your dog already knows the basic obedience commands, follow the procedures given. Your dog must learn how to respond to the e-collar for each command before you can use your PetSpy collar for training at a distance. -
Page 11: General Tips
PetSpy XPro has 16 different stimulation levels. This allows you to choose the level that is best for your pet. Once you have placed the Receiver Collar on your pet, it is time to find the Stimulation Level that is best for him. This is called the Recognition Level . -
Page 12: Troubleshooting
•Contact us at support@petspy.com if the above steps don’t help. REGULAR MAINTENANCE AND STORAGE •When not used, PetSpy Dog Training System must be kept in a dry place just like any other electronic devices. •To prevent batteries from damage, charge both the Transmitter and Receiver regularly even when it’s not used. - Page 13 15. Where can i get a copy of the user manual or dog trainig e-book? You can download it free of charge at www.petspy.com. Should you have more questions, feel free to contact us at support@petspy.com...
-
Page 14: Terms Of Use And Limitation Of Liability
Pay extra attention to all Caution statements. 2. No Unlawful or Prohibited Use This Product is designed for use with dogs only. PetSpy dog training collar is not intended to harm, injure, or provoke. Using this product in a way that is not intended could result in violation of Federal, State or local laws.
Need help?
Do you have a question about the XPro and is the answer not in the manual?
Questions and answers
xpro v2.0 not pairing. tried using instructions provided.
The PetSpy XPro V2.0 may not be pairing despite following the instructions if:
1. The transmitter or receiver is not fully charged or not turned on.
2. The receiver is not properly in Synchronization Mode (hold the power button for 5 seconds until it beeps and the green LED flashes rapidly).
3. The correction command is not sent while the LED is still flashing.
4. The channel on the remote is not correctly set for the collar being used.
Ensure all steps are followed precisely and verify the devices are powered and properly synchronized.
This answer is automatically generated