Table of Contents
Advertisement
Quick Links
Advertisement
Table of Contents

Subscribe to Our Youtube Channel
Related Manuals for Bartscher 150145


Summary of Contents for Bartscher 150145
- Page 1 Top Juicer 150145...
- Page 2 Bartscher GmbH Phone: +49 5258 971-0 Franz-Kleine-Str. 28 Fax: +49 5258 971-120 Technical Support Hotline: +49 5258 971-197 D-33154 Salzkotten Germany www.bartscher.com Version: 2.0 Date of preparation: 2020-12-14...
-
Page 3: Table Of Contents
List of Components of the Appliance ............9 Functions of the Appliance ..............10 Installation and operation ................11 Installation ....................11 Operation ....................12 Cleaning ...................... 18 Safety Instructions for Cleaning ............. 18 Cleaning ....................18 Disposal ....................... 20 150145 1 / 22... -
Page 4: Safety
The signal word DANGER warns against hazards that lead to severe injuries or death if the hazards are not avoided. WARNING! The signal word WARNING warns against hazards that may lead to moderate or severe injuries or death if the hazards are not avoided. 2 / 22 150145... -
Page 5: Safety Instructions
Do not bend, pinch nor knot the power cord. • Always completely unwind the power cord. • Never place the appliance or other objects on the power cord. • Always take hold of the plug to disconnect the appliance from the power supply. 150145 3 / 22... -
Page 6: Intended Use
As described below, every use of the appliance for a purpose differing and/or diverging from its intended standard use, is prohibited and considered to be an unintended use. The following is an intended use: – Making fruit and vegetable juices. The appliance is intended for home use only. 4 / 22 150145... -
Page 7: Unintended Use
An unintended use may lead to personal injuries or property damages caused by hazardous voltage, fire or high temperature. The appliance may only be used to perform tasks described in this instruction manual. The following is an unintended use: – Processing of unsuitable food products. 150145 5 / 22... -
Page 8: General Information
Declaration of Conformity The appliance meets the currently applicable standards and guidelines of the European Union. We confirm the above in the EC Declaration of Conformity. We may provide relevant Declaration of Conformity upon request. 6 / 22 150145... -
Page 9: Transport, Packaging And Storage
– in a location protected against mechanical shocks. In the case of extended storage (over three months), make sure you check the condition of the packaging and the parts regularly. If needed, replace the packaging with a new one. 150145 7 / 22... -
Page 10: Technical Data
Technical Data Technical Data Technical Specifications Name: Juicer Top Juicer 150145 Article number: Material: stainless steel, plastic Speed levels: Rotational speed (RPMs), max.: 18000 Volume of pulp container, in l: Diameter of filling shaft, in mm: Connected load: 0,7 kW / 230 V / 50-60 Hz... -
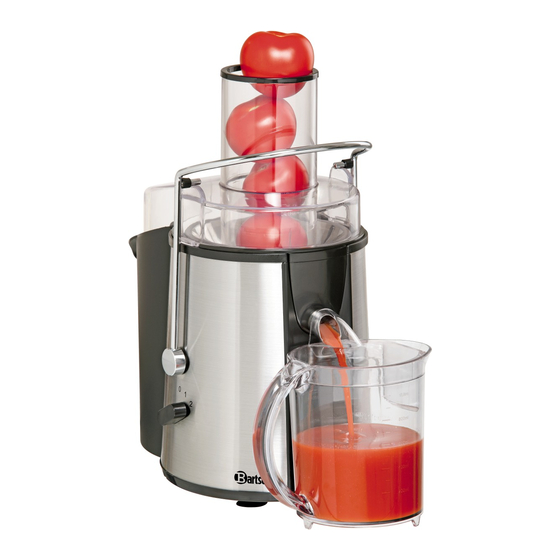
Page 11: List Of Components Of The Appliance
2. Locking bow with safety element 3. Pusher 4. Filling shaft 5. Lid 6. Splash-guard 7. Plastic beaker 8. Sieve basket 9. Cleaning brush 10. Juice spout pipe 11. Sieve base 12. Speed level switch (0–1–2) 13. Pulp container 150145 9 / 22... -
Page 12: Functions Of The Appliance
Functions of the Appliance The appliance is designed for efficient juice production. Powerful motor — in connection with large filling shaft and pulp container — makes it possible to effortlessly squeeze juice from whole fruit or vegetables. 10 / 22 150145... -
Page 13: Installation And Operation
– sufficiently large, and thus enabling usage of the appliance with no problems; – easily accessible; – well ventilated. • Maintain sufficient clearance from table edges. The appliance might turn over and fall down. • Leave at least 20 cm clearance from flammable walls and items. 150145 11 / 22... -
Page 14: Operation
Some stones of citrus fruit may be bitter. Remove the stones in such fruit before you proceed to squeezing the juice. • Cut the fruit and vegetables that are too large into smaller pieces. Conical vegetables and fruits, such as carrots, introduce with a thin end first. 12 / 22 150145... - Page 15 Celery roots Cut into 6–7 cm pieces Cucumbers Remove skin, cut into approx. 15 cm pieces Tomatoes Fennel Cut into 6–7 cm pieces Cherries Remove stones Apricots Remove stones Peaches Remove stones Plums/European Remove stones plums 150145 13 / 22...
- Page 16 2. Rinse the cleaned elements in fresh water and then wipe them with a linen-free cloth or leave to dry in open air. 3. Wipe the motor block, base unit and supply cord with a soft, moistened cloth. 14 / 22 150145...
- Page 17 7. Then, pull the locking bow (2) over the lid (5). Latch it in nest at both sides of the lid (5). ATTENTION! The appliance operates only when all components are correctly fitted, and the locking bow with safety element is engaged with the lid. 150145 15 / 22...
- Page 18 Fig. 3 6. Move the pusher slowly down, with a little pressure, to get a minimum amount of juice. When pressed too hard, the amount of the obtained juice is reduced, and the appliance may be damaged. 16 / 22 150145...
- Page 19 (rotate the speed level switch to '0'). Leave the appliance to cool down before the squeezing process is continued. 12. When the squeezing process is finished, switch the appliance off and disconnect it from mains socket (pull the plug out). 150145 17 / 22...
-
Page 20: Cleaning
4. Hold the sieve basket under running water and brush the external side of the sieve basket first, using the enclosed brush. 5. Then brush the inside of the sieve basket with the brush, making movements in counter-clockwise direction to remove the left over pulp. 18 / 22 150145... - Page 21 8. Clean the base unit / motor block and power cord with a soft, damp cloth only. 9. Then wipe the base unit / motor block and power cord dry with a soft cloth only. 10. Assemble all the parts after drying, and prior to subsequent use or storage of the appliance. 150145 19 / 22...
-
Page 22: Disposal
You must not dispose of electric appliances with household waste. Disconnect the appliance from the power supply and remove power cord from the appliance. Electrical appliances should be returned to designated collection points. 20 / 22 150145...
Need help?
Do you have a question about the 150145 and is the answer not in the manual?
Questions and answers