
Related Manuals for TQC PowderTAG


Summary of Contents for TQC PowderTAG
- Page 1 T Q C P o w d e r TAG LD5850 IMPORTANT! Before taking this instrument in use we strongly advise you User Guide to read this manual carefully. V1.1 0117...
- Page 2 Warranty TQC will grant a warranty for a period of 12 months for TQC PowderTAG and 12 months for all related equipment from the date of delivery in respect of any evidence of faulty workmanship and materials. Should a delivered consignment prove to be contrary to contract upon inspection, the customer shall grant TQC the opportunity hereunder of removing the fault, or else the customer may demand a replacement.
- Page 3 It mainly comes in handy on curved objects and corners that cannot be measured with a regular coating film thickness gauge • In case of new combinations of materials check measured PowderTAG values against a regular coating thickness gauge. • When a second layer of coating is applied the PowderTAG will add 25% of the layer thickness of the first (cured) layer to the measured value of the second layer. To calculate the actual layer thickness of the second layer this 25% has to be substracted from the measured value.
-
Page 5: Table Of Contents
THE INSTRUMENT 2.1 General 2.2 Details 2.3 Operating principle 2.4 Power Supply GETTING STARTED 3.1 Insert batteries and connect sensor 3.2 Starting the PowderTAG and perform measurements USER INTERfACE 4.1 Main menu 4.2 Measurement screen 4.3 Measure settings 4.4 Instrument Settings MeAsUrING MOde 5.1 Notes for coating thickness measurement... - Page 6 cONTeNT CARE AND MAINTENANCE 7.1 Transport and Storage 7.2 Maintenance 7.3 Cleaning 7.4 Batteries sPeCIfICATIONs 8.1 equipment specifications 8.2 Safety 8.3 Disposal DISCLAIMER...
-
Page 7: Introduction
The measurement system consists of a sensor and a display device. The sensor is connected to the display device with a cable. Please note that the performance-, range- and accuracy of the PowderTAG is depending on the structure and specific colour of the powder coating. The majority of powder coatings can be measured without any problems. -
Page 8: Copyright
1.3 copyright The copyright of this operating manual remains with TQC. This operating manual is intended solely for the user and his personnel. Its instructions and guidelines may not be duplicated, circulated or otherwise passed on to others, neither fully, nor partly. -
Page 9: The Instrument
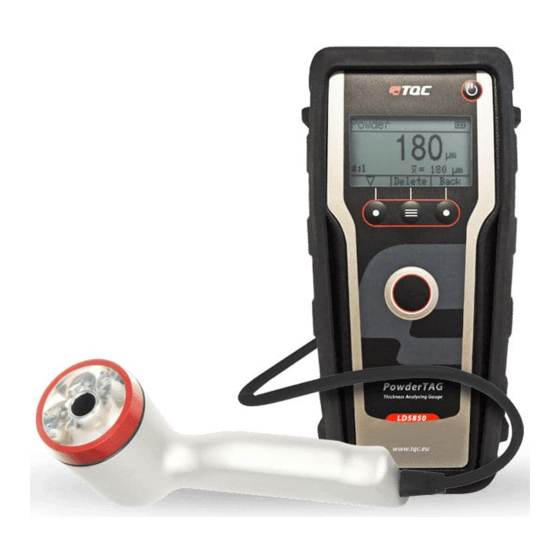
2. The INsTRUMeNT 2.1 General The PowderTAG is delivered in a rugged hard carrying case. The package includes: • A photo-thermal coating thickness sensor with cable • A display unit for displaying the coating thickness readings • four li-Ion batteries plus extra pack of four li-Ion batteries • Quad Charger for li-Ion batteries • rubber harness to protect the display unit • Verification tool (see chapter 4.4) • Manual The display unit has a large graphic display (128 x 64 pixels) with backlight that allows easy... -
Page 10: Details
2.2 Details a. On/Off button b. Measurement button Context-sensitive function buttons d. Sensor with led pointers Coating thickness sensor plug Display unit socket g. Battery compartment lid h. fixation screws Rating plate with serial number IR warning sign... -
Page 11: Operating Principle
Statistic function: Measure settings Mean value Number of measurements Max deviation Measurement value Highest value Compliance to set limit values Lowest value Too high Description context-sensitive Compliance function buttons Too low Battery level 2.3 Operating principle The on-off button (a) is used to turn the instrument on or off. Activating the sensor and triggering of measurements is carried out with the large, easy identifiable measure button (b) in the middle of the device. The triggering of measurements is only possible when the measurement or calibration function is selected and the probe (d) is... -
Page 12: Power Supply
2.4 Power supply The PowderTAG is powered by four Li-Ion batteries 3.7V type (included). It is not suitable for operation with conventional 1.5V AA batteries. To charge the batteries, an external battery charger (included) must be used. This charger is exclusively designed for Li-ion batteries. -
Page 13: Getting Started
3.2 starting the PowderTAG and perform measurements 1. Press the on-off button (a) for 2 seconds to turn the PowderTAG on. The instrument is immediately ready for operation. The display shows the selected application (1). - Page 14 4. Point the sensor to the object. Make sure the three LED pointers combine into one point on the object. This is the correct measuring distance. 5. Press the measurement button to trigger the measurement (b). Start and end of the measurement are indicated by a brief flash of the positioning LEDs and an acoustic signal.
-
Page 15: User Interface
4 UseR INTeRfAce 4.1 Main menu After turning the unit on the measurement screen appears. The context sensitive function but- ton on the right (c3) has the function ‘back’ . This can be read in the display (6c). It takes you back to the main menu. -
Page 16: Measure Settings
By pressing the left context sensitive function button (6a) the display of statistical values (if enabled) can be switched between the following statistic functions: Mean value Max deviation Highest value Lowest value When coating thickness limits are defined (see section 4.3.1), the left context sensitive function button description (6) shows compliance (O) or higher ( ) is - or lower ( ) Pressing the center function button shortly, deletes the last recorded measured value. Pressing it long deletes all recorded values. -
Page 17: Instrument Settings
Deletes all measured values, user calibrations, and user settings Information: Displays the version and date *To change the settings, select (c1) the correct setting and press the OK button (c2). 4.4.1 check instrument 1. Go to the instrument settings menu and choose Check instrument 2. Take the reference socket / verification tool out of the case 3. Place the sensor on the reference socket verification tool as shown on the picture 4. Press the OK button to start the check 5. The displays shows if the test function (Ir source) is OK or not (NOK) 6. If the result is “not okay’ for five times in a row, even after changing batteries, the instrument needs to be returned to TQC. -
Page 18: Measuring Mode
(See Chapter 6). NOTe When a second layer of coating is applied the PowderTAG will add 25% of the layer thickness of the first (cured) layer to the measured value of the second layer. To calculate the actual layer thickness of the second layer this 25% has to be substracted from the measured value. -
Page 19: Performing Measurements
5.3 Performing measurements 5.3.1 freehand measurements Photo-thermal measuring processes are non-contact thus non-destructive. While performing a freehand thickness measurement it is important to keep the correct working distance to the object. The LED-pointer helps to achieve this. The pointer consists of three on the sensor positioned LEDs. -
Page 20: Calibrations
Measure settings menu of the PowderTAG shows all the Calibration options. Three factory calibrations are available: Powder, Powder Thick and Cured. It is possible to create user calibrations based on the factory calibrations. The PowderTAG has the option of single-point or two-point calibration. -
Page 21: User Calibration
Here you can make measurements, and adjust the measurement value manually. We suggest the following calibration procedure for Powder application: • Create a reference object and choose the area you want to measure. • Take a series of 5 measurements of this area with the PowderTAG. Use the measurement button (b) to perform the measurement. The PowderTAG displays the mean of all measurements. • remember the area you have measured. • Cure the reference object. •... - Page 22 PowderTAG measured coating thickness = offset = measured point = calibrated point Example: With a regular coating thickness gauge you have determined that the average layer thickness of a certain spot is 80µm. On this same spot the PowderTAG averagely measures 60µm. This way you have determined that a specific powder deviates +20μ to the actual layer thickness. By correcting the value to 80μm (and store it), the deviation is compensated.
-
Page 23: Loading Calibrations
Both factory set calibrations and user calibrations can be loaded in the measurement settings menu. factory set calibrations are powder, powder thick and cured. User calibrations are listed s eparately in measure settings > user calibration>load. After selecting the appropriate calibration the calibration is activated and the PowderTAG switches to the Measurement display. -
Page 24: Editing User Calibrations
6.7 Deleting User calibrations NOTe All measured values and user calibrations can be deleted immediately via the menu Instrument settings >> factory reset. The PowderTAG returns to the measurement screen. All User settings will be reset as well. (See also section 4.4) -
Page 25: Care And Maintenance
See also section 7.4.1 Batteries in carry-on baggage (aircraft cabin) 7.2 Maintenance All maintenance work must be carried out exclusively by the company TQC. In particular, the casing of the display unit must never be opened. for accumulating maintenance the company TQC must be consulted. -
Page 26: Batteries
The battery employed in PowderTAG is a generic single cell Lithium-Ion battery, 3.7V 850mAh. The battery employed in PowderTAG has a capacity of 3.11 Watt-hours, and is rated for low-power use only. A protection circuitry has been applied to the PowderTAG mainboard as per best practice. -
Page 27: Specifications
8 sPecIfIcATIONs 8.1 equipment specifications 8.1.1 environmental conditions Data Value Unit Altitude <2000 m Relative humidity 5 - 80% Relative humidity (32 ° C) 5 - 50% Temperature (operating) 5 - 40 ° C Temperature (storage) 0 - 55 ° C Estimated operating time approx 5000 h 8.1.2 Display unit... -
Page 28: Safety
8.2 safety 8.2.1 Designated purpose The photo-thermal meter "PowderTAG" is exclusively designed to determine the thickness of wet and dry organic coatings for quality assurance and production-related testing in the laboratory environment as described within the specifications. Other applications will be considered improper use. TQC will not be held liable for damage resulting from improper use. Designated purpose also includes proper observing all instructions in the operation manual, and adhere to inspection and maintenance schedules. - Page 29 The infrared beam may inflame flammable materials, liquids or gases and cause serious or even fatal injuries. - Do not use PowderTAG in hazardous areas. - Don’t point the infrared beam directly to highly flammable materials. 8.2.4 dangers involved in using lithium-ion batteries - Avoid mechanical and thermal loads.
-
Page 30: Disposal
8.2.5 Notes on Using the charger The charger must only be used for charging batteries of the type 14500th It is recommended to load the batteries at least in pairs (2 or 4 pieces) in slot 1 and 3 and / or 2 and 4. The charger is only designed for use indoors. - Page 32 4053 S. Lapeer Road - Suite Metamora, MI. 48455 - USA +1 810 678 2400 +1 810 678 2422 joel@tqc-usa.com www.tqc-usa.com TQC ITALIA S.R.L. Via Cesare Cantu’, 26 20831 Seregno (MB) - ITAlY +39 0362 1822230 +39 0362 1822234 info@tqcitaly.it www.tqc.eu...
Need help?
Do you have a question about the PowderTAG and is the answer not in the manual?
Questions and answers