Advertisement
Available languages
Available languages
Quick Links
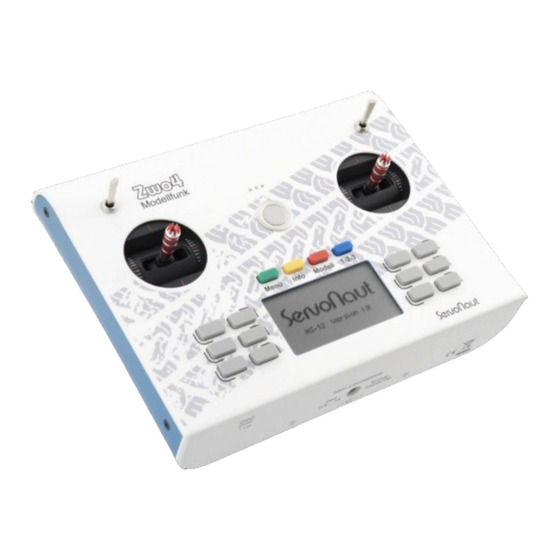
Zwo4StickSet3D
Umrüst-Set für Servonaut HS12
besonders geeignet für die Steuerung
von Baumaschinen
Technische Daten
Funktion:
2-Achsen Kreuzknüppel plus eine
Drehachse und Drucktaster, erweitert
die Proportionalgeber des HS12
um 2 Drehachsen (auf insgesamt 6)
3D Stick Set for Servonaut HS12
especially for construction machinery
Specifications
Features:
2 axes joystick plus rotary knob
and push button, 2 additional
proportional inputs (6 in total) for
the HS12
Advertisement

Subscribe to Our Youtube Channel
Related Manuals for Servonaut Zwo4StickSet3D


Summary of Contents for Servonaut Zwo4StickSet3D
- Page 1 Funktion: 2-Achsen Kreuzknüppel plus eine Drehachse und Drucktaster, erweitert die Proportionalgeber des HS12 um 2 Drehachsen (auf insgesamt 6) 3D Stick Set for Servonaut HS12 especially for construction machinery Specifications Features: 2 axes joystick plus rotary knob and push button, 2 additional...
- Page 3 Umrüstset aus zwei 3D- Sticks mit Taster für den Servonaut Handsender HS12 Das Set ist besonders geeignet für die Steue- rung von Baumaschinen wie Kräne und Bagger. Die zusätzliche Drehachse lässt sich zum Beispiel für die Kettensteuerung oder das Drehen...
- Page 4 Standard-Knüppel entfernen Ebenen-Umschalter entfernen Sender auf die Front-Seite legen. Als · · Schraube an der Akku-Platine lösen, Unterlage eignet sich zum Beispiel ein Platine nach oben schieben und hoch- kleinerer offener Karton oder Klötze als nehmen. Abstandshalter, damit die Knüppel frei ·...
- Page 5 3D-Knüppel einsetzen Die schwarzen Abdeckringe von oben auf Sender umdrehen und auf der Front die · · die 3D-Knüppel setzen - geriffelte Seite Überwurfmuttern der Ebenen-Umschalter nach oben. Knüppel einsetzen und fest- mit einem Schraubenschlüssel lösen. schrauben (je vier Schrauben pro Knüppel, Umschalter nach innen ziehen und samt eine davon verdeckt durch Platine).
- Page 6 Software-Einstellungen im HS12 Nach dem Umrüsten müssen Sie im Sender folgende Einstellungen vornehmen: · Rufen Sie das Sendermenu auf über [Menü] > [Sender] > [3D Stick]. · Aktivieren Sie die 3D-Sticks! (Bei Wechsel auf 2D-Knüppel hier wieder deaktivieren.) · Aus dem Sendermenü gelangen Sie mit zwei Tasten ins Abgleichmenü...
- Page 7 · Den Geberabgleich durchführen: Dazu den entsprechenden Knüppel in die Richtung des angezeigten Pfeils bewegen und am Anschlag festhalten, bis der Pfeil nicht mehr angezeigt wird. · Knüppel wieder in Mittelposition bringen (wird durch ein Quadrat in der Mitte symbolisiert). Dies für jeden angezeigten Pfeil wiederholen.
- Page 9 Upgrade set with two 3D sticks with push buttons for Servonaut radio HS12 The kit is especially suited for construction machinery, e.g. tracked vehicles and cranes because of the additional rotary knob. We recommend to use a console for the radio.
- Page 10 Remove standard joysticks Remove level switches Place the radio on its front. Use a small Unscrew the battery plate, push it box or blocks as spacers so the sticks upwards and take it out. hang freely. Remove the plugs of the level switches Remove the white plugs and loosen the and pull the cables.
- Page 11 Insert new 3D sticks Place the black cover ring on the stick - Loosen the coupling nuts of the level swit- the rough side upwards. Insert the 3D ches on the front with a wrench. Pull sticks and screw them tight (four screws inside and remove the level switches each, one under the pcb).
- Page 12 Software Setup with the HS12 After mounting the new sticks you need to adjust the settings with your HS12 radio: Go to the radio menu with [Menü] > [Radio] > [3D Stick]. Activate the 3D Sticks! (If you change back to 2D sticks deactivate the 3D sticks again.) In the radio menu go to the adjustment menu by pressing two buttons in this...
- Page 13 Calibrate the controls: Move the stick according to the arrow in the display and hold it in end position until the arrow disappears. Move the stick back to the center position (a square is shown). Repeat for each arrow the display shows. For the rotary function make sure to turn the stick in the direction the arrow points to - if the arrow points to the left turn the...
- Page 15 Haftung bleibt in jedem Fall auf den Kaufpreis beschränkt. Die Haftung für Folgeschäden ist ausgeschlossen. Subject to change without notice. Technische Änderungen vorbehalten. “Servonaut” ist eine 5/2015 eingetragene Marke der tematik GmbH. Alle weiteren Produktnamen, Warenzeichen und Firmennamen sind Eigentum ihres jeweiligen Besitzers.
- Page 16 Sammelstellen. Die Abgabe dort ist kostenlos. Help us to protect the environment. Please do not dispose electrical and electronic equip- ment in domestic household waste. tematik GmbH - Servonaut WEEE-Reg.-Nr. DE 76523124 tematik GmbH Fon: +49 (0) 4103 80 89 89 - 0...
Need help?
Do you have a question about the Zwo4StickSet3D and is the answer not in the manual?
Questions and answers