Table of Contents
Advertisement
Available languages
Available languages
Quick Links
Dosificadores / Dispensers
VITLAB
Dispenser TA
Antes del primer uso enjuagar cuidadosamente
el aparato o desechar las primeras dosificacio-
nes.
Before using the instrument for the first time,
ensure it is rinsed carefully or discard the first
few samples dispensed.
®
Instrucciones de manejo
2
Operating Manual
VITLAB GmbH
Linus-Pauling-Str.1
63762 Grossostheim
Germany
tel: +49 6026 97799-0
fax: +49 6026 97799-30
info@vitlab.com
www.vitlab.com
Advertisement
Chapters
Table of Contents

Subscribe to Our Youtube Channel
Related Manuals for Vitlab TA2


Summary of Contents for Vitlab TA2
- Page 1 Dosificadores / Dispensers VITLAB ® Dispenser TA Instrucciones de manejo Operating Manual VITLAB GmbH Linus-Pauling-Str.1 63762 Grossostheim Germany Antes del primer uso enjuagar cuidadosamente el aparato o desechar las primeras dosificacio- tel: +49 6026 97799-0 nes. fax: +49 6026 97799-30 Before using the instrument for the first time,...
-
Page 3: Table Of Contents
Contenido 1. Normas de seguridad 2. Función y limitaciones de empleo 3. Campos de aplicación recomendados 4. Elementos de manejo 5. Primeros pasos 6. Purgar el aire 7. Dosificación 8. Accesorios 9. Límites de errores 10. Controlar el volumen (Calibrar) 11. -
Page 4: Normas De Seguridad
firmemente. ción, si está lleno el cilindro dosificador. 16. El aparato no debe esterilizarse en autoclave. 2. Función y limitaciones de empleo El dosificador acoplable a frasco VITLAB Dispenser TA se emplea para la dosificación de líquidos directa- ®... - Page 5 300 mbares aspire lentamente para de inmediato (pág. 17). evitar la ebullición del líquido. – viscosidad cinemática hasta 500 mm El VITLAB Dispenser TA está concebido para ® (viscosidad dinámica [mPas] = aplicaciones generales de laboratorio y cumple con viscosidad cinemática [mm²/s]...
-
Page 6: Campos De Aplicación Recomendados
3. Campos de aplicación recomendados Elegir válvulas con resortes de platino-iridio o tantalio dependiendo del campo de aplicación. El aparato puede utilizarse para dosificar los medios siguientes: Medio a dosificar Resortes de válvulas: Resortes de válvulas: Ta Pt-Ir Ácido acético Ácido clorhídrico Ácido fluorhídrico* Ácido fosfórico... -
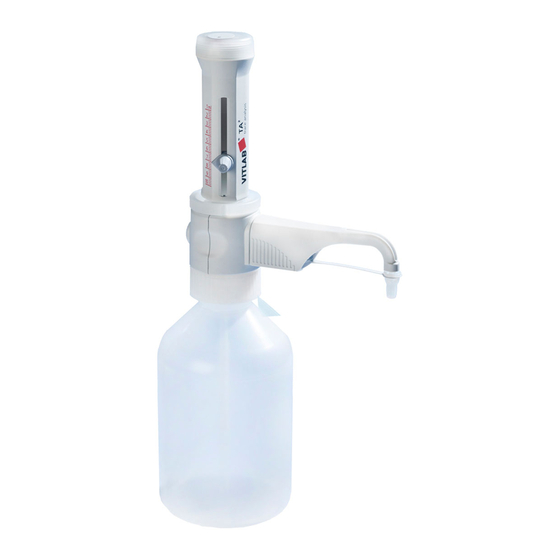
Page 7: Elementos De Manejo
4. Elementos de manejo Logement du piston Cabeza del émbolo Flèche indicatrice Ajuste del volumen Unidad de dosificación con número de serie Parties du boîtier Manette de la soupape de purge Anillo de retención Cánula de Válvula de purga dosificación (opcional) Bloque de válvulas (GL 45 filetage de flacon) -
Page 8: Primeros Pasos
5. Primeros pasos 5.1 Contenido del embalaje El embalaje contiene: Dosificador acoplable a frasco VITLAB Dispenser TA , tubo de aspiración telescópico, cánula de dosifica- ® ción o cánula de dosificación con válvula de purga y tubo para dosificación inversa (optativa para aparato con válvula de purga), llave de montaje, tres adaptadores para frasco, un certificado de calidad y estas... - Page 9 Montaje y alineación del aparato en el frasco Enrosque el aparato (rosca GL 45) en el frasco del reactivo y alinee la cánula de dosificación de acuerdo con la etiqueta del frasco. Para ello, gire el bloque de válvulas (fig. 3). Para frascos pequeños utilizar el soporte con objeto de evitar que se vuelque el frasco (véase pág.
-
Page 10: Purgar El Aire
6. Purga al aire ¡Atención! Utilizar protección para los ojos, vestimenta y guantes de protec- ción. No desplazar nunca el émbolo hacia abajo estando colocada la caperuza a rosca! Evitar salpicaduras de reactivo! En la caperuza a rosca pueden acumularse restos de medios. ¡Dosificar despacio para evitar salpicaduras! Observar todas las reglas de seguridad así... -
Page 11: Dosificación
7. Dosificación 7.1. Ajustar el volumen Mediante tres cuartos giro suelte el tornillo de regulación de volumen (1), desplace la flecha indicadora verticalmente hasta el volumen deseado (2) y vuelva a apretar el selector de volumen (3). 7.2. Dosificación ¡Atención! Utilizar protección para los ojos, vestimenta y guantes de protec- ción. -
Page 12: Accesorios
Después retíre la cánula de dosificación mediante movimientos suaves hacia arriba y abajo (fig. 1). 4. Deslice el soporte del tubo de dosificación flexible desde la parte inferior del bloque de válvulas (fig. 2) y enrosque. VITLAB ® Dispenser TA no debe ser montado en la botella. - Page 13 Tubo de secado Con medios sensibles a la humedad y al CO puede ser necesario utilizar un tubo de secado con un medio absorbente adecuado (no incluido en el suministro) (véase 'Accesorios', pág. 22). Montaje Desenrosque el tapón de aireación con una moneda (fig. 1) Enrosque el tubo de secado lleno (fig.
-
Page 14: Límites De Errores
68 °F) del aparato, del ambiente, y del agua destilada. La prueba se realizó según 20 °C DIN EN ISO 8655-6 con el aparato completamente lleno y dosificación uniforme y sin sacudidas. Límites de errores VITLAB Dispenser TA ® E* ≤ ±... -
Page 15: Controlar El Volumen (Calibrar)
10. Controlar el volumen (Calibrar) Dependiendo de la aplicación, recomendamos realizar un control gravimétrico de volumen del aparato cada 3 a 12 meses. La periodicidad debe adaptarse a los requisitos individuales. Las instrucciones detalladas de calibración (SOP) pueden descargase en www.brand.de. Adicionalmente puede efectuarse un control de funcionamiento en períodos de tiempo cortos, p. -
Page 16: Ajustar
11. Ajustar Después de un uso prolongado puede ser necesario un ajuste. Calibrar p. ej. después del ajuste del volumen nominal (pág. 15). Calcular el volumen medio (valor real) (pág. 15). Ajustar el aparato (ajustar el valor real). Después del ajuste, calibrar nuevamente para control. Insertar el vástago de la llave de montaje en la tapa del dispo- sitivo de ajuste (fig. -
Page 17: Limpieza
12. Limpieza Para garantizar el funcionamiento correcto del aparato, debe limpiarse en los casos siguientes: antes de cambiar una válvula antes del primer uso periódicamente si se utilizan fluidos que for- inmediatamente si el émbolo se mueve con man depósitos (p. ej. medios cristalizantes) dificultad periódicamente, si se acumulan fluidos en la antes de cambiar el reactivo... -
Page 18: Limpieza Para Análisis De Trazas
13. Limpieza para análisis de trazas Antes de utilizarlo para análisis de trazas, el aparato debe limpiarse cuidadosamente. Para ello, utilizar reactivos de grado de pureza "pro análisis", o superior. Para evitar una contaminación del contenido del frasco, utilizar el aparato sin la válvula de purga. En el caso de que el aparato se utilizara con la válvula de purga, la limpieza deberá... -
Page 19: Cambio De Cánula De Dosificación/ Válvulas
14. Cambio de cánula de dosificación/ válvulas ¡Advertencia! El cilindro, las válvulas, el tubo de aspiración telescópico y la cánula de dosificaciónestán llenos de reactivo. Por lo tanto, antes de pro- ceder con el desmontaje, ¡realice siempre una limpieza estándar! ¡La unidad de dosificación no debe desmontarse! ¡Cumpla con las disposiciones de seguridad! (véase pág. -
Page 20: Desmontaje Del Aparato
Dispenser TA se utiliza una válvula de aspiración ® siempre idéntica, pero distintas válvulas de expulsión. Para su diferenciación, las válvulas de expulsión del VITLAB Dispenser TA ® están identificadas con 'Pt-Ir' o 'Ta'. Prestar atención que en el VITLAB Dispenser TA se utilice solo la válvula de aspiración pre-... -
Page 21: Referencias
16. Referencias VITLAB Dispenser TA , Analógico ® volumen resortes de sin válvula de purga con válvula de purga válvulas ref. ref. Platino-iridio 1627515 1627525 Tantalio 1627535 1627545 Nota: Alcance del suministro véase pág. 80. 17. Accesorios · Recambios Adaptadores para frasco ETFE/PTFE. - Page 22 Tubo de dosificación ref. nominal, ml Ø externo mm Ø interno mm 1678136 Válvula de salida Tubos de aspiración VITLAB Dispenser TA ® telescópicos PFA/zafiro. Resorts de FEP. Longitud ajustable válvulas: identificaión de de manera individual. la válvula 'Pt-Ir' or 'Ta'.
- Page 23 Válvula de aspiración Tubo para dosificación PFA/ zafiro. Identi- inversa ficaión de la válvula 'S'. 1 unidad por embalaje. 1 unidad por embalaje. ref. 1676739 ref. 1676747 Caperuza a rosca Llave de ajuste, con fijación montaje ETFE. 1 unidad por embalaje. 1 unidad por embalaje.
-
Page 24: Qué Hacer En Caso De Avería
18. ¿Qué hacer en caso de avería? Avería Causa probable ¿Qué hacer? Líquido está encima del Émbolo no hermético. Efectúe una limpieza estándar, cambie la unidad émbolo dosificadora (pág. 17-20). Desplazamiento Formación de cristales, Inmediatamente abstenerse de dosificar. Proceder a difícil del émbolo suciedad una limpieza (pág. -
Page 25: Reparación · Service De Calibración
Las instrucciones de calibrado detalladas se pueden descargar de la página www. vitlab.com para un download. Además, VITLAB le ofrece la posibilidad de calibrar sus instrumentos por medio del servicio de calibrado de VITLAB. Mándenos sencillamente los instrumentos a calibrar con la información qué tipo de calibrado desea. -
Page 26: Garantía
20. Garantía No seremos responsables de las consecuencias derivadas del trato, manejo, mantenimiento, uso incorrecto o reparación no autorizada del aparato, ni de las consecuencias derivadas del desgaste normal, en especial de partes susceptibles de abrasión, tales como émbolos, juntas hermeticas, valvulas, ni de la rotura de partes de vidrio o del incumplimiento de las instrucciones de manejo. - Page 27 Contents 1. Safety Instructions 2. Functions and Limitations of Use 3. Recommended Application Range 4. Operating Elements 5. First Steps 6. Priming 7. Dispensing 8. Accessories 9. Error Limits 10. Checking the Volume (Calibration) 11. Adjustment 12. Cleaning 13. Cleaning for trace analysis 14.
-
Page 28: Safety Instructions
9. Reagents can accumulate in the screw cap of the discharge tube. Thus, it should be cleaned regularly. 2. Functions and Limitations of Use The bottle-top dispenser VITLAB Dispenser TA is designed for dispensing liquids directly from the reservoir ®... - Page 29 – vapor pressure up to max. 600 mbar. Aspirate should be cleaned immediately (see page 41). slowly above 300 mbar, in order to prevent the liquid from boiling. The VITLAB Dispenser TA is designed for general ® – kinematic viscosity up to 500 mm...
-
Page 30: Recommended Application Range
3. Recommended Application Range Select valves with platinum-iridium or tantalum valve springs, based on the intended application. The instrument can be used for the following dispensing media: Dispensing medium Valve springs: Pt-Ir Valve springs: Ta Acetic acid Ammonia solution Bromine Hydrochloric acid Hydrofluoric acid* Hydrogen peroxide... -
Page 31: Operating Elements
4. Operating Elements Cover plate Piston seat Pointer Volume adjustment Replaceable dispensing Housing cartridge supplied with certificate Recirculation valve lever Safety ring Discharge tube Recirculation valve (optional) Valve block (GL 45 bottle thread) Screw cap Recirculation tube (optional) Telescoping filling tube Mounting tool Filling tube Recirculation tube... -
Page 32: First Steps
5. First Steps 5.1 Is everything in the package? Confirm that your package includes: Bottle-top dispenser VITLAB Dispenser TA , telescoping filling tube, discharge tube or discharge tube with ® recirculation valve, recirculation tube (included only in recirculation valve models), mounting tool, three bottle adapters, a performance certificate and this operating manual. - Page 33 Mounting and aligning the instru-ment on a bottle Screw the instrument (GL 45 thread) onto the reagent bottle and then align the discharge tube with the bottle label by turning the valve block (Fig. 3). To prevent tipping over use a bottle stand for small bottles (page 47).
-
Page 34: Priming
6. Priming Warning! Wear protective clothing, eye protection and gloves! Never press down the piston when the screw cap is screwed on! Avoid splash- ing the reagent! Liquid may accumulate in the screw cap. To avoid splashes dispense slowly. Follow all safety instructions and observe limitations of use and operating limitations (page 28-29). -
Page 35: Dispensing
7. Dispensing 7.1. Setting the volume Loosen the volume selector thumb screw three-fourths turn (1), set the pointer to the desired volume (2) and then retighten the volume thumb screw (3). 7.2. Dispensing Warning! Wear protective clothing, eye protection and gloves! Never press down the piston when the screw cap is screwed on! Avoid splash- ing the reagent! Liquid may accumulate in the screw cap. -
Page 36: Accessories
3. Slide the discharge tube housing all the way up. Then pull dis- charge tube forward with gentle up and down motions (Fig. 1). 4. Push the flexible discharge tube holder from the bottom of the valve block (Fig. 2) and tighten it. For this, VITLAB Dispenser TA ®... - Page 37 8.2 Drying tube Use of a drying tube, filled with a suitable absorbent (purchased separately), might be necessary for moisture- and CO - sensitive media ('Accessories', page 46). Assembly Use a coin to unscrew the air vent cap (Fig. 1). Screw the filled drying tube in (Fig.
-
Page 38: Error Limits
(20 °C/68 °F). Testing takes 20 °C place according DIN EN ISO 8655-6 with a completely filled instrument and with uniform and smooth dispensing. Error limits VITLAB Dispenser TA ® A* ≤ ±... -
Page 39: Checking The Volume (Calibration)
This time frame should be adjusted to correspond with individual requirements. The complete test- ing procedure (SOP) can be downloaded at www.vitlab.com. In addition, you can also carry out function checks at shorter intervals, e.g. dispensing the nominal volume into a volumetric test flask. -
Page 40: Adjustment
11. Adjustment After a long period of use an adjustment of the instrument might be necessary. Calibrate for example at nominal volume (see page 39). Calculate mean volume (result of weighing) (see page 39). Adjust the instrument (to the calculated mean volume). After adjusting, recalibrate for control. -
Page 41: Cleaning
12. Cleaning The instrument must be cleaned in the following situations to assure correct operation: prior to changing the valves before the first use regularly when using liquids which form immediately when the piston deposits (e.g., crystallizing liquids) is difficult to move regularly when liquids accumulate in the before changing the reagent screw cap... -
Page 42: Cleaning For Trace Analysis
13. Cleaning for Trace Analysis Before use in trace analysis, the instrument must first be thoroughly cleaned. Pure chemicals used for analytical purposes are used for this cleaning procedure. If contamination of the bottle contents must be avoided, use the instrument without the recirculation valve. If the instrument is used with the recirculation valve, it must be cleaned in both dispensing and recirculation modes (Fig. -
Page 43: Replacement Of Discharge Tube/Valves
14. Replacement of discharge tube/valves Warning! The valve, telescoping filling tube and dispensing tube are full of reagent! For this reason, always perform a standard cleaning before dismantling the instrument. The dispensing unit must not be disassembled! Follow the safety instructions (page 28)! 14.1 Replacing the discharge tube Instruments with a recirculating valve should be set to 'Recircu- late', and the valve lever pulled upwards to remove (Fig. -
Page 44: Dismantling The Instrument
(the threads should no longer be visible). Caution: Always install the valve provided for the specific instrument types (see 'Ordering data', page 46). For the VITLAB Dispenser TA ® model, an identical filling valve is used, but different discharge valves. -
Page 45: Ordering Information
16. Replacement of discharge tube/valves VITLAB Dispenser TA , Analog-adjustable ® Capacity Valve spring Without recirculation With recirculation valve valve Cat. No. Cat. No. Platinum-iridium 1627515 1627525 Tantalum 1627535 1627545 Note: Items supplied see page 32. 17. Accessories · Spare Parts Bottle adapters ETFE/PTFE. - Page 46 PTFE, coiled, length 800 mm, with safety handle. Pack of 1. Not suitable for hydrofluoric acid. Nominal volume Dispensing tube Cat. No. outer-Ø mm inner-Ø mm 1678136 VITLAB Dispenser TA ® Telescoping filling discharge valve tubes PFA/sapphire. Valve FEP. Adjusts to various spring: Valve marking bottle heights.
- Page 47 Filling valve PFA/sapphire. Valve mar- Recirculation tube king 'S'. Pack of 1. Pack of 1. Cat. No. 1676739 Cat. No. 1676747 Calibrating-, mount- Screw cap with ing-tool fastener Pack of 1. ETFE. Pack of 1. Cat. No. 1676748 Cat. No. 1676029 Bottle Stand PP.
-
Page 48: Troubleshooting
18. Troubleshooting Problem Possible cause Corrective action Liquid is above the piston Piston is leaking. Perform a standard cleaning, replace the piston/ cylinder assembly (see page 41-44). Piston difficult Formation of crystals, dirty Stop dispensing immediately. Follow all cleaning to move instructions (page 41). -
Page 49: Repairs · Calibration Service
Just send in the instruments to be calibrated, accompanied by an indication of which kind of calibration you wish. Your instruments will be returned within a few days together with a test report (VITLAB calibration service) or with a DAkkS Cali- bration Certificate. For further information, please contact your dealer or VITLAB. -
Page 50: Warranty Information
20. Warranty We shall not be liable for the consequences of improper handling, use, servic- ing, operation or unauthorized repairs of the instrument or the consequences of normal wear and tear especially of wearing parts such as pistons, seals, valves and the breakage of glass as well as the failure to follow the instructions of the operating manual. - Page 52 13 / 1695118/ 0616 / 1...
Need help?
Do you have a question about the TA2 and is the answer not in the manual?
Questions and answers