Advertisement
Quick Links
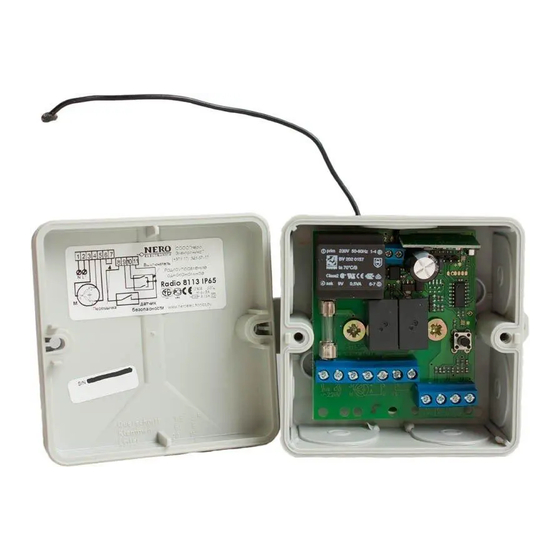
Single-channel radio receiver
to connect an optocentor, photo cells and other safety sensors
Description
1.1 Usage
The radio receiver Radio 8113 IP is designed to operate
motors of gates, garage doors, awnings, blinds, roller shutters
as well as light and other electric devices.
1.2. Technical characteristics
Supply voltage, V/ Hz .................................................................................~230 (+10%, -15%) / 50
Max switched current, A .................................................................................................................3
Switched voltage, V .........................................................................................................~250 / =30
Number of operated motors ............................................................................................................1
Working frequency, MHz ...........................................................................................434,42 ± 0,37
Working distance in open space, m .............................................................................................100
Memory ...............................................................................................................36 remote controls
Dimensions, mm ..............................................................................................................80? 80? 55
Ambient temperature, °Ñ ............................................................................................ îò -20 äî +65
Working conditions ..............................................................................................indoors, outdoors
IP protection class ......................................................................................................................IP65
Protection class under GOST 27570 .............................................................................................II
Conformity ..................................................................................................................................CE
1.3. Working modes of Radio 8113 IP
1) "Other automation units": the mode is used to connect a Radio 8113 IP to another automation
device that operates roller shutters, gates, or garage doors. The signal is transmitted 1,5 seconds
(i.e. voltage is supplied to the automation device for 1,5 sec).
2) "Roller shutters": the mode is used to connect a Radio 8113 IP directly to a roller shutter motor.
The signal can be programmed from 0,2 to 180 seconds. The factory preset is 60 seconds.
3) "Outdoor blinds": the mode is used to connect a Radio 8113 IP directly to a blinds motor to
open/close blinds and turn their lamellas horizontally. he signal can be programmed from 0,2 to 180
seconds. The factory preset is 120 seconds.
4) "Light and other electric devices": the mode is used to connect a Radio 8113 IP directrly to a
lighting unit or any other electric device. The signal is transmitted until the "stop" signal has been
activated with a remote control or a switch (needs to be connected to the Radio 8113 IP).
The following contacts are used to:
1 —
connect to N of ~230 V supply main
2 — connect to L of
~230 V supply main
3 —
connect the "N " cable of the motor
4 — connect the "up" cable of a motor (black or
brown).
5 — connect the "down" cable of a motor.
6, 7 — bridge A to connect L of supply main to
executive relays in the receiver.
8 — safety sensor.
9 — connect to "up" output of the switch.
10 — connect to "down" output of the switch.
11 — connect to "common" output of the switch
and sensor.
12- common contact for antenna connection.
13 - input of antenna.
Fig. 1. Connection scheme for Radio 8113 IP
Bridge
contacts
4 and 5
Button
Remove bridge
from contacts
6 and 7
Connect to the button input of control block
for gates, garage doors, barriers
Fig. 2. Scheme that shows how to connect
Radio 8113 IP to a step-by-step input (open-
stop-close) of a control block for operation
of gates, barrier arm gates or of a garage
door motor.
* View how to connect an optosensor on page 2.
(no ground connection required)
Switcher of safety
Antenna
sensor modes
.
.
.
Safety
fuse
Motor
Bridge
Safety sensor*
Button
Incandescent
220/230V lamp
Electric load
up to 690W
Fig. 3. Scheme that shows how to connect
Radio 8113 IP to a lighting unit or other
electric devices.
Radio 8113 IP
2. Programming
2.1. Programming modes:
1) programming remote controls;
2) programming scenario switches;
3) setting working modes of Radio 8113 IP.
2.1.1. Programming remote controls mode
a) Programming remote controls into the memory of Radio 8113 IP:
Press and hold the programming button more until the LEDs flash red and green.
The LED will continue to blink red during the entire process of remote controls programming.
Press the button of the remote control you want to programme. The LED will flash green three
times to signal that the button of the remote control has been programmed.
Note: if the LED flashes green only one time, it signals that the button has been previously
programmed into the memory of the receiver Radio 8113 IP. If the LED blinks red and green, it
signals that the memory of Radio 8113 IP is full, and the button can not be programmed..
In case you need to programme several buttons, press the desired buttons one by one.
To finish programming, press the programming button one time. The LED signals the end of
programming with two red and green flashes.
b) Deleting ALL remote control from the memory of Radio 8113 IP:
Press and hold the programming button until t
Again press and hold the programming button more than 4 seconds until LED 2 flashes red
twice. Release the programming button.
To come back to the standby mode, press the programming button one time.
c) Deleteing the desired button(s)/remote control(s) from the memory of Radio 8113 IP:
Press and hold the programming button until the LEDs flash red and green.
The LED will continue to blink red during the entire process of remote controls deleting.
Press and hold the button of the remote control you want to delete more than one second. When
LED 2 flashes red, release the button.
In case you need to delete several buttons, press and hold the desired buttons more than one
seconds one by one.
To finish deleting, press the programming button one timer. The LED signals the end of
programming with two red and green flashes.
2.1.2. Programming scenario switches mode
Press and hold the programming button until the LEDs flash red and green.
Press the button of the scenario switch you want to programme. The LED will flash green and
red and then continue to blink red during the programming session.
For further steps, please, see the corresponding manual on Radio 8105-50-4, Radio 8105-50-6,
Radio 8105-50-8.
2.1.3. Setting working modes of Radio 8113 IP
Press and hold the programming button until the LEDs flash red and green.
Press the programming button. The LED flashes red and green to indicate that Radio 8113 IP
has entered the mode, where you can set the necessary working regime (mode) of the receiver
(see the modes description in point 1.3).
Count how many times the LED blinks green to determine the current working mode. The
LED 1
number of green blinks indicates the chosen working mode (see the table below). The factory
preset is roller shutters mode with the 60-second signal.
LED 2
Programming
No.
Working mode
button
Switch
Other automation units
Roller shutters
Outdoor blinds
Light and other electric
devices
To finish setting the working mode of Radio 8113 IP, select one of the two options:
a) to remember the selected working mode and signal duration: press the programming button one
time. The LED signals the end of programming with two red and green flashes.
b) to ignore the selected working mode and signal duration: wait for 32 seconds until Radio 8113 IP
leaves the programming mode itself. The LED signals the return to the standby mode with two
green and red flashes.
2.2. Setting signal duration for roller shutters mode or for outdoor blinds mode
Switch off the Radio 8113 IP power.
Connect a switch (see fig. 1).
Switch on the power.
Follow the first three steps of point 2.1.3.
Select the desired working mode if necessary (see the table above).
Close the roller shutter or blinds with the connected switch.
Open the roller shutter or blinds with the connected switch.
In five seconds after the roller shutter or blinds reach the upper position, stop the object by
pressing shortly the DOWN button of the switch.
Press the programming button one time. The LED signals the end of setting signal duration
with two green and red flashes.
with a possibility
he LEDs flash red and green
How to switch to
How LED signals
the next mode
switching to
the next mode
Press and hold the programming
button more than 1 second
Press and hold the programming
button more than 1 second
Press and hold the programming
button more than 1 second
Press and hold the programming
button more than 1 second
.
Indication
How Led signals
the chosen
working mode
Advertisement

Related Manuals for Nero Radio 8113 IP


Summary of Contents for Nero Radio 8113 IP
- Page 1 In case you need to delete several buttons, press and hold the desired buttons more than one seconds one by one. 2) “Roller shutters”: the mode is used to connect a Radio 8113 IP directly to a roller shutter motor. To finish deleting, press the programming button one timer. The LED signals the end of The signal can be programmed from 0,2 to 180 seconds.
- Page 2 Radio 8113 IP receiver. Note: when module 1 and sensors by Witt-Sensoric are used, Programming contacts 8 and 11 of the Radio 8113 IP receiver are not active. To button stop the motor of the roller shutter, it is necessary to touch the button of the opposite direction on the connected switch.
Need help?
Do you have a question about the Radio 8113 IP and is the answer not in the manual?
Questions and answers