
Related Manuals for Austroflamm SmartSpot


Summary of Contents for Austroflamm SmartSpot
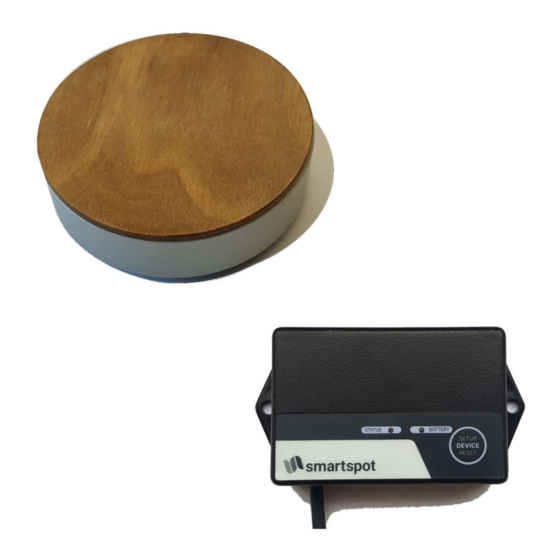
- Page 1 Benutzerhandbuch / User instructions Manuel d’instructions / Manuale SmartSpot SmartSpot Receiver...
-
Page 3: Table Of Contents
Ihnen die Messung der aktuellen Raumtemperatur an der von Ihnen gewünschten Position im Wohnraum. Die Verbindung zum Ofen erfolgt mittels Bluetooth Funktechnologie. Abhängig vom Ofenmodel ist für die Funktion des SmartSpot die zusätzliche Installation eines SmartSpot Receivers erforderlich. Technische Daten:... -
Page 4: Inbetriebnahme Des Smartspot Sensors
1 Inbetriebnahme des SmartSpot Sensors Für die erste Inbetriebnahme des Sensors drehen Sie den SmartSpot mit der Rückseite nach oben. Drehen Sie das untere Gehäuseteil nach rechts. Nun Entfernen Sie den Isolierstreifen von den lösen sich der obere und untere Gehäuseteil von Batteriekontakten. -
Page 5: Installation Des Smartspot Receivers
Wir empfehlen: Lassen Sie die Installation von einen Fachmann ausführen. Der Ofen muss beim Anschluss des SmartSpot Receivers an die Steuerung vom Stromnetz getrennt sein ! Die Steuerung befindet sich hinter einer Verkleidung (abhängig vom Ofenmodell) des Ofens. Die entsprechende Seitenverkleidung muss vorab demontiert werden. -
Page 6: Zusätzliche Funktionen Des Smartspot Sensors
5 Zusätzliche Funktionen des SmartSpot Sensors BLINKSIGNAL – FUNKTIONSBESTÄTIGUNG: Der SmartSpot Sensor blinkt als “Lebenszeichen“ alle 3 Minuten kurz auf. Die Farbe bzw. die Funktion dieses Lebenszeichens kann geändert werden. Drücken Sie dazu die mit „1“ markierte Taste so lange, bis Ihre gewünschte Farbe leuchtet. - Page 7 The connection with your stove will be made via Bluetooth. Depending on the stove model an additional installation of a SmartSpot receiver may be necessary in order to use the function of the SmartSpot.
-
Page 8: Start Up Of The Smartspot Sensor
2 Connecting the SmartSpot Sensor with the XL-DISPLAY (year of manufacture 2020) Stove models already equipped with an XL-DISPLAY (manufacture year 2020), do not need a SmartSpot receiver. The SmartSpot sensor can be connected directly with the display. Change the setting to „Bluetooth devices“. Choose After a few seconds the connection build-up is being the function „add Bluetooth device“. -
Page 9: Installation Of The Smartspot Receiver
GND 4 Connecting the SmartSpot sensor with the receiver The SmartSpot receiver must be connected to the stove’s control board and the power must be on. (TEST: LED light on the receiver slowly blinks green.) The batteries of the SmartSpot sensor must be inserted correctly. -
Page 10: Additional Functions Of The Smartspot Sensor
BLINKING SIGNAL – PROCESSING CONFIRMATION: As a processing confirmation, the SmartSpot sensor briefly flashes every 3 minutes. The colour and function of this processing confirmation can be changed. Press the highlighted button „1“ permanently and hold down until the desired colour is on. This feature can also be switched off. - Page 11 Codes couleur de la LED et causes d’erreurs ................4 Merci d’avoir choisi SmartSpot, le capteur de température ambiante d’Austroflamm. Grâce à lui, vous pouvez mesurer la température de l’air là où vous le souhaitez dans votre pièce à vivre. La connexion au poêle se fait par technologie sans fil Bluetooth.
-
Page 12: Mise En Service Du Capteur Smartspot
Séparez ensuite la partie supérieure de la partie inférieure du boîtier. 2 Connexion du capteur SmartSpot à l’ÉCRAN XL (à partir des modèles 2020) Les modèles de poêles disposant d’un ÉCRAN XL, produits à partir de 2020, ne nécessitent pas de récepteur SmartSpot. -
Page 13: Installation Du Récepteur Smartspot
Brun 4 Connexion du capteur SmartSpot au récepteur Le récepteur SmartSpot doit être raccordé à la commande du poêle et alimenté en courant (CONTRÔLE : clignotement vert lent de la LED du récepteur). Les piles du capteur SmartSpot doivent être installées correctement. -
Page 14: Fonctions Supplémentaires Du Capteur Smartspot
SIGNAL CLIGNOTANT – CONFIRMATION DE FONCTIONNEMENT Le capteur SmartSpot envoie un « signal de vie » en clignotant brièvement toutes les 3 minutes. Il est possible de modifier la couleur et de désactiver ce signal de vie. Pour ce faire, maintenez appuyée la touche marquée d’un « 1 »... - Page 15 Codici colore LED e cause possibili errori ..................4 Grazie di aver scelto il rilevatore di temperatura SmartSpot di Austroflamm. Vi consentirà di misurare la temperatura ambiente laddove preferite trascorrere il vostro tempo. Il collegamento con la vostra stufa avviene via Bluetoooth.
-
Page 16: Attivazione Smartspot
2 Collegamento dello SmartSpot con il DISPLAY XL (anno di produzione 2020) I modelli già dotati di DISPLAY XL (anno di 2020), non necessitano di ricevitore. Lo SmartSpot può essere collegato direttamente con il display. Nelle impostazioni, sotto „Dispositivi Bluetooth“, Dopo alcuni secondi, la connessione viene scegliete la funzione „aggiungi dispositivo Bluetooth“. -
Page 17: Installazione Del Ricevitore Dello Smartspot
Raccomandazione: Fate installare il dispositivo da un tecnico specializzato. La stufa deve essere scollegata dalla presa di corrente prima che il ricevitore dello SmartSpot si colleghi con il pannello di controllo della stufa! Il pannello di controllo si trova nella parte posteriore della stufa, dietro il rivestimento, il quale dev’essere smontato prima dell’operazione. -
Page 18: Funzioni Aggiuntive Dello Smartspot
SEGNALE LAMPEGGIANTE – CONFERMA DI FUNZIONAMENTO: A conferma di funzionamento, lo Smartspot lampeggia brevemente ogni 3 minuti. Il colore e questo tipo di funzione possono essere cambiati. Mantenete premuto il tasto „1“ fino a quando non appare il colore desiderato. Questa funzione può...
Need help?
Do you have a question about the SmartSpot and is the answer not in the manual?
Questions and answers