
Related Manuals for Price PP1


Summary of Contents for Price PP1
- Page 1 MANUAL – INSTALLATION + SERVICE Power and Control Module Plenum Pressurization - PP1 v000 – Issue Date: 01/30/19 © 2019 Price Industries Limited. All rights reserved.
-
Page 2: Table Of Contents
PCM - PlenuM Pressurization TABLE OF CONTENTS Product Overview Plenum Pressure Control ..........1 Control Methods ............1 General Description ............2 Remote Pressure Node ..........3 Features of the PCM ............. 3 Installation & Mounting Instructions Installing the PCM ............4 Input/Output Description .......... -
Page 3: Product Overview
Dampers (DGD) are installed, these can also be controlled by the PCM. Daisy chained together, up to twelve DGDs can be controlled via a Price plug-and- play cable to modulate the air being supplied to the underfloor plenum. Similar to modulation of the fan column,... -
Page 4: General Description
PCM - Underfloor Pressure Controller The Price PCM with BACnet can control up to 12 plenum dampers, controlling the amount of airflow that enters the underfloor plenum. By reading static pressure sensor inputs, the PCM can monitor and regulate the very low static pressure required by typical underfloor plenums. -
Page 5: Remote Pressure Node
Plenum pressure relative to room pressure is measured using Remote Pressure Nodes (RPN). The RPN fits inside any style mounting ring and under any Price round floor diffuser. This maintains a consistent look with the installed diffusers. The RPN is equipped with an extremely sensitive pressure... -
Page 6: Installing The Pcm
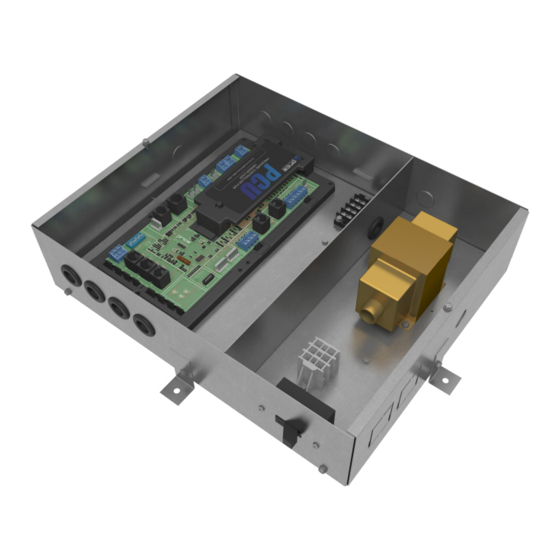
PCM - PlenuM Pressurization INSTALLATION & MOUNTING INSTRUCTIONS installing the PCM Place the PCM in the underfloor plenum in the center of the controlled zone using a 35 ft. cable. Supply power and ground to terminal per wiring diagram. THIS TASK MUST BE COMPLETED BY A CERTIFIED AND LICENSED ELECTRICIAN. -
Page 7: Input/Output Description
PCM - PlenuM Pressurization INSTALLATION & MOUNTING INSTRUCTIONS input/output Description 24VAC Binary Outputs Binary Output for On/Off control of fan. Multiple configurations. For example: BO1 – Open Aux binary output available. BO2 – Plenum Damper Plenum damper open. Used for floating point actuators. BO3 –... -
Page 8: Wiring
Power Source �--.,..24 VAC floating L_�:::: :::: :::: :::: :::: :::: :::: :::: :::: :::: :::: � �1���� � i i[D� NOTE2: point actuator ouput Price PCU primary voltage 24 VA maximum -t'./ - r 1-------------------- Pressure L..,.common ,,.__-�_,... -
Page 9: Thermostat Installation
PCM controller with the ease of RJ-45 connections. snapping the bottom half in. note: The cable run can be extended using a Price cable 3. The thermostat will come equipped with a 0.0 coupler and an additional CFLEX cable. 2. Mount the required thermostat in a place that is... -
Page 10: How To Use Thermostats
• Setpoint can be adjusted from a hidden dial on the back of the thermostat using a small flat-head screw driver. • Setpoint limits can be adjusted through free setup software using the Price LINKER, or through a BACnet system. -
Page 11: Display Navigation
PCM - PlenuM Pressurization DISPLAY NAVIGATION initial startup: (LCD & Motion Thermostat only) When the LCD thermostat is powered from the PIC, it will display the following information: PriCe eleCtroniCs Start-up screen. lCD tHerMostat Standard/Motion model. stanDarD MoDel lCD tHerMostat Displays firmware version of thermostat. -
Page 12: Info Menu
PCM - PlenuM Pressurization DISPLAY NAVIGATION info Menu (LCD & Motion Thermostat only) The info menu shows information about the controller status regarding room load, damper position and BACnet Address info. No values can be changed from this menu and it is not locked or protected in any way. Press ‘Enter Menu’... -
Page 13: Service Menu
PCM - PlenuM Pressurization DISPLAY NAVIGATION service Menu (LCD Thermostat only) Hold down the ‘Menu’ button for 5 seconds, display will show ‘Passcode:’ Use ‘Up’ and ‘Down’ keys to enter the password in this sequence: Down – Up – Up – Down. Press setuP Change the application the unit is operating as. - Page 14 PCM - PlenuM Pressurization DISPLAY NAVIGATION service Menu Regardless of room condition, the pressure controller will maintain plenum pressure at the pre- Press aPP: Const. Press selected pressure setpoint (default: 0.05 in. w.g.) Var. Press Controller will decrease or increase static pressure based on room temperature ConstPressBYP Throttles the bypass valve to maintain constant pressure setpoint Var.PressBYP...
- Page 15 PCM - PlenuM Pressurization DISPLAY NAVIGATION service Menu DiViDer Default 250 Used to increase and decrease damper speed (damper step) nearPress.Pnt In. w.g. Near Pressure Setpoint - Reduces damper steps as it nears this pressure setpoint. stl tiMe-near 120 sec how long it slows the damper when within the pressure setpoint. stl tiMe-Far 20 sec how long it increases the damper movements when outside the pressure setpoint.
-
Page 16: Temperature Setpoint Menu
PCM - PlenuM Pressurization DISPLAY NAVIGATION temperature setpoint Menu (Variable Pressure application only. Setpoint Limits and Temperature Units) Scroll through menu with Up and Down keys. Press ‘Enter/Menu’ button to apply your changes. *---Saving---* will display as your changes are applied. •... -
Page 17: Service Menu - Input Menu
PCM - PlenuM Pressurization DISPLAY NAVIGATION service Menu – input Menu Scroll through menu with Up and Down keys. Press ‘Enter/Menu’ button to apply your changes. *---Saving---* will display as your changes are applied. #oF sensors 2 Number of sensors connected to the PCM. •... -
Page 18: Service Menu - Output Menu
PCM - PlenuM Pressurization DISPLAY NAVIGATION service Menu – output Menu Scroll through menu with Up and Down keys. Press ‘Enter/Menu’ button to apply your changes. *---Saving---* will display as your changes are applied. Bo2&3 useD as DaMPer & ao4 Assign use of BO2 and BO3 to reheat or damper. -
Page 19: Output Menu - Heat
PCM - PlenuM Pressurization DISPLAY NAVIGATION output Menu - Heat (Setup of Heat Outputs) Scroll through menu with Up and Down keys. Press ‘Enter/Menu’ button to apply your changes. *---Saving---* will display as your changes are applied. •Reheat Type: Binary, Hot water, Binary/PWM, Hot Water/PWM. reHeat tYPe: BinarY •Binary uses Stage 1, 2, 3 –Default. -
Page 20: Output Menu - Cool
PCM - PlenuM Pressurization DISPLAY NAVIGATION output Menu - Cool (Setup of Cool Outputs) Scroll through menu with Up and Down keys. Press ‘Enter/Menu’ button to apply your changes. *---Saving---* will display as your changes are applied. BinarY Cool 1% Binary Cool Trip Point: engages at 1% cooling load. -
Page 21: Output Menu - Room Lights
PCM - PlenuM Pressurization DISPLAY NAVIGATION output Menu – room lights (Setup of Room Lighting Output – Motion Thermostat option only) Scroll through menu with Up and Down keys. Press ‘Enter/Menu’ button to apply your changes. *---Saving---* will display as your changes are applied. Analog Outputs: Can reassign outputs as needed. -
Page 22: Address Menu
• 9600 baud (all BACnet devices must at least support this speed) - slowest BauD rate 76800 • 19200 baud • 38400 baud • 76800 baud (Default baud rate for PRICE products) - fastest Press Menu to eXit Setting the MAC address using the Dip Switches: The MAC address is set in binary. -
Page 23: Stat Setup Menu
PCM - PlenuM Pressurization DISPLAY NAVIGATION stat setup Menu (Stat Options) Scroll through menu with Up and Down keys. Press ‘Enter/Menu’ button to apply your changes. *---Saving---* will display as your changes are applied. oCCuPanY on – Show current occupancy source. VVt MoDe ON from VVT (always on), ON from Airflow, ON from Contact, ON from Motion Sensor (Motion Sensor STAT only) -
Page 24: Networking & Setup
PCM - PlenuM Pressurization NETWORKING & SETUP BaCnet networking and setup Setting the MAC Address: MAC Address must be UNIQUE on an MS/TP network segment within building. An installer setting up an MS/TP segment with up to 30 devices must ensure each device has a UNIQUE MAC Address (Range 1-99). The MAC Address is set with DIP switches on the BACnet Module. -
Page 25: Setting The Device Instance
PCM - PlenuM Pressurization NETWORKING & SETUP setting the Device instance Device Instance: A device instance number identifies a device within an entire building, therefore giving it a unique number or address, much like a telephone ext. number. A building can have one telephone number, but all the extensions have a unique number to identify them. A device instance number would work the same way and must be unique throughout the building. -
Page 26: Linker - Usb Service Tool
The Price USB LINKER is the interface that can be used with any of the Price Thermostat for the PCM. The LINKER connects to a laptop (not supplied) via a USB A to B cable supplied by Price, and then connects to the service jack of the thermostat via an RJ- 12 cable supplied by Price. -
Page 27: Troubleshooting
PCM - PlenuM Pressurization MAINTENANCE troubleshooting The following information is provided in the event that the PCM does not appear to function properly after installation. Fault Solution Controller appears to be not Check thermostat first for either green indication light, or LCD display. If either of these does not appear, then check the controller for power (green blinking light). - Page 28 Fault Solution BACnet Communication Errors Price does not use EOL or termination on their devices. Terminating a device is almost never required at the low baud rate of MS/TP devices. In fact terminating can create more problems than it solves.
-
Page 29: Hardware Specifications
Maximum recommended devices per MS/TP segment: 30 LINKER port • For local setup using Price USB LINKER service tool 40 in-lbs (nominal torque). 90 seconds running time 90º maximum angle of rotation. External Actuator Specifications slide knob for manual override. Less than 35 db (A) noise level. - Page 30 This document contains the most current product information as of this printing. For the most up-to-date product information, please go to priceindustries.com © 2019 Price Industries Limited. All rights reserved.
Need help?
Do you have a question about the PP1 and is the answer not in the manual?
Questions and answers