Advertisement
Quick Links
E
ngineered
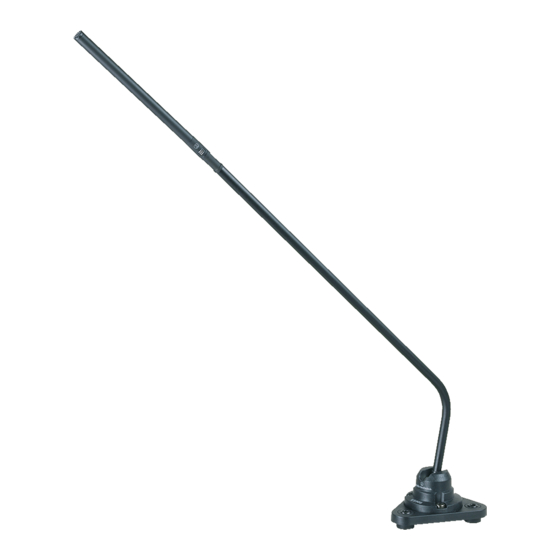
The ES905/C is a wide-range condenser
microphone with a cardioid polar pattern. It
is designed for quality sound reinforcement,
professional recording, television and other
demanding sound pickup applications. The
rigid-pipe design with ball-in-socket base permits
flexible positioning. An included snap-on foam
windscreen effectively reduces noise from wind
or ventilation air currents.
The cardioid polar pattern provides a 120°
angle of acceptance. Additional interchangeable
elements
with
hypercardioid
MicroLine
®
(90°) pickup patterns are available.
[
Installation and Operation
Output is low impedance balanced. The
output connector of the power module mates
with XLRF-type cable connectors. The balanced
signal appears across Pins 2 and 3, while the
ground (shield) connection is Pin 1. Output
is phased so that positive acoustic pressure
produces positive voltage at Pin 2, in accordance
with industry convention.
The ES905/C is intended for mounting to a
hard surface such as a table, desk, or podium
using the isolation base plate. ATTENTION!
Do not remove ball-in-socket assembly from
the base plate. The microphone is supplied with
three #8 x 1" black oxide wood screws for
mounting the microphone. The cable can exit out
the back of the microphone or be routed
through the bottom of the isolation base plate.
To install the microphone with bottom-routed
cable: Drill a
5
/
" (4 mm) hole centered in
32
the area where the microphone mount is to be
positioned. Remove the power module from the
cable (see instructions below), pass the cable
extending from the microphone mount through
this hole, mount the microphone into position
using the screws provided, and finally, re-attach
the power module.
The cable length may be shortened at the
power module. To disassemble the power
module, turn the silver screw counter-
clockwise (left-handed thread) until it is down in
the connector base and clear of the case. Use a
screwdriver with
3
/
" (2.5 mm) blade. Then slide
32
Terminal
screws
1"
Red-Red
Yellow-Yellow
1
/
"
Red-Red
2
1
/
" strip reds
8
and yellows
Shield strands,
fully twisted
Figure 1
S
[
]
Description
The microphone features a 9.5' (2.9 m)
permanently-attached miniature cable. Its free
end connects to the provided
AT8536 power module via internal
solderless screw terminals for
simple cable-length adjustment in the
field. It can be powered from any external
11V to 52V DC phantom power supply.
A recessed switch in the power module
permits choice of flat response or low-frequency
roll-off to help control undesired ambient noise.
(100°)
and
The microphone is enclosed in a sturdy metal
housing with a low-reflectance black finish.
Its isolation base plate is designed to be
table-mounted (hardware included).
the outer case up the cable to reveal the circuit
board and screw terminals. Loosen the three
terminal screws and remove the cable from the
module. Next, slide the case off the cable, cut the
cable to the desired length (allowing a few extra
inches) and slide the case back onto the cable.Tie
a single knot in the cable about two inches from
the cut end. Following Figure 1, cut the cable off
1" down from the top of the knot and carefully
remove
1
/
" of the outer jacket. Strip the mic
2
cable wires and attach them to their respective
terminals (Fig. 2). Make certain that the terminals
are clamped on the conductors, not on the
insulation, and that there are no loose strands of
wire which might touch other terminals. Replace
the case, being certain that the roll-off switch is
accessible and the silver screw is aligned with its
hole in the case. Finish by turning the screw
clockwise until the case is firmly secured. Test
the microphone for proper operation.
The provided foam windscreen simply snaps
over the head of the microphone, effectively
reducing noise from wind or ventilation air
currents.
While a modern condenser microphone
is not unduly sensitive to the environment, tem-
perature extremes can be harmful. Avoid leaving
the microphone in the open sun or in areas
where temperatures exceed 110° F (43° C) for
long periods of time. Extremely high humidity
should also be avoided.
Yellow-Yellow
Shield
+V
SIG
GND
R
Y/W
S
PC board
Figure 2
ound
]
[
ES905 / C
Cardioid Condenser
Rigid-Pipe Microphone
[
Advertisement

Subscribe to Our Youtube Channel
Related Manuals for Audio Technica ES905


Summary of Contents for Audio Technica ES905
- Page 1 Pin 2, in accordance with industry convention. The ES905/C is intended for mounting to a hard surface such as a table, desk, or podium using the isolation base plate. ATTENTION! Do not remove ball-in-socket assembly from the base plate.
-
Page 2: Polar Pattern
The microphone shall be 16.78" (426.2 mm) long with a head diameter of 0.33" (8.4 mm). The microphone weight shall be 10.0 oz (284 grams). Finish shall be low-reflectance black. The Audio-Technica ES905/C is specified. Audio-Technica U.S., Inc. 1221 Commerce Drive, Stow, Ohio 44224 10 dB...
Need help?
Do you have a question about the ES905 and is the answer not in the manual?
Questions and answers