Table of Contents

Subscribe to Our Youtube Channel
Related Manuals for ASG DTT Series


Summary of Contents for ASG DTT Series
- Page 1 PROGRAMMING AND CALIBRATION MANUAL ASG DTT TORQUE METER Version 4H 2013 ASG Div. Jergens Inc. 15700 S. Waterloo Rd. Cleveland Ohio 44110-3898 Phone: 216-486-6163 Fax: 216-481-4519 E-mail: asginfo@asg-jergens.com Web: www.asg-jergens.com...
-
Page 2: Table Of Contents
TABLE OF CONTENTS PAGE DTT Meter and LCDLayout Button Functions Menu Detail and Instructions 4-16 Main Menu Menu 1, Zero Adjust Menu 2, Setup Menu 3, Memory Menu 3, Memory, Memory Full Alert Menu 4, Calibration 7,8,9,10 Menu 4, Calibration, System Password Menu 4, Calibration, Change System Password 9,10 Menu 5, Communication... -
Page 3: Dtt Meter And Lcdlayout
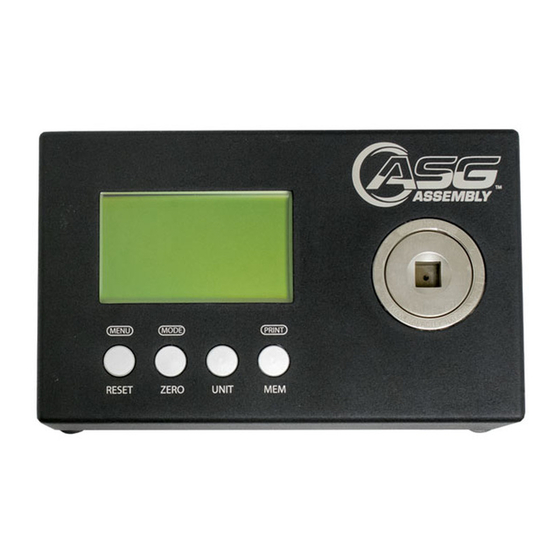
DTT Meter Layout During normal operation, the LCD display will show: The Measurement Mode in the upper left-hand corner of the LCD. The Measurement Units in the upper right hand corner of the LCD. The Torque Reading in the center of the LCD, The Current Time in the lower left hand corner of the LCD and the circle (or CW / CCW arrow) showing the direction the torque was applied. -
Page 4: Button Functions
(left to right) Button Functions Button (#1) MENU/RESET/ESC In normal operation, pressing the MENU/ RESET/ESC button resets the torque readings to zero in either the PEAK or FIRST PEAK mode. In TRACK MODE, pressing the MENU/RESET/ESC button takes you into the MAIN MENU. At any other place in the menu this button acts as an ESCAPE button to take you back to the previous screen. -
Page 5: Menu 1, Zero Adjust
Menu 1) Zero Adjust This operation cannot be performed with the charger connected. Use if the DTT meter does not automatically zero when turned on, or if the LCD does not return to zero when the RESET button is pressed. To enter, select 1) Zero Adjust and press the ENTER button. -
Page 6: Menu 3, Memory, Memory Full Alert
Press ESCAPE. You will again see: Data Memory Menu View Delete Last Delete All Select 2) Delete Last and press ENTER. You will see: Delete Last? 1) Cancel 2) Accept Select either 1) Cancel, not to delete the last reading, or 2) Accept to delete the last reading and press ENTER You will again see: Data Memory Menu View... -
Page 7: Menu 4, Calibration
The Calibration menu is used when the DTT meter requires re-calibration. The System units are selected here. ASG recommends annual re-calibration by qualified personnel. Re-calibration may also be necessary if a check reveals that the DTT meter is out of spec. Calibration, or a calibration check can only be performed with the DTT operating on battery power. -
Page 8: Menu 4, Calibration, System Password
Check the readings at several other points of the scale to be sure that the readings are within +-.2 lbf.in of the proper reading. ASG checks 4 points. After checking in the CW direction Press the ENTER button. You will again see:... -
Page 9: Menu 4, Calibration, Change System Password
Password: XXXX This will be your new password. Write it in here _ _ _ _ to be sure you do not lose it. ASG can reset the password to 9991 but the meter will have to be returned to ASG to achieve this. -
Page 10: Menu 5, Communication
RS-232 to USB Serial bridge cable, or the RS-232 to DB9 Serial cable supplied with the DTT meter. Your computer must have the ASG Torque Memory Loader software, found on the CD-ROM provided with your DTT meter, installed on your PC. NOTE You must also load the driver (s) for the USB serial bridge cable if your PC does not recognize it. - Page 11 To begin to download the torque readings click on the icon shown below: The following screen should now be seen on your PC.
- Page 12 The software will default to COM-1 (communication port 1) on your PC. If you have a conflict you can change COM ports by clicking on CONFIG on the toolbar. You will see: Use your mouse to select COM-2, COM-3, COM-4, COM-5 or COM-6 With the data now on your PC you may now save this file just as you would any other file.
-
Page 13: Menu 6, Date & Time
This file will be named “object.xls”. You can then save it with any name you choose. Once the data is in the spreadsheet the math functions in Excel may be used to manipulate the data to obtain statistics. You will have to determine how you want the data manipulated and what statistics you want to keep. -
Page 14: Menu 6, Date & Time, Switch Time Or Date On Lcd
& processor. This firmware version should not be confused with the version of the ASG download software. The serial number of the main board may or may not be the same as the physical serial found on... -
Page 15: Setup Menu Detail And Instructions
Select 7) About and press ENTER. You will see: ____________________ TORQUE TESTER v4F Model DTT100 MB 0204 __________________ There is nothing here you can change. Pressing any button returns you to: Main menu 1) Zero Adjust 2) Setup 3) Memory 4) Calibration 5) Communication 6) Date &... -
Page 16: Setup Menu 1, Measure Mode
Setup Menu 1) Measure Mode 2) Measure Unit 3) Auto Print 4) Auto Memory 5) Auto Reset Mode 6) Go-No Go Mode 7) Decimal Place 8) Mfg. Setting 9) Save Setup Note! Remember you have to change the mode to TRACK to enter the Main Menu. If you save the setup without changing back to Peak or First peak, then TRACK mode will be set as the default. -
Page 17: Setup Menu 2, Measure Unit
2) Measure Unit Sets the default torque units for the DTT meter. This should not be confused with changing the units in normal operation with the UNIT button or setting the system units in the calibration menu. Select 2) Measure Unit and press ENTER. You will see: Setup Unit 1) Kgf-cm. -
Page 18: Setup Menu 4, Auto Memory
4) Auto Memory With Auto Memory turned on, the torque reading is automatically entered into the DTT memory each time a new reading is taken. It is not necessary to press the ENTER button each time. This will function only in PEAK MODE and only with torque readings applied in the clockwise direction. Select 3) Auto Memory and press ENTER. - Page 19 Select 2) Use Auto Reset and press ENTER. You will see: AutoReset min 2%* Enter Percent of 100 lbf.in** Old Data : 00% Enter New : 00% *This % number will depend on which model DTT meter is used. See page 26 for other models.
- Page 20 5) Go-No Go Mode Go-No Go mode is used to set a range or “window” for acceptable torque readings. This can be used only with the meter in PEAK or FIRST PEAK modes. When a torque falls within the range the meter will show the word “GOOD!”...
- Page 21 *This number is the maximum torque value of the meter. On a DTT-100 this is 100 lbf.in The maximum upper level that can be set up is 99 lbf.in (See page 26 for other models). Any number from 3 to 99 can be selected, which would then represent 3% to 99% of 100 lbf.in, or 3 to 99 lbf.in.
-
Page 22: Setup Menu 6, Go- No Go
Select 1) OFF and press ENTER. You will see: Setup Go - NoGo 1) Set Lower Level 2) Set Upper Level 3) Set Sound Select 3) Set Sound and press ENTER. You will see: Set Sound 1) Sound 2) Sound Select 1) Sound Off and press ENTER. -
Page 23: Setup Menu 8, Mfg. Settings
Press ESCAPE to return to the normal operating menu. 7) Mfg. Setting This menu allows a quick return to the FACTORY DEFAULT menu settings. You can return your DTT meter to the menu options it had when it was received without having to turn off each option Setup Menu 1) Measure Mode 2) Measure Unit... -
Page 24: System Overview
SYSTEM OVERVIEW ASG DIGITAL TORQUE TESTER Electronics Display: Graphics LCD display size 128 x 64 dots Battery: 12 Hours (NiMH 7.2V rechargeable) Battery charger: 110-120 VAC 60 Hz 12W input 12 VDC 500mA output Optional 220-240 VAC input available ADC:... -
Page 25: Dtt Meter Specifications Sheet
DTT METER SPECIFICATIONS SHEET MODEL kgf-cm lbf.in DTT-5 .025 - 5.00 .025 – 5.0 .0025 – 0.50 DTT-10 .057 – 11.00 .050 – 10.0 .005 – 1.10 DTT-30* .171 – 33.0 .150 – 30.0 .015 – 3.30 MEASUREMENT RANGE DTT-50* .288 –... -
Page 26: Calibration Check Readings
Calibration Check Readings DTT-5 = +-0.01 lbf.in of reading. DTT-10 = +- 0.02 lbf.in of reading DTT-30 = +-0.06 lbf.in of reading. DTT-50 = +- 0.10 lbf.in of reading DTT-100 = +- 0.20 lbf.in of reading DTT-200 = +-0.40 lbf.in of reading DTT-500 = +- 1.0 ;bf.in of reading Calibration Check Readings DTT-5 = +-0.01 lbf.in... -
Page 27: Torque Conversion Factors
Torque Conversion Factors ozf.in = inch ounces gmf.cm = gram centimeters mNm = mili Newton meters lbf.in = inch pounds kgf.cm = kilogram centimeters cN.m = centi Newton meters lbf.ft = foot pounds kgf.m = kilogram meters N.m = Newton Meters Units to be Imperial Metric... - Page 28 Division of Jergens, Inc. 15700 S. Waterloo Road | Cleveland, Ohio 44110-3898 Toll Free: (888) 486-6163 | Fax: (216) 481-4519 Email: asginfo@asg-jergens.com | www.asg-jergens.com...
Need help?
Do you have a question about the DTT Series and is the answer not in the manual?
Questions and answers