Advertisement
TIMER INSTRUCTIONS (BATTERY POWER)
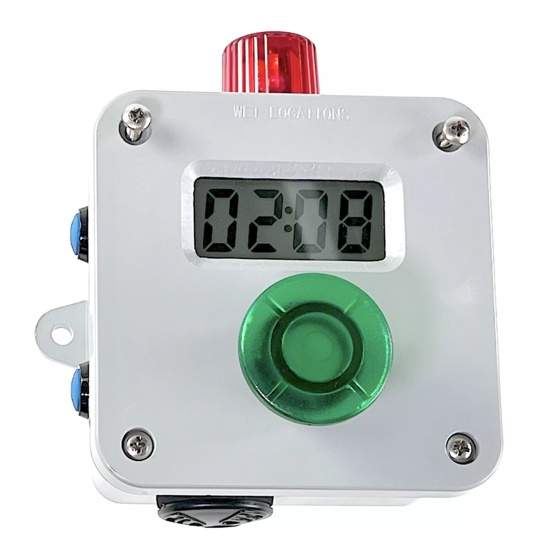
1. CONNECT BATTERY
• Remove cover and install 9V battery.
2. SETTING THE TIME
• The blue buttons on the side adjust the time up and down
left of the colon. Alternatively, use the white buttons on the
PCB. (model T7)
• To program the digits right-of the colon, (usually seconds)
hold down the green "stop/start" button then adjust the
blue buttons.
3. SELECTING PROGRAM
• Switch #1 selects minutes /seconds (or HH:MM) in
every case. For minutes/seconds the switch will be to
the RIGHT.
• Switches 2,3,4,5, select other behaviors according the
this table below. See detailed "mode chart" on our
website for further detail on the behaviors.
MODE
SWITCH POSITION
1
2
1
L / R
R
2
L / R
3
L / R
R
4
L / R
5
L / R
R
6
L / R
7
L / R
R
8
L / R
9
L / R
R
10
L / R
11
L / R
R
12
L / R
13
L / R
R
14
L / R
15
L / R
R
16
L / R
FIRMWARE V. 51_511_01X
3
4
5
R
R
R
L
R
R
R
L
R
R
L
L
R
R
R
L
R
L
R
L
R
L
L
R
L
L
L
R
R
R
L
L
R
R
L
L
R
L
L
L
R
L
R
L
L
L
R
L
L
L
L
L
L
L
L
L
Page
UP
DOWN
DESCRIPTION
EARLY WARNING ON LED1 (DEFAULT)
MANUAL STOP - CANNOT CANCEL CYCLE
T5
PAUSING (ACCUMULATES TIME AFTER STOPPING)
AUTOMATIC CYCLE STOP (WITH CANCEL)
EARLY WARNING ON LED2
GUARD DUTY
T5
T5
T5
T5
FUTURE USE
FUTURE USE
FUTURE USE
FUTURE USE
FUTURE USE
SWITCHES FOR SELECTING MODES
1
of
2
START / STOP
MODEL T4
Advertisement
Table of Contents

Related Manuals for GIZMO ENGINEERING T4

Summary of Contents for GIZMO ENGINEERING T4
- Page 1 For minutes/seconds the switch will be to DOWN the RIGHT. • Switches 2,3,4,5, select other behaviors according the MODEL T4 this table below. See detailed “mode chart” on our website for further detail on the behaviors. MODE SWITCH POSITION...
- Page 2 • Pressing both blue buttons resets display to zero time. • Holding down blue buttons for a few seconds advances the time quickly. • Modes 3,8,910, 11 do not apply to the battery version T4 as they involve relay output which is not installed on the T4.
Need help?
Do you have a question about the T4 and is the answer not in the manual?
Questions and answers