Advertisement
Available languages
Available languages
Quick Links
JL-1048 / JL-1049
SECURFIX BEEP
Manuale d'uso
Seggiolino trasporto auto per bambini GRUPPO 0+/1
Adatto a bambini di peso da 0 kg a 18 kg (da 0 mesi a 4 anni)
User manual
Child restraint device GROUP 0+/1
Suitable for children weighing from 0 kg to 18 kg (from 0 months to 4 years)
Manual de instrucciones
Dispositivo de retención infantil GRUPO 0+/1
Apto para niños con un peso de 0 kg a 18 kg (de 0 meses a 4 años)
Mode d'emploi
Siège auto pour enfants est adapté aux catégories de poids de 0+ a I (Gruppo 0+/1)
Pour des enfants de 0 à 18 kg de poids (de 0 mois à 4 ans environ)
Conforme alla Norma /Complies with/
Conforme à la Norme/ Conforme a la Norma ECE R44-04
Advertisement

Related Manuals for Joyello JL-1048 SECURFIX BEEP


Summary of Contents for Joyello JL-1048 SECURFIX BEEP
- Page 1 JL-1048 / JL-1049 SECURFIX BEEP Manuale d’uso Seggiolino trasporto auto per bambini GRUPPO 0+/1 Adatto a bambini di peso da 0 kg a 18 kg (da 0 mesi a 4 anni) User manual Child restraint device GROUP 0+/1 Suitable for children weighing from 0 kg to 18 kg (from 0 months to 4 years) Manual de instrucciones Dispositivo de retención infantil GRUPO 0+/1 Apto para niños con un peso de 0 kg a 18 kg (de 0 meses a 4 años)
- Page 2 IMPORTANTE - CONSERVARE PER LA CONSULTAZIONE FUTURA – LEGGERE CON ATTENZIONE IMPORTANT- RETAIN FOR FUTURE REFERENCE - READ CAREFULLY IMPORTANTE: CONSERVELO PARA FUTURAS CONSULTAS. – LEER ATENTAMENTE IMPORTANT - A CONSERVER POUR CONSULTATION ULTERIEURE - A LIRE SOIGNEUSEMENT...
-
Page 3: Prima Dell'uso
Grazie per aver acquistato un seggiolino auto JOYELLO. IMPORTANTE: prima dell’uso leggere attentamente integralmente questo libretto d’istruzioni per evitare pericoli nell’utilizzo e conservarlo per ogni futuro riferimento. Per non compromettere la sicurezza del vostro bambino seguite attentamente queste istruzioni. ATTENZIONE! Prima dell’uso rimuovere ed eliminare eventuali sacchetti di plastica e tutti gli elementi facenti parte della confezione del prodotto o comunque tenerli lontani dalla portata dei bambini. - Page 4 AVVERTENZE Il prodotto è destinato esclusivamente a un uso come Seggiolino per auto e non all’utilizzo in casa. Per il montaggio e l’installazione del prodotto seguire scrupolosamente le seguenti istruzioni. Evitare che qualcuno utilizzi il prodotto senza aver letto le istruzioni. Tenere sempre questo manuale a disposizione, conservandolo con il prodotto.
- Page 5 l’imbracatura allacciata. Non lasciare mai il seggiolino sul sedile dell’auto non agganciato, potrebbe urtare e ferire i passeggeri. Non interporre nulla, che non sia un accessorio approvato per il prodotto, né tra il sedile auto e il seggiolino, né tra il seggiolino e il bambino: in caso di incidente il seggiolino potrebbe non funzionare correttamente.
- Page 6 La lista è soggetta ad una continua revisione con cambiamenti e aggiunte di modelli di autovetture. L’ e lenco aggiornato è consultabile nel nostro sito internet www.joyello-bimbinitaly.it. Leggere il manuale dell’autoveicolo prima dell’installazione del dispositivo di ritenuta. Il manuale indicherà...
- Page 7 Il seggiolino non deve essere istallato sul sedile anteriore se dotato di airbag (fig.2). This child restraint is classified for”(Restricted/Semi-universal)”use and is suitable Il seggiolino deve essere istallato solo su sedili fissati alla struttura for fixing into the seat positions of the following cars: rivolti nel senso di marcia.
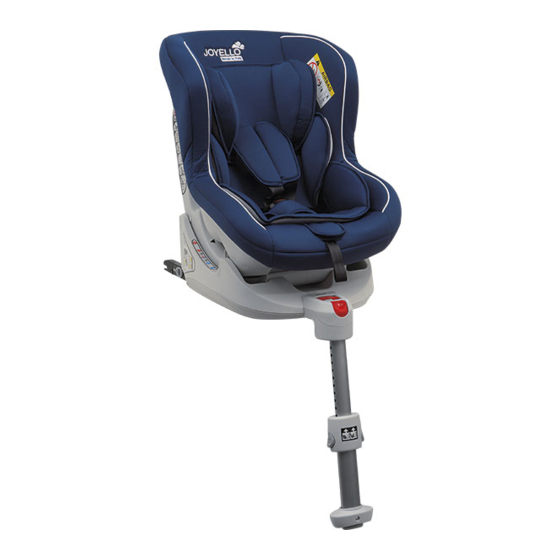
- Page 8 COMPONENTI 1 - Poggiatesta 2 - Cinture 3 - Copricintura (spallacci) 4 - Cuscino 5 - Pulsante di regolazione cinture seggiolino (sotto al tessuto) 6 - Nastro per la regolazione della cintura 7 - Pulsante di sgancio del seggiolino dalla base 8 - Pulsante di sgancio dei connettori ISOFIX 9 - Gamba di appoggio 10 - Pulsante di regolazione della gamba di appoggio...
- Page 9 UTILIZZO DEL SEGGIOLINO AUTO ATTENZIONE! QUESTO SEGGIOLINO PUÒ ESSERE UTILZZATO SOLO CON LA RISPETTIVA BASE. NON UTILIZZATE MAI LA SCOCCA DEL SEGGIOLINO SENZA LA BASE! CONTROLLO DELL’ALTEZZA DELLE CINTURE DEL SEGGIOLINO Controllare sempre che le cinture siano posizionare alla giusta altezza per il vostro bambino. La corretta posizione si ha quanto le spalle del bambino sono alla stessa altezza delle asole delle cinture.
-
Page 10: Forward Facing
uckle connector together. forward facing Firstly, adjust the shoulder straps height, please proceed as follows: the slot in the buckle until they Step1. Put the two metal sections of the buckle connector together. Installed forward-facing or rearward facing, there are 3 rec Step2. - Page 11 ATTENZIONE! Verificare sempre che le cinture siano agganciate correttamente al connettore di fissaggio posto sul retro del seggiolino, che non risultino attorcigliate e che siano collocate alla stessa altezza. 10.Remove the buckle and car seat pad RIMOZIONE DEL RIVESTIMENTO 10.Remove the buckle and car seat pad ×...
- Page 12 the car seat (fig.2) STEP 3: Take out the buckle from the pad(fig.3). √ Note: Please keep the buckle and crotch pad as well. Il seggiolino dispone di 3 posizioni di reclinazione sia che si trovi in direzione di marcia, sia che si trovi in direzione contraria di marcia.
- Page 13 Adjust the length of the leg to make sure that the leg can touch the ground of the car very steadily(A5). Note:Leg not hanging in the air or other items can be used to support.At the same time to ensure that the leg is no higher that the safety seat.Check whether leg 13.
- Page 14 STEP 1:Flat on the ISOFIX base on the car seat,the ISOFIX base connected with the connection device on the car(C1). NOTE:Pull outward ISOFIX base to ensure that both sides have been locked. STEP 2: Combine the car seat with isofix base(C2,C3,C4). Per sganciare il seggiolino dalla base mantenere premuto il pulsante di blocco della seduta STEP 3:There are 3 recline position available.
-
Page 15: Pulizia E Manutenzione
4.If foo STEP 2: Combine the car seat with isofix base(D2,D3,D4). the chil 5.For cl STEP 3:Push in the direction of car back seat,make sure that the backrest of the instruc baby seat is firmly pressed against the backrest of car seat (D5). 17.2 W Never u STEP 4:There are 3 recline position available. - Page 16 Le parti mobili del seggiolino non devono essere in alcun modo lubrificate Pulire le parti in plastica con un panno umido e poi asciugarle. Non usare solventi o altri prodotti simili. Controllare periodicamente il sistema di trattenuta per verificare che tutti i componenti si trovino in perfetto stato.
- Page 17 “VEHICLE FITTING LISTS” presente alla fine di questo manuale di istruzioni. L’ e lenco aggiornato è consultabile nel nostro sito internet www.joyello-bimbinitaly.it. La lista è soggetta ad una continua revisione con cambiamenti e aggiunte di modelli di autovetture.
- Page 18 them out of reach of children. It is recommended to dispose of these items at an appropriate differentiated collection point, as requir ed by the regulations in force. WARNING! HAXARD! Never fit this car seat on a front seat equipped with a front airbag. The child car seat can be fitted to a front seat only if the front airbag has been deactivated: check with the car manufacturer or see the owner’s manual instructions on how to deactivate the airbag.
- Page 19 original safety standards. This product must not be modified in any way unless approved by manufacturer. Do not fit any accessories, spare parts or components not supplied or approved by the manufacturer. Never leave your child unsupervised in the car seat whether harnessed or not. Always ensure that the child car seat is securely fastened to the car seat;...
- Page 20 The list is liable to change continually as vehicle models are modified and added. The updated list is available for consultation on our website at: www.joyello-bimbinitaly.it. Read the vehicle’s manual before installing the restraint device. The manual will indicate the positions in your vehicle which are compatible with an approved ISOFIX SEMI-UNIVERSAL restraint device.
- Page 21 The child seat must not be installed on the front seat if it is equipped with an airbag (fig.2). This child restraint is classified for”(Restricted/Semi-universal)”use and is suitable The child seat must only be installed on a seat which is fixed to for fixing into the seat positions of the following cars: the vehicle’s body and faces forward.
- Page 22 COMPONENTS 1. Headrest 2. Harness 3. Strap cover (shoulder straps) 4. Padding 5. Harness adjuster button (under the fabric) 6. Harness adjuster strap 7. Seat release button (from base) 8. ISOFIX connector arms extender button 9. Support leg 10. Support leg adjuster button 11.
- Page 23 USING THE CHILD CAR SEAT CAUTION! THIS CHILD CAR SEAT CAN ONLY BE USED WITH ITS ASSOCIATED BASE. NEVER USE THE CHILD SEAT SHELL WITHOUT ITS BASE! ADJUSTING THE HEIGHT OF THE CAR SEAT HARNESS Always check that the harness is positioned at the right height for your child. The correct position is when the child’s shoulders are at the same height as the harness slots through which the shoulder straps have been threaded.
-
Page 24: Forward Facing
uckle connector together. forward facing Firstly, adjust the shoulder straps height, please proceed as follows: the slot in the buckle until they Step1. Put the two metal sections of the buckle connector together. Installed forward-facing or rearward facing, there are 3 rec Step2. - Page 25 back of the child seat, that they are not twisted and that they are both at the same height. 10.Remove the buckle and car seat pad REMOVING THE PADDING 10.Remove the buckle and car seat pad × × STEP 1: Release the buckle(fig.1),release the shoulder belt as long as you can. Before removing the padding, carefully note how the various parts are attached so that you can STEP 1: Release the buckle(fig.1),release the shoulder belt as long as you can.
- Page 26 √ Note: Please keep the buckle and crotch pad as well. This child seat has 3 reclined positions whether positioned forward-facing or rear-facing. Note:Leg n To recline the child seat, press the adjuster button located under the front of the child seat and time to ens STEP 4: Slide both of the harness off the harness connector(fig.4),and take off...
- Page 27 Adjust the length of the leg to make sure that the leg can touch the ground of the car very steadily(A5). Note:Leg not hanging in the air or other items can be used to support.At the same time to ensure that the leg is no higher that the safety seat.Check whether leg e off shows green(A6).
- Page 28 connection device on the car(C1). NOTE:Pull outward ISOFIX base to ensure that both sides have been locked. STEP 2: Combine the car seat with isofix base(C2,C3,C4). STEP 3:There are 3 recline position available. Adjust the seat to suitable position(C5). To release the seat from the base, press and hold the seat locking button whilst simultaneously pushing the release button.
-
Page 29: Cleaning And Maintenance
STEP 2: Combine the car seat with isofix base(D2,D3,D4). the chil 5.For cl STEP 3:Push in the direction of car back seat,make sure that the backrest of the instruc baby seat is firmly pressed against the backrest of car seat (D5). 17.2 W Never u STEP 4:There are 3 recline position available. - Page 30 Clean the plastic parts with a damp cloth and then dry them. Do not use solvents or other similar products. Check the restraint system periodically to ensure that all components are in perfect working order. CAUTION! the child seat’s harness must never be washed, but simply cleaned with a cloth and mild detergent.
- Page 31 “VEHICLE FITTING LIST” included at the end of this instruction manual. The updated list is available for consultation on our website at: www.joyello-bimbinitaly.it. The list is liable to change continually as vehicle models are modified and added.
- Page 32 ATENCION! Antes del uso retirar y eliminar posibles bolsas de plástico y todos los elementos que componen la confección del producto, tenerlos de todas formas lejos del alcance de los niños. Se recomienda efectuar la eliminación de estos elementos por medio de la recolección diferenciada de residuos en conformidad a las leyes vigentes.
- Page 33 Ninguna silla de automóvil puede garantizar la total seguridad del niño en caso de accidente, pero el uso de la silla reduce los riesgos. El riesgo de serios daños al niño, no solo en casos de accidente, incluso en otras situaciones (por ej. frenada brusca, etc.) aumenta si las instrucciones de este manual no son seguidas atentamente: verificar siempre que la silla esté...
- Page 34 seguridad por la propia seguridad debido a que, durante el viaje en caso de accidente o frenada brusca, podrían lastimar al niño. ATENCION! En los procedimientos de regulación del apoyacabeza y de las cinturas, asegurarse que las piezas móviles de la silla no estén en contacto con el cuerpo del niño. Durante la marcha, antes de realizar procedimientos para regular la silla o acomodar al niño, detener el vehículo en un lugar seguro.
- Page 35 La lista está sujeta a una contínua revisión con modificaciones y agregados de modelos de automóviles. El elenco actualizado se puede consultar en nuestro sitio internet www.joyello.bimbinitaly.it Leer el manual del automóvil antes de la instalación del dispositivo de retención. El manual indicará...
- Page 36 is contained on the labels. DO NOT use on the vehicle seats that face the sides or rear of the vehicle(a,b). Use the child safety seat only on the vehicle seats that face forward.According to accident statistics,children are safer when properly restrained in the rear seating positions than in the front seating position(c,d).
- Page 37 13. Base de la silla 14. Botón p/los enganches ISOFIX 15. Botón p/regular la reclinación de la silla 16. Indicador de la barra de apoyo 17. Ranuras p/regular la altura de las cinturas 18. Cinturas 19. Conector de enganche posterior 20.
-
Page 38: Forward Facing
please proceed as follows: uckle connector together. forward facing Firstly, adjust the shoulder straps height, please proceed as follows: the slot in the buckle until they Step1. Put the two metal sections of the buckle connector together. Installed forward-facing or rearward facing, there are 3 rec Step2. - Page 39 4. Enganchar nuevamente los bordes en el conector de enganche en la parte posterior de la silla. ATENCION! Verificar siempre que las cinturas estén enganchadas correctamente al conector colocado en la parte posterior de la silla, que no estén torcidas y que estén colocadas a la misma altura. 10.Remove the buckle and car seat pad RETIRAR EL REVESTIMIENTO 10.Remove the buckle and car seat pad...
- Page 40 √ Note: Please keep the buckle and crotch pad as well. La silla de automóvil dispone de 3 posiciones de reclinación, sea que se encuentre en el sentido de Note:Leg n la marcha o que se encuentre en sentido contrario a la marcha. time to ens STEP 4: Slide both of the harness off the harness connector(fig.4),and take off...
- Page 41 Adjust the length of the leg to make sure that the leg can touch the ground of the car very steadily(A5). Note:Leg not hanging in the air or other items can be used to support.At the same time to ensure that the leg is no higher that the safety seat.Check whether leg e off shows green(A6).
- Page 42 STEP 1:Flat on the ISOFIX base on the car seat,the ISOFIX base connected with the connection device on the car(C1). NOTE:Pull outward ISOFIX base to ensure that both sides have been locked. STEP 2: Combine the car seat with isofix base(C2,C3,C4). Para desenganchar la silla de la base, presionar el botón de bloqueo empujándolo hacia adentro y STEP 3:There are 3 recline position available.
- Page 43 4.If foo STEP 2: Combine the car seat with isofix base(D2,D3,D4). the chil 5.For cl STEP 3:Push in the direction of car back seat,make sure that the backrest of the instruc baby seat is firmly pressed against the backrest of car seat (D5). 17.2 W Never u STEP 4:There are 3 recline position available.
-
Page 44: Limpieza Y Mantenimiento
LIMPIEZA Y MANTENIMIENTO Los procedimientos de limpieza y mantenimiento deberán ser realizados sólo por adultos. Las partes móviles no deben de ninguna manera ser lubrificadas. Limpiar las partes en plástica con un paño húmedo y luego secarlas. No usar solventes u otros productos similares. - Page 45 “Lista de vehículos” presente dentro de este Manual de Instrucciones. El elenco actualizado se puede consultar en nuestro sito internet www.joyello-bimbinitaly.it La lista esta sujeta a una contínua revisión con modificaciones y agregados de modelos de vehículos.
- Page 46 Suivre attentivement instructions pour compromettre la sécurité de votre enfant. ATTENTION ! Avant l’utilisation, enlever et jeter tous les sachets en plastique éventuels et tous les éléments composant l’ e mballage du produit. les tenir hors de portée des enfants. nous recommandons de jeter ces éléments conformément aux réglementations en vigueur.
- Page 47 courts trajets. Ne pas le faire risque de compromettre la sécurité de l’ e nfant. S’assurer en particulier que la ceinture soit correctement tendue, ne soit pas vrillée ou en position incorrecte. Les ceintures abdominales doivent être placées aussi bas que possible afin que les hanches de l’...
- Page 48 Cette housse fait partie intégrante du siège-auto et constitue une garantie de sécurité. Elle ne peut être remplacée par une autre housse non approuvée par le fabricant. Ne pas utiliser le siège-auto sans les rembourrages de protection des ceintures (épaulières), qui font partie intégrante du siège-auto et garantissent une sécurité...
- Page 49 Cette liste fait l’ o bjet d’une révision systématique, visant à modifier et à mettre à jour les modèles de voitures spécifiques. La liste actualisée est disponible sur notre site Internet www.joyello- bimbinitaly.it. Lisez le manuel du véhicule avant d’installer le dispositif de retenue. Ce manuel indique les sièges compatibles avec un dispositif de retenue homologué...
- Page 50 “*” Please see the list of approved cars Seat positions in other cars may also be suitable to accept this child restraint.If in doubt,consult either the child restraint manufacturer or the retailer. WARNING Important! Please read all instructions in this manual and in the vehicle owner’s être fixé...
- Page 51 1. Appuie-tête 2. Ceintures 3. Capitonnage du harnais 4. Coussin 5. Bouton-poussoir de réglage des ceintures du siège-auto (sous le tissu) 6. Ruban de réglage de la ceinture 7. Bouton-poussoir de déverrouillage du siège-auto de la base 8. Bouton-poussoir de déverrouillage des crochets ISOFIX 9.
- Page 52 8.Adjust the backrest angle 6.Usage of buckle UTILISATION DE LA BOUCLE 8.Adjust the 6.Usage of buckle 8.Adjust the backr CLICK CLICK CLICK please proceed as follows: Avant toute chose, veillez à régler la hauteur des ceintures. uckle connector together. Firstly, adjust the shoulder straps height,please proceed as follows: forward facing Firstly, adjust the shoulder straps height, please proceed as follows: Step1.
- Page 53 d-facing or rearward facing, there are 3 recline positions available. ing handle under the front of the seat upwards,and then pull or push s or backwards.Release the positioning handle in the desired h until you hear “click”. k to make sure the child seat is securely locked in the desired ng the positioning handle.
- Page 54 × STEP 1: Release the buckle(fig.1),release the shoulder belt as long as you can. STEP 2: Please adjust the seat to the biggest angle,you will see the end bracket under the car seat.Then you can pull out the harness from the solt which under the car seat (fig.2) STEP 3: Take out the buckle from the pad(fig.3).
- Page 55 × Press ISOFIX release button to make ISOFIX connectors × Press ISOFIX release button to make ISOFIX connectors can. come out of the base. Appuyez sur le bouton-poussoir pour permettre l’ o uverture des crochets come out of the base. cket ISOFIX de la base (fig.A1).
- Page 56 STEP 4:Push in the direction o seat is firmly pressed against 14. Installation of installing the shell INSTALLATION DU SIÈGE-AUTO SUR LA BASE Put the shells on the base,heard “CLICK”,and check the color of the knob place, whether it is green. Insérez le siège-auto sur la base ;...
- Page 57 STEP 2: Combine the car seat with isofix base(C2,C3,C4). STEP 3:There are 3 recline position available. Adjust the seat to suitable position(C5). STEP 4:Push in the direction of car back seat,make sure that the front of the baby seat is firmly pressed against the backrest of car seat (C6). INSTALLATION DU TYPE DE SIÈGE GROUPE O+ (0-13KG)/(sens contraire à...
-
Page 58: Nettoyage Et Entretien
4.If food or drin STEP 2: Combine the car seat with isofix base(D2,D3,D4). the child seat a 5.For cleaning t STEP 3:Push in the direction of car back seat,make sure that the backrest of the instruction. baby seat is firmly pressed against the backrest of car seat (D5). 17.2 Washing Never use any s STEP 4:There are 3 recline position available. - Page 59 solvants ou autres produits similaires. Contrôlez périodiquement le système de retenue afin de vous assurer que l’ e nsemble des composants sont en parfait état. ATTENTION ! Les ceintures du siège-auto ne doivent jamais être lavées, mais seulement nettoyées en faisant usage d’un chiffon et d’un nettoyant délicat.
- Page 60 « LISTE DES VÉHICULES » consultable à la fin de ce manuel d’instructions. La liste actualisée est disponible sur notre site Internet www.joyello-bimbinitaly.it. Cette liste fait l’ o bjet d’une révision systématique, visant à modifier et à mettre à jour les modèles de voitures spécifiques.
- Page 61 VEHICLE FITTING LIST...
- Page 62 VEHICLE FITTING LIST...
- Page 63 VEHICLE FITTING LIST...
- Page 64 VEHICLE FITTING LIST...
- Page 68 JOYCARE S.R.L. Socio unico Sede legale e amministrativa: Via Massimo D’Antona, 28 60033 Chiaravalle (AN) - ITALY Tel: +39 071 890151 www.joyello-bimbinitaly.it Made in China REV00-MAR2017...
Need help?
Do you have a question about the JL-1048 SECURFIX BEEP and is the answer not in the manual?
Questions and answers