Advertisement
Quick Links
Advertisement

Subscribe to Our Youtube Channel
Related Manuals for MAKSIWA DE.1200/3


Summary of Contents for MAKSIWA DE.1200/3
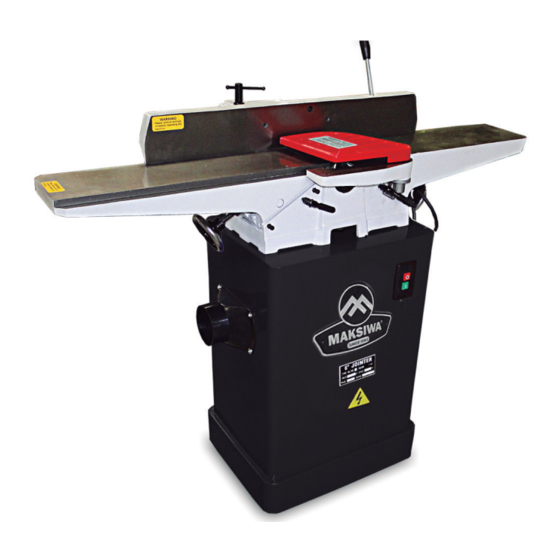
- Page 1 DE.1200/3 Wood Jointer INSTRUCTION MANUAL Attention: Read this manual before using your machine.
-
Page 2: Grounding Instructions
A. The jointer has a grounding plug similar to the Channel you will fi nd several videos plug illustrated in Sketch A. Make sure the jointer is that will help you whit Maksiwa´s connected to an outlet having the same confi guration machines. To use the QRCODE. - Page 3 distance from work area. • Extension cables. Make sure your extension cord is in good condition. When using an extension, be sure • Make the workplace childproof making use of of their ability to transmit the electrical current used padlocks, master keys or removing the ignition key. by your product.
- Page 4 A 10% decrease in voltage or more will cause loss of power and overheating. All equipment MAKSIWA are tested at the factory. If this machine does not work, check the electricity supply. Check the compatibility of your outlet and plug the machine.
- Page 5 To mount the jointer to the stand: 2. Lift the motor upward far enough to allow the V-Belts to be placed around the cutterhead pulley 1. Remove the outer cover of the cabinet. and motor pulley. 2. With the help of an assistant, lift the jointer onto the cabinet.
- Page 6 To install the carriage mounting bracket: 2. Use two M8-1,25 x 20 cap screws, lock washers and flat washers to secure the fence assembly to the fence 1. Align the locating pins on the back of the carriege carriage assembly. mounting bracket with the sockets on the jointer table.
- Page 7 To install the dust port: Setting Outfeed Table Height: NOTE: if you choose to not use a dust collection The outfeed table must be level with the knives when system, don’t install the dust port. Chips will build up they are at top-dead-center. This adjustment has been inside the cabinet and clog.
- Page 8 4. Connect your machine to the power source. 5. Press the START button to turn the machine ON Cleaning the DE.1200/3 is relatively easy. Vacuum excess wood chips and sawdust, and wipe off the - The jointer should run smoothly with little or no remaining dust with a dry cloth.
- Page 11 Inspecting Knives To set the knives The height of the knives can be easily and quickly 1. Disconnect the jointer from the power source!. inspected with the knife setting jig. This inspection will ensure that the knives are set in the cutterhead as 2.
- Page 12 Setting Fence Stops 8. Rotate the cutterhead to the first knife you started with. Slightly tighten all the gib bolts, starting at the ends and working your way to the middle by The fence stops are adjustable nuts and bolts that alternating left and right.
- Page 13 3. Loosen the jam nut on the 45° outward fence stop bolt. Swing Stop Jam Nut Fence Stop Bolt 90° swing stop engaged. 45° outward fence stop jam nut 4. Adjust the 45° outward fence stop bolt until it 2. Using a 90° square, adjust the fence to the 90° position using the fence stop bolt and jam nut: makes contact with the back of the fence.
-
Page 14: Technical Assistence
Damage caused by bad weather (floods, flooding, WARRANTY TERM lightning, power outages etc.). The MAKSIWA assures the owner of his equipment, For your safety, trust the repairs, maintenance and identified by the date of issue of the purchase invoice,...
Need help?
Do you have a question about the DE.1200/3 and is the answer not in the manual?
Questions and answers