
Related Manuals for Walker WPS818C SAORVIEW

Summary of Contents for Walker WPS818C SAORVIEW
- Page 1 WALKER OPERATING INSTRUCTIONS WPS818C SAORVIEW Digital HD Satellite & Terrestrial Receiver www. g l en di m p l ex i re l an d .com...
-
Page 3: Table Of Contents
Contents Safety Precautions ..........2 Markings on the Product......... 3 Features ..............3 Accessories ............3 Overview of the Remote Control ......4 Connections............5 Remote Control ............6 Connection to the TV ..........6 Power Connection ..........7 Power On-Off ............7 Antenna Connection .......... -
Page 4: Safety Precautions
• If any solid object or liquid falls into the cabinet, Safety Precautions unplug the apparatus and have it checked by a qualified personnel before operating it any further. Power Source Apparatus shall not be exposed to dripping or • Always use the provided AC adaptor. splashing and no objects filled with liquids such as •... -
Page 5: Markings On The Product
Markings on the Product Features The following symbols are used on the product as • DVB Teletext a marker for restrictions and precautions and safety • Channel capacity: 2000 instructions. Each explanation shall be considered • DVB 7 days event information (7 days EPG) where the product bears related marking only. -
Page 6: Overview Of The Remote Control
Overview of the Remote Control 1. Standby: Switches On / Off the box 2. Favourites: Displays a list of favourite channels 3. Media browser: Opens the media browsing screen 4. Volume +/- 5. Swap: Quickly cycles between previous and current channels 6. -
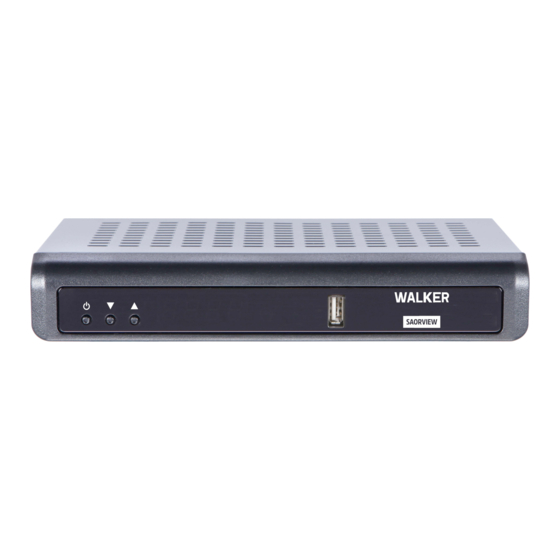
Page 7: Connections
Connections Front View 1. Standby / On 2. Programme -/+ 3. USB Input: To connect USB storage devices for media playback and recording functions Back View 1. Analog A/V Output: To connect the box to your TV’s analog A/V input (if available) by using an A/V cable 2. -
Page 8: Remote Control
Remote Control First remove the battery compartment cover on the underside of the remote control. Insert two size AAA batteries. Make sure the (+) and (-) signs match (observe correct polarity). Do not mix old and new batteries. Replace only with same or equivalent type. Place the cover back on. While using the remote control, direct it towards the front side of the receiver. -
Page 9: Power Connection
Power Connection IMPORTANT: This set top box is designed to operate on 12V DC. For this, an adaptor is used which gives 12 V voltage. Connect this adaptor to a system that supplies 220-240 V AC, 50/60Hz. After unpacking, allow the set-top box to reach the ambient room temperature before you connect the set to the mains. -
Page 10: Digital Audio Connection
may cause physical damage to the USB player and Digital Audio Connection especially the USB device itself. You can use digital audio output socket if you want to Do not pull out USB module while playing or recording connect your set-top box to a hi-fi set. By using this a file. -
Page 11: First Time Installation
Some stream packets may not be recorded because Press OK button on the remote control to continue of signal problems, as a result sometimes videos may and the Network/Internet Settings menu will be freeze during playback. displayed, if you confirm the previously displayed message asking whether you want to do the network Record, Play, Pause, Display (for PlayListDialog) keys settings. -
Page 12: Menu System
Using SatcoDX Feature Note: Some menu options may not be available depending on the country selection in the First Time Installation. You can perform SatcoDX operations using the Default PIN could have been set to 0000 or 1234. If you Installation>Satelite Settings menu. -
Page 13: Channel List
OSS: Displays Open Source Software license the list. You can make multiple choices by pressing information. the Yellow button. Then press the OK button to open the Channel Edit Options menu and select Add/ Show All Cookies: Displays all saved cookies. Remove Favourites option. -
Page 14: Timeshift Recording
other than None. Set your preference using the Left/ Timeshift Recording Right directional buttons. Press Pause button while watching a broadcast to Hard disk information start timeshifting. In timeshifting mode, the programme You can view detailed information about the USB is paused and simultaneously recorded to the storage device connected to your TV. -
Page 15: Standby Notifications
When the Mute button is pressed the sound of your on after the upgrade, unplug, wait for two minutes then plug it back in. set-top-box will be muted and a mute symbol is displayed on the screen. To cancel mute, you can press Mute button again or the Volume + button. -
Page 16: Connectivity Troubleshooting
Highlight Internet Speed Test and press the OK 1. Server Software Installation button. Set-top box will check the internet connection The Audio Video Sharing feature cannot be used if bandwidth and display the result when complete. the server programme is not installed onto your PC or if the required media server software is not installed Advanced Settings onto the companion device. -
Page 17: Internet Portal
the browser bar which contains previous/next buttons, Internet Portal the refresh button, the adress/search bar, the Speed Dial and the Opera buttons are available. HINT: A broadband internet connection is required for high quality viewing. You must set the country option To add a desired website to the Speed Dial list for accordingly in the First Time Installation for proper quick access, move the cursor to the top of the page. -
Page 18: Hbbtv System
HbbTV requires AV streaming capability for the HBBTV System platform. There are numerous applications providing VOD (video on demand) and catch-up TV services. HbbTV (Hybrid Broadcast Broadband TV) is a The user can use play, pause, stop, forward, and new industry standard that seamlessly combines rewind keys on the remote control to interact with TV services delivered via broadcast with services the AV content. -
Page 19: Specifications
content. If you decline an upgrade, you will not be able DVB T Guard Intervals: 1/32, 1/16, 19/256, 1/8, to access content that requires the upgrade. 19/128 and 1/4 DVB T2 Pilot Patterns: PP1, PP2, PP3, PP4, PP5, PP6, PP7, PP8 DVB T2 PLPs: Single PLP, Multiple PLP General Modulation... - Page 20 AC Adaptor Manufacturer Name: MOSO POWER SUPPLY TECHNOLOGY CO., LTD Model Identifier: MSA-C2000IS12.0-24C-DE S7047-V0 Input Voltage: 100-240 V Input AC Frequency: 50-60 Hz Output Voltage: 12,0 V Output Current: 2,0 A Output Power: 24,0 W Average Active Efficiency: % 86,8 Efficiency at Low Load (%10): % 76,8 No-load Power Consumption: 0,08 W English - 18 -...
-
Page 21: Trouble Shooting
Trouble Shooting Trouble Possible Reasons What To Do Adaptor cable is not Check if the adaptor cable is plugged The standby LED is not lit. connected. into the power socket. Check the aerial and video No picture or sound. No signal or weak signal. connections (AV/HDMI). - Page 22 TR: İşbu belgede; VESTEL Komünikasyon Sanayi ve Ticaret VESTEL Komünikasyon Sanayi ve Ticaret A.Ş., igazolja, A.Ş., telsiz ekipmanı tipi SET TOP BOX ’ın 2014/53/AB hogy a SET TOP BOX típusú rádióberendezés megfelel a sayılı direktife uygun olduğunu beyan eder. AB uygunluk 2014/53/EU irányelvnek.
- Page 24 WALKER Glen Dimplex Ireland, Airport Road, Cloghran, Co. Dublin IRELAND K67DT89 50559100...
Need help?
Do you have a question about the WPS818C SAORVIEW and is the answer not in the manual?
Questions and answers