Kogan FORTIS 700C User Manual
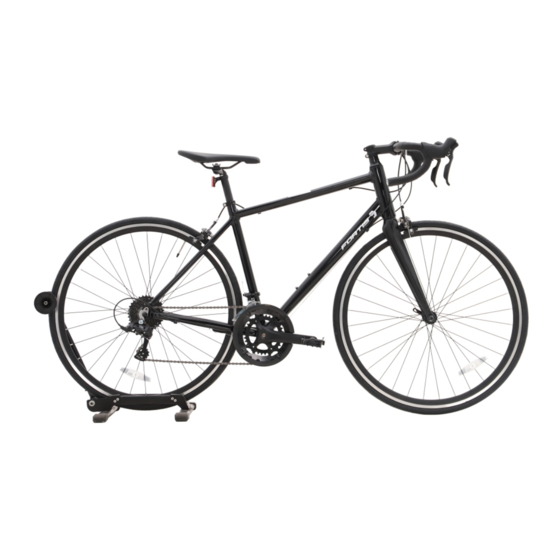
Urban master pro road bike
Hide thumbs
Also See for FORTIS 700C:
- User manual (28 pages) ,
- User manual (32 pages) ,
- User manual (32 pages)

Related Manuals for Kogan FORTIS 700C


Summary of Contents for Kogan FORTIS 700C
- Page 1 USER GUIDE FORTIS 700C URBAN MASTER PRO ROAD BIKE (2X8 SPEED, ALUMINIUM FRAME & CARBON FORK) FS700CACRRA...
- Page 3 Before First Ride • Before first use, please double-check the function of all the parts of your bike. If you have any doubts or if you detect a problem, please contact Kogan.com for support. • Respect local and national road traffic regulations.
- Page 4 Because any fall can result in serious injury or even death, we do not repeat the warning of possible injury or death whenever the risk of falling is mentioned. Kogan.com does not encourage: trick riding, ramp riding, jumping, aggressive riding, riding on severe terrain, riding in severe climates, riding with heavy loads, riding double, commercial activities;...
- Page 5 Weight Limit: The maximum structural weight recommendations for our bicycles are; • 20 inch bicycles: 80 kg • Adult bicycles up to 26 inches: 125 kg CAUTION: For safe and comfortable riding there should be a clearance of no less than 1 inch between the inseam area of the intended rider and the top tube of the bicycle frame, while the rider straddles the bicycle with both feet flat on the ground.
- Page 6 • Wet weather riding - riding your bicycle in wet conditions is not recommended. In wet conditions traction and braking power is reduced. Riding in such conditions could result in personal injury. • Proper helmet use. A helmet that meets Australian standards should always be worn when riding a bicycle.
- Page 7 SAFETY CHECKLIST Before every ride, it is important to carry out the following safety checks: Brakes: • Ensure front and rear brakes work properly. • Ensure brake pads are not over worn and are correctly positioned in relation to the rims. •...
- Page 8 Chain: • Ensure chain is oiled, clean and runs smoothly. • Extra care is required in wet or dusty conditions. • On bicycles equipped with coaster brakes, check for proper chain tension. • Check to make sure your chain guard is tight and not touching the crank or chain.
- Page 9 OVERVIEW Bike Seat Clamp Tools Required (not included) Phillips Head Flat Head 15mm Open Screwdriver Screwdriver Ended Spanner Allen Key Set Adjustable Slip Joint Pliers (4 - 8mm) Wrench...
- Page 10 ASSEMBLY Getting Started Open the box and check that all parts are present. We strongly recommend reading the user guide before beginning. If you aren’t comfortable with the assembly, you should bring your bike to your local bike shop to have a qualified mechanic put it together for you.
- Page 11 Step 2: Attaching the pedals Before your first ride, please do the following checks and ensure your pedals are attached correctly. • There is a right side pedal marked “R” and a le side pedal marked “L” • The right pedal has a RED sticker, the Le pedal has a GREEN sticker. •...
- Page 12 Step 3: Attaching the crank • If you have a 3 piece crank, check the crank bolts to ensure they are tightened (Figure 4). Re-check the bolts a er your first ride. • If you have a 1 piece crank, firmly grasp the crank arm on the le side of the bicycle and wiggle it gently.
- Page 13 Step 4: Installing the seat • Add some white grease to the inside of the seat tube, and slide the seat post into the bicycle. • Make sure that the minimum insertion mark is completely covered and that the seat is pointing forward in alignment with the bicycle (Figures 6 &...
- Page 14 Step 6: Seat clamp • As your bike has a standard seat clamp (see Figure 9), use an Adjustable Wrench to tighten the nut securely. • If your bike has a bolt on seat clamp , use a 4, 5, or 6 mm Allen Key to tighten the bolt securely.
- Page 15 Handlebar/Stem This bike features a threadless stem (Figure 10) the stem has been pre-installed, to change handlebar height requires moving height adjustment spacers from below the stem to above the stem, or vice versa. Alternatively you’ll have to get a stem of different length or rise. Do not attempt to do this yourself, as it requires special knowledge and your bicycle should be taken to a professional bike shop for this adjustment.
- Page 16 Step 7: Securing the handlebars • Loosen the bolts on the side of the stem, slide the stem into place, making sure it lines up with the fork . • Check the gap between the steerer tube and stem, ensuring there is enough space to reinstall the cap and bolt.
- Page 17 Step 8: Installing the wheels • Ensure the brakes are loose enough to allow the wheel to pass through the brake pads easily. • Place wheel into fork drop outs. • Install retaining washers with raised lip pointed towards the fork, and insert into the small hole of the fork blade (Figure 16).
- Page 18 Step 9: Brakes A er installing the front wheel, re-connect the front brake by squeezing the arms together, and sliding the cable guide back into the carrier (Figures 18 & 19). Figure 18 Figure 19 WARNING: When assembling or adjusting the brakes, make sure the cable anchor nut is tight (Figure 18).
- Page 19 Step 10: Inflating the tires Use a hand pump, foot pump, or floor pump to properly inflate the tires. The maximum inflation (PSI) is shown on each tire sidewall (Figure 20). If your pump does not have a built in gauge, use a separate pressure gauge to ensure the tires are inflated to the correct pressure.
- Page 20 Be sure to read and to understand this section . If you have even the slightest doubt as to whether you understand something, talk to your local bicycle specialist or contact Kogan.com for support. Removing and Installing Bolt-on Wheels Removing Bolt-on Front Wheel: Open up the brake shoes.
- Page 21 Installing a Bolt-On Rear Wheel: Shi the rear derailleur to its outermost position and pull the derailleur body back with your right hand. Put the chain onto the smallest sprocket. Then, insert the wheel into the frame dropouts and pull it all the way into the dropouts. The axle nut washers should not be on the outside, between the frame and the axle nuts.
- Page 22 If the lever still fails the Mechanical Safety Check, or if you have any question about whether your brakes are working properly have your brakes checked by a bicycle specialist or contact Kogan.com for support.
- Page 23 Shi er Adjustment Adjustment - Front Derailleur: (Figure 22) Shi the rear shi er to the smallest number indicated, then shi the front shi er to the smallest number indicated. Disconnect the front derailleur cable from the cable anchor bolt and place the chain on the smallest chainwheel. Ensure the front derailleur cage is parallel with the outer chainwheel on the crankset.
- Page 24 Lubrication All the pivoting points of the front and rear derailleurs should be lubricated with light oil at least once a month. Be sure to wipe off any excess oil to prevent attraction of dirt into the mechanisms. The shi ing cables should be cleaned and re-coated with a thin layer of grease every 6 months, or whenever new cables are being installed.
- Page 25 MAINTENANCE Lubrication Lubrication should be performed by a qualified bicycle mechanic for the parts to be disassembled. The information provided in this user guide about the service is for only those who are comfortable doing the maintenance. The following are examples of the type of service you should perform yourself. All other service, maintenance and repair should be performed in a properly equipped facility by a qualified bicycle mechanic using the correct tools and procedures.
- Page 26 Service Checklist: Frequency Component Lubricant How to Lubricate • Chain • Chain lube or light oil • Brush or squirt on • Derailleur wheels • Chain lube or light oil • Brush or squirt on Weekly • Derailleur • Oil •...
- Page 27 TROUBLESHOOTING Gears/Chain: Problem Component Lubricant • Derailleur cables sticking or • Lubricated, tighten, or replace stretched or damaged. cables. • Front or rear derailleur not • Adjust derailleurs. Gear shi s not working adjusted properly. properly. • Adjust indexing. • Indexed shi ing not adjusted properly •...
- Page 28 Pedals: Problem Cause Solution • Stiff chain link • Lubricated chain or adjust chain link. • Loose pedal axle or bearing. • Adjust bearings or axle nut. Constant clicking • Loose bottom bracket axle or noises when pedalling. bearings. • Adjust bottom bracket. •...
- Page 29 Wheels/Tires: Problem Cause Solution • Axle broken. • Replace axle. • Wheel out of true. • True wheel. Wobbling wheel. • Hub comes loose. • Adjust hub bearings. • Headset binding. • Adjust headset. • Hub bearings collapsed. • Replace bearings. •...
- Page 30 NOTES...
- Page 31 NOTES...
- Page 32 Need more information? We hope that this user guide has given you the assistance needed for a simple set-up. For the most up-to-date guide for your product, as well as any additional assistance you may require, head online to help.kogan.com...
Need help?
Do you have a question about the FORTIS 700C and is the answer not in the manual?
Questions and answers