Table of Contents
Advertisement
Quick Links
1. We hereby declare that the following machine comply with the machine directive 2006/42/EC,
EMC-directive 2004/108/EC, Non-road mobile machinery emission directive 97/68/EC (amended by
2002/88/EC, 2004/26/EC, 2006/105/EC) and noise emission 2000/14/EC (amended by 2005/88/EC).
Forklifts
2. Manufacturer
Authorized representative :
Owner of the technical fi le for
machine production.
(TCF : Technical Construction File)
3. Harmonized European directives :
4. Noise level :
Certain n˚ :
Date :
Conformity assessment procedure :
Authorized entity :
Engine power :
Guaranteed sound power level :
5. Remarks
*****
Managing Director
Geel, Belgium
**/**/****
EC Declaration of conformity - update 05/01/'10
Model :
Serial Nr. :
Hyundai Heavy Industries Co. Ltd.
1 Chonha-Dong, Dong-Ku
Ulsan
The republic of Korea
Hyundai Heavy Industries Europe N.V.
Vossendal 11
2440 Geel
Belgium
ISO3691-1.3, ISO 20898:2008, EN ISO 2867:2008
e13*2000/14*2005/88*0059*08
2009-06-17
Attachment VIII following the periodical inspection on technical
extended with "Information on the scope of delivery" by TÜV
Rheinland.
Société Nationale de Certification et d'Homologation s.à r.l
CE0499 11, route de Luxembourg
5230 Sandweiler
Luxemburg
***
***
*******
***
kW
dB (A)
Advertisement
Table of Contents

Related Manuals for Hyundai 15D-7E


Summary of Contents for Hyundai 15D-7E
- Page 1 2002/88/EC, 2004/26/EC, 2006/105/EC) and noise emission 2000/14/EC (amended by 2005/88/EC). Forklifts Model : ******* Serial Nr. : 2. Manufacturer Hyundai Heavy Industries Co. Ltd. 1 Chonha-Dong, Dong-Ku Ulsan The republic of Korea Hyundai Heavy Industries Europe N.V. Authorized representative : Vossendal 11 Owner of the technical fi...
-
Page 2: A Message To Hyundai Lift Truck Operators
HYUNDAI lift trucks are built to take hard work, but not abuse. They are built to be dependable, but they are only as safe and efficient as the operator and the persons responsible for maintaining them. Do not make any repairs to this truck unless you have been trained in safe lift truck repair procedures and are authorized by your employer. -
Page 3: Introduction
HYUNDAI lift truck in a safe and correct manner. Your HYUNDAI lift truck has been designed and built to be as safe and efficient as today's technology can make it. As manufactured, for some models, it meets all the applicable mandatory requirements of ANSI B56.1-1988 Safety Standard for Powered Industrial Trucks. -
Page 4: How To Use This Manual
HYUNDAI reserves the right to make improvements and changes in specifications or design, without notice and without incurring obligation. Please check with your authorized HYUNDAI dealer for information on possible updates or revisions. - Page 5 Acquaint yourself with the various procedures in this manual. Understand how all gauges, indicator lights, and controls function. Please contact your authorized HYUNDAI dealer for the answers to any questions you may have about your lift truck's features, operation, or manuals.
-
Page 6: Ec Regulation Approved
EC REGULATION APPROVED Noise level (2000/14/EC and EN 12053) are as followings. Model (EU only) 15D/18D/20DA-7E 101 dB 81 dB 20D/25D/30D/33D-7E 103 dB 80 dB 20DF/25DF/30DF/33DF-7, 35DF-7 80 dB 103 dB 35D/40D/45D-7E, 50D-7AE 106 dB 82 dB 35DS/40DS/45DS/50DA-7E 106 dB 82 dB 50D/60D/70D-7E, 80D-7E 82 dB... -
Page 7: Safety Labels
SAFETY LABELS 1. LOCATION Always keep these labels clean. If they are lost or damaged, attach them again or replace them with new labels. 15D/18D/20DA-7E 24 , 25 START SWITCH SUB BONNET DASHBOARD BONNET DASHBOARD COVER FAN SHROUD 15D7EOM101 Logo 11 Hand caution 20 Model name Warning plate... - Page 8 20D/25D/30D/33D-7E 24, 25 SUB BONNET DASHBOARD SAFETY INSTRUCTION TRAVEL power can be shutdown When an operator leaves more than 3seconds without parking and neutral position. LOAD CAPACITY CHART FAN SHROUD BONNET DASHBOARD COVER 91FP-00340 91FP-00340 START SWITCH ENGINE AIR INTAKE KEEP WATER AND OTHER FOREIGN MATERIALS OUT.
- Page 9 20DF/25DF/30DF/33DF-7, 35DF-7 24, 25 SUB BONNET DASH BOARD BONNET DASH BOARD COVER FAN SHROUD 91FP-00340 START SWITCH 35DFOM101 Logo 11 Hand caution 20 Model name Warning plate 12 Diesel fuel 21 Noise Tire caution 13 Temperature 22 Load chart Air intake 14 Parking brake 23 Label(UL) Start key...
- Page 10 35D/40D/45D-7E, 50D-7AE, 35DS/40DS/45DS/50DA-7E BONNET DASH BOARD DASH BOARD COVER FAN SHROUD 16 11 91FP-00340 91FP-00340 35D7EOM101 Logo 12 Diesel fuel 21 Noise Warning plate 13 Temperature 22 Load chart Tire caution 14 Parking brake 23 Label(UL) Start key 15 Warning safety 24 Name plate(CE) Radiator &...
- Page 11 50D/60D/70D-7E, 80D-7E FAN SHROUD DASH BOARD COVER PARKING BRAKE HEAD GUARD 16 20 80D7EOM101 Logo 13 Temperature 23 Label-UL Warning plate 14 Parking brake 24 Name plate (CE) Tire caution 15 Warning safety 25 Name plate (UL) Start key 16 Hook 26 Fuse Radiator cap &...
- Page 12 50DS/60DS/70DS-7E DASHBOARD DASHBOARD COVER FAN SHROUD START SWITCH 50DS7EOM101 Logo 12 Diesel 21 Noise Warning plate 13 Temperature 22 Load chart Tire caution 14 Parking brake 23 Label(UL) Start key 15 Warning safety 24 Name plate(CE) Radiator & fan 16 Hook 25 Name plate(UL) Hydraulic oil 17 Safety instruction...
- Page 13 50DF/60DF/70DF-7 VIEW A 17 21 FAN SHROUD DASH BOARD DASH BOARD COVER 50DF7OM101 Logo 12 Fuel 20 Model name Warning plate 13 Temperature 21 Grease Tire caution 14 Parking brake 22 Load capacity Start key 15 Warning safety 24 Name plate (CE) Radiator cap &...
- Page 14 2. DESCRIPTION There are several specific warning labels on this machine please become familiarized with all warning labels. Item numbers are based on the 15D/18D/20DA-7E Replace any safety label that is damaged, or missing. WARNING PLATE (item 2) This warning label is positioned on the both side of the mast.
- Page 15 RADIATOR CAP & FAN (item 6) This warning label is positioned on the cooling fan shroud of the radiator to warn of the danger or injury from spinning fan blades and forbid to open the filler cap of the radiator because operator might get scalded due to spouting of hot water.
- Page 16 HOOK (item 16) This warning label is positioned respectively on the both top side of mast and near rear tire of the both side of the main frame. Refer to page 7-59 for safe loading procedures. 92FT-40640 50DEOM35 CABIN TILTING WARNING (item 30) This warning label is positioned on the left top side of the frame.
- Page 17 BRAKE FLUID (item 18) This warning label is located on the left side of dashboard cover. 25L7A0OM03 TART WARNING (item 10) This warning and caution plate are located on the right side of the dashboard cover. 5 6' Start key switch after 5~6 seconds from 92AD-00920 ON position.
- Page 18 WARNING SAFETY (item 15) This warning label is positioned on the front outside of overhead guard stay-LH. Refer to operator's manual in detail. Always buckle up the seat belt for safety operation. When the operator get off the machine, always pull the parking brake lever so that the machine can keep with stopping condition.
- Page 19 GUIDE 1. DIRECTION The directions of this machine indicate forward, Front backward, right and left when machine is in the travelling direction. Right Left Rear D255SM01 2. SERIAL NUMBER Inform following when you order parts or the machine is out of order. MACHINE SERIAL NUMBER It's shown on front of the right side frame.
-
Page 20: Table Of Contents
A message to hyundai lift truck operators - - - - - - - - - - - - - - - - - - - - - - - - - - - - - - - - -... - Page 21 3. KNOW YOUR TRUCK 1. General locations - - - - - - - - - - - - - - - - - - - - - - - - - - - - - - - - - - - - - - - - - - - - - - - - - - - - - - - - - - - - - - - - - - - - - - - - - - - - - - - - - - - - - - - - - - - - - - - - - - 3-1 2.
- Page 22 10. Handling machine in extremely hot places - - - - - - - - - - - - - - - - - - - - - - - - - - - - - - - - - - - - - - - - - - - - - - - - - - - - - - 7-55 11.
-
Page 23: Safety Hints
1. SAFETY HINTS 1. DAILY INSPECTION At the beginning of each shift, inspect your truck and fill out a check, maintenance and lubrication table. Check for damage and maintenance problems. Have repairs made before you operate the truck. Do not make repairs yourself. Lift truck mechanics are trained professionals. -
Page 24: Do's And Don'ts
2. DO'S AND DON'TS Do watch for pedestrians. D35AOM03 Do wear safety equipment when required. D35AOM05 Don't mix drugs or alcohol with your job. D35AOM02 Don't block safety or emergency equipment. D35AOM04 Don't smoke in NO SMOKING areas or when refueling. D35AOM06... - Page 25 Don't operate the truck outdoors in rainy day. xclude the truck equipped cabin. D35AOM07 Exhaust gas is dangerous. Do not operate the truck at the inhouse, if possible. Provide adequate ventilation when working in a closed space. D35AOM08...
-
Page 26: Seat Belts
3. SEAT BELTS Always buckle up for the machine equipped with safety belt. D507OM09 Seat belts can reduce injuries. B207OM10... -
Page 27: No Riders
4. NO RIDERS The operator is the only one who should be on a truck. D255OM11A Never transport personnel on the forks of a lift truck. D255OM12A... -
Page 28: Pedestrians
5. PEDESTRIANS Watch where you are going. Look in the direction of travel. Pedestrians may use the same roadway you do. Sound your horn at all intersections or blind spots. D35AOM13 Watch for people in your work area even if your truck has warning lights or alarms. -
Page 29: Operator Protection
6. OPERATOR PROTECTION Keep under the overhead guard. Always keep your body within the confines of the truck. Do not operate truck without overhead guard, unless condition prevent use of a guard. D35AOM16... -
Page 30: Fork Safety
7. FORK SAFETY Never allow anyone to walk under raised forks. D255OM17A There is special equipment to raise people for overhead work. DO NOT USE LIFT TRUCKS. D255OM12A Always lower the load slowly. Raise and lower with mast vertical or tilted slightly back(Never forward). -
Page 31: Pinch Points
8. PINCH POINTS Keep hands, feet and legs out of the mast. D255OM61 Don't use the mast as a ladder. D255OM62 Never try to repair the mast, carriage, chain, or attachment by yourself. Always get a trained mechanic. D255OM63... -
Page 32: Travel
9. TRAVEL Travel with the load near the floor/ground, with mast tilted back to cradle the load whenever possible. Never lift or lower the load when the truck is in motion. D35AOM23 When handling bulky loads that restrict your vision operate your truck in reverse to improve visibility. -
Page 33: Grades, Ramps, Slopes And Inclines
10. GRADES, RAMPS, SLOPES AND INCLINES Never turn on a grade, either loaded or unloaded. Unloaded-Forks downgrade D255OM26A Loaded - Forks upgrade D255OM27A 1-11... -
Page 34: Tip Over
11. TIP OVER LATERAL TIP OVER Lateral tip over can occur with a combination of speed and sharpness of turn. This combination will exceed the stability of the truck. This condition is even more likely with an unloaded truck. With the load or mast raised, lateral tip over can occur while turning and/or braking when traveling in reverse or accelerating and turning while traveling forward. - Page 35 WHAT TO DO IN CASE OF A TIP OVER If your truck starts to tip over, do not jump. Brace yourself as illustrated right. 1. Make sure your seat belt is fastened securely, if the truck is equipped with seat belt. 2.
-
Page 36: Surface And Capacity
12. SURFACE AND CAPACITY Avoid these conditions. They can cause a truck to tip over or lose traction for braking or driving. Know the weight of your truck and load. Especially when using elevators, know the capacity of the elevator you intend to use. -
Page 37: Parking
13. PARKING Never park on a grade. D35AOM33 Always come to a complete stop before leaving truck. Be sure travel control is in NEUTRAL. D35AOM34 Lower forks fully to floor and tilt forward. D255OM35A Set parking brake. Position 1 : Lock Position 2 : Release Turn key to OFF position. -
Page 38: Refueling
14. REFUELING Before adding oil, check around machine for oil leakage. D255OM02 Keep away from fire when adding oil or during operation. D255OM03 After adding oil, wipe off any oil spilled on machine. D255OM04 1-16... -
Page 39: Step
15. STEP When getting on or off the machine, use the step provided. D255OM05 Do not jump up or down from the machine. D255OM06 1-17... -
Page 40: Operator's Safety Rules
Always buckle up if a seat belt is provided. D35AOM23 Parking brake must be locked in the PARK HYUNDAI POSITION before exiting from the vehicle. 1. Release(Drive) Parking brake must remain locked in the 2. Lock(Park) park position(2) except when an operator is in the normal operating position. -
Page 41: Operating Hazards
2. OPERATING HAZARDS 1. LOOSE LOADS Loose or unbalanced loads are dangerous. Observe these precautions. Never carry loose or uneven material. D255OM39 Center wide loads. D35AOM40 Stack and band loose material. D35AOM41 Avoid sudden braking or starting When the machine is loaded, do not drive at maximum speed. -
Page 42: Long And Wide Loads
2. LONG AND WIDE LOADS With long or wide loads, you need more room. So slow down and watch your clearance. When extra-long material makes it necessary to travel with the load elevated, do so with extreme care and be alert to load end-swing when turning. -
Page 43: Low Overhead Clearance
4. LOW OVERHEAD CLEARANCE Know the height of your truck, with and without a load. Check your clearances. Keep the load low and tilted back. B207OM44 Watch overhead clearance: Moving into overhead structures can tip a truck over, or spill a load. B207OM45 5. -
Page 44: Drop-Offs
6. DROP-OFFS To avoid these hazards, you must: Talk to the truck driver yourself: make sure the driver does not move the trailer until you are done. Apply trailer brakes. Use wheel chocks. Use trailer-to-dock locking system if available. D35AOM48 The impact of moving in and out of a trailer may cause the trailer to creep or move. -
Page 45: Chain Slack
8. CHAIN SLACK Slack chains mean rail or carriage hang- Raise the forks before you move, or broken chains can result. In case forks with loads are stuck while lowering the mast, lift the mast again and prevent chains from being slack. D35AOM51 D35AOM52 9. -
Page 46: Caution For Electrical Lines
10. CAUTION FOR ELECTRICAL LINES When moving the machine with the mast raised, watch out electrical lines over the machine. The operating near the electrical lines is very dangerous. Operate within safe working permitted as below. Supply voltage Min safe separation D255SF01 6.6 kV 3m (10ft) -
Page 47: Lifting Loads
11. LIFTING LOADS Never permit any persons to stand or pass under lifted load. D255OM08 Never use wire rope to lift a load. D255OM09 12. SIDE SHIFT Never operate the side shift while the forks are not equipped with supports such as a load table for the load. - Page 48 It should be observed that the side shift with load is operated in netural position before traveling. When operating side shift with load, operate slowly so that it can not avoid from dropping of the load or overturning of the fork lift. 35D7EOM63 Never move the load to push or pull of it by the side shift.
- Page 49 13. FORK POSITIONER Do not operate the fork positioner with a load, or with the fork arm on the ground. Never move the levers to operate the pork positioner suddenly and quickly. It can be caused to drop the load. 35D7EOM65...
-
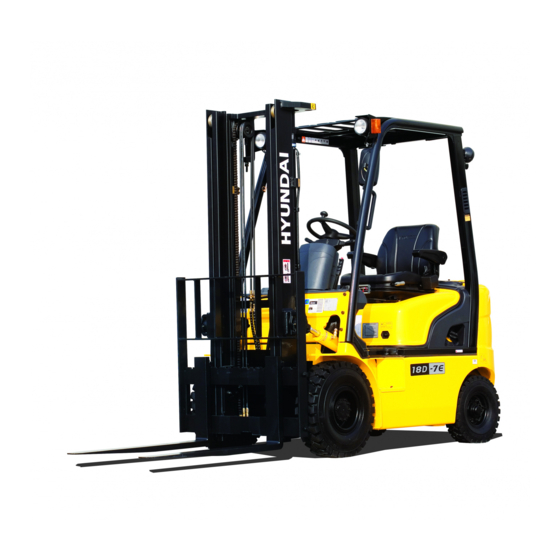
Page 50: Know Your Truck
3. KNOW YOUR TRUCK 1. GENERAL LOCATIONS 15D/18D/20DA-7E 15D7EOM54 Mast Forks 13 Counterweight Lift chain Overhead guard 14 Rear wheel Lift cylinder Turn signal lamp 15 Front wheel Backrest 10 Head lamp 16 Rear combination lamp Tilt cylinder 11 Operator's seat Lift bracket 12 Bonnet... - Page 51 20D/25D/30D/33D-7E, 20DF/25DF/30DF/33DF-7, 35DF-7 20D7OM01 Mast Forks 13 Counterweight Lift chain Overhead guard 14 Rear wheel Lift cylinder Turn signal lamp 15 Front wheel Backrest 10 Head lamp 16 Rear combination lamp Tilt cylinder 11 Operator's seat Lift bracket 12 Bonnet...
- Page 52 35D/40D/45D-7E, 50D-7AE, 35DS/40DS/45DS/50DA-7E 35DS7EOM54 Mast Forks 13 Counterweight Lift chain Overhead guard 14 Rear wheel Lift cylinder Turn signal lamp 15 Front wheel Backrest 10 Head lamp 16 Rear combination lamp Tilt cylinder 11 Operator's seat Lift bracket 12 Bonnet...
- Page 53 50D/60D/70D-7E, 80D-7E 50DEOM54 Mast Forks 11 Bonnet Lift chain Overhead guard 12 Counterweight Lift cylinder Turn signal lamp 13 Rear wheel Backrest Head lamp 14 Front wheel Tilt cylinder 10 Operator's seat 15 Rear combination lamp...
- Page 54 50DS/60DS/70DS-7E 50DS7EOM54 Mast Forks 13 Counterweight Lift chain Overhead guard 14 Rear wheel Lift cylinder Turn signal lamp 15 Front wheel Backrest 10 Head lamp 16 Rear combination lamp Tilt cylinder 11 Operator's seat Lift bracket 12 Bonnet...
- Page 55 50DF/60DF/70DF-7 60DF7CM54 Mast Forks 11 Bonnet Lift chain Overhead guard 12 Counterweight Lift cylinder Turn signal lamp 13 Rear wheel Backrest Head lamp 14 Front wheel Tilt cylinder 10 Operator's seat 15 Rear combination lamp...
-
Page 56: Data/Safety Plates And Decals
Truck serial number An identification number assigned to this particular truck and should be used when requesting information or ordering service parts for this truck from your authorized HYUNDAI dealer. The serial number is also stamped on the frame. Attachment description(If any installed) The user must see that the truck is marked to identify the attachment(s), including the weight of the truck/attachment combination and truck capacity with the attachment. - Page 57 OPERATOR SAFETY WARNING DECAL 15D/18D/20DA, 20D/25D/30D/33D ONLY 15DEOM59K Safety and warning decals are placed in conspicuous locations on the truck to remind you of essential procedures or to prevent you from making an error that could damage the truck or possibly cause personal injury.
-
Page 58: Instruments And Controls
3. INSTRUMENTS AND CONTROLS 15D/18D/20DA-7E 29,30,31 8 9 10 11 3 4 5 7 0 0 0 0 HYUNDAI HYUNDAI 0 0 0 0 17 18 24 25 26 27 DETAIL A 15D7EOM641 Start switch 13 Parking brake signal lamp... - Page 59 20D/25D/30D/33D-7E, 20DF/25DF/30DF/33DF-7, 35DF-7 29,30,31 8 9 10 11 3 4 5 7 0 0 0 0 HYUNDAI HYUNDAI 0 0 0 0 17 18 24 25 26 27 DETAIL A 15D7EOM641 Start switch 13 Parking brake signal lamp 25 Tilt lever...
- Page 60 35D/40D/45D-7E, 50D-7AE, 35DS/40DS/45DS/50DA-7E 32 33 28,29,30 3 4 5 8 9 10 11 0 0 0 0 HYUNDAI HYUNDAI 0 0 0 0 15 16 17 18 23 24 25 26 DETAIL A 35DS7EOM64T Start switch 13 Parking brake signal lamp...
- Page 61 50D/60D/70D-7E, 80D-7E CABIN TILT SWITCH 17 8 6 20,21,22 26 27 28 50DEOM64 Start switch 19 Forward-reverse lever 37 Steering wheel knob Water temperature gauge 20 Head lamp switch 38 Engine check lamp Left turn signal lamp 21 Clearance lamp switch 39 Brake fail warning lamp 22 Multi function switch 40 T/M error warning lamp...
- Page 62 50DS/60DS/70DS-7E 21 40 26272829 22,23,24 3 4 5 8 9 10 11 0 0 0 0 HYUNDAI HYUNDAI 0 0 0 0 15 16 DETAIL A DETAIL B 30 31 32 33 OIL TEMP 50DS7EOM64 Start switch 16 Water separator lamp...
- Page 63 50DF/60DF/70DF-7 DETAIL A 23 24 25 26 , 29, 30 13 4 5 7 6 8 9 17 15 60DF7EOM64T Start switch 14 Hour meter 26 Attach 2 lever(opt) Water temperature gauge 15 Preheater signal lamp 27 Horn button Left turn signal lamp 16 Water separator check lamp 28 Head lamp switch Fuel level warning lamp...
-
Page 64: Indicator Symbols
4. INDICATOR SYMBOLS FUEL GAUGE E : Empty F : Full Fill fuel tank regularly. Never allow machine to run out fuel. Do not overfill the fuel tank. 15D7EOM10K Always check the fuel level on level ground. 160D7ECD04 60DFOM10K HOUR METER This indicates the time of total machine operation. - Page 65 WATER TEMPERATURE GAUGE The indicator shows the engine cooling water temperature. White range : Normal Red range : Danger of overheating. Action to take if indicator enters red range. Stop operations immediately and move the truck to a safe 15D7EOM03K place.
- Page 66 PRE HEATER SIGNAL LAMP This lamp lights up when key is turned to ON position. After a while the heater signal lamp goes out, then turn the key to START position. D35AOM80 ENGINE OIL PRESSURE WARNING LAMP This lamp informs the operator that the engine oil pressure is below the specified level.
- Page 67 HEAD LAMP SIGNAL LAMP This lamp shows that the head lamp lights up or not. Head lamp lights up : Signal lamp lights up. Head lamp goes out : Signal lamp goes out. D35AOM85 ORKING LAMP SIGNAL LAMP This lamp shows that the working lamp lights up or not. Working lamp lights up : Signal lamp lights up.
- Page 68 If the engine check lamp is lighted up, stop and park the machine, and then consult with the service center or D357OM904T Hyundai dealer at once. OPERATOR SAFETY LAMP 35D/40D/45D-7E, 50D-7AE, 50D/60D/70D-7E, 80D-7E OPSS equipped This signal lamp lights ON when the operator leaves the seat.
- Page 69 BRAKE FAIL WARNING LAMP The lamp lights ON when the oil pressure of service brake drops below the normal range. When the lamp is ON, stop the engine and check for its cause. Do not operate until any problems are corrected. 77073CD16 ENGINE OVERHEAT WARNING LAMP This lamp is turned ON when the temperature of cooling water is...
- Page 70 CLUSTER BUTTON (50D/60D/70D-7E, 80D-7E) Each button has the following function. Buzzer stop button Next button MENU button 160D7ECD121E uzzer stop button This switch is used to stop the buzzer sound. Stop the buzzer when the switch is pressed. 160D7ECD22 Menu and next button This switches are used to choose the model.
- Page 71 LCD (50D/60D/70D-7E, 80D-7E) LCD has the functions to display start mode, standby mode and model select. START MODE DISPLAY Display initialization state with HYUNDAI logo and program version. 160D7ECD25 TANDBY MODE DISPLAY Displays rpm Odometer Hourmeter 50DECD33 ODEL SELECT DISPLAY On model select mode, displays like this image.
- Page 72 Spanner Electronic control unit recognized an error, is flashing Letters STOP Immediate stop is required(At the moment not activated) If it happens error codes, consult with Hyundai service center to repair the fault. 3-23...
- Page 73 isplay during operation Symbol Meaning Remarks Actual gear and direction F, N, R Central side shows actual gear 1, 2, 3 Right side shows actual direction Not neutral, waiting for neutral To engage a gear, first move shift selector to (Central and right side) after power up or a severe fault neutral position and again to F to R position...
- Page 74 Definition of the error codes Introduction The error codes consists of two hexadecimal numbers. The first number shows the type of signal, the second number shows signal and the type of the error. Description of error codes First No. Meaning of number 1 hex Digital input signals 2 hex...
- Page 75 Number Meaning of error code 3A hex Short circuit to battery voltage or open circuit at output speed input 3B hex Short circuit to ground or open circuit at output speed input 3C hex Logical error at output speed input 71 hex Short circuit to battery voltage at clutch KC 72 hex...
- Page 76 Number Meaning of error code D1 hex Short circuit to battery voltage at power supply for sensors D2 hex Short circuit to ground at power supply for sensors Low voltage at battery D3 hex High voltage at battery D4 hex Error at valve power supply 1 D5 hex D6 hex...
-
Page 77: Operating Lever And Switch
5. OPERATING LEVER AND SWITCH START SWITCH There are four positions, HEAT, OFF, ON and START. Before starting, set gear shift lever at N, and pull parking brake. HEAT : Preheating electrical circuit activates. (20~33DF-7) 0~10 C : 5~10 seconds, below 0 C : 10~20 seconds. : None of electrical circuits activates. - Page 78 HAZARD LAMP SWITCH Use for parking, or loading machine. I I f the switch is left ON for a long time, the battery may be discharged. 5.0~8.0 ton : Standard 1.5~4.5 ton, 50DA-7E, 50D-7AE : Option L255OM17 WORK LAMP SWITCH This switch is used to operate work lamps.
- Page 79 WIPER SWITCH (50D/60D/70D-7E, 80D-7E, OPTION) Machine with cabin offers this switch. Wiper operates when this switch is pressed. D507CD62 CABIN TILTING SWITCH (50D/60D/70D-7E, 80D-7E) Horn ( By pressing position the horn sounds and by releasing, the horn stops. ound the horn to warn near by personnel, before tilting the cabin.
- Page 80 GEAR SELECTOR LEVER (50D/60D/70D-7E, 80D-7E) This lever is used for gear selection, forward 3 stage and reverse 3 stage. If turning the gear selector lever forward, the machine Decel increases the speed, but if turning it backward, the machine reduces the speed. Accel D507OM96 HORN BUTTON...
- Page 81 LIFT LEVER LIFT Lift Lower PULL the lever BACK to LIFT the load. LOWER PUSH the lever FORWARD to LOWER the load. HOLDING D507OM17 When the lever is released, the lifting or lowering action stops. Lifting speed is controlled by accelerator pedal. Lowering speed is controlled by lever only.
- Page 82 FORK POSITIONER ① OUTSTRECH THE FORKS Outstrech Push the lever forward to outstrech simultaneously outward of the both forks. Pucker up ② ② PUCKER UP THE FORKS Pull the lever backward to pucker up simultaneously inward of the both forks. 160D7CD19 LEVER FOR SIDE SHIFT WIDTH FORK POSITIONER SIDE SHIFT...
- Page 83 ② ② H FORK MOVEMENT Outward - Push the lever forward to move outward for the RH fork. - Pull the lever backward to move inward for the RH fork. Inward 160D7CD22 STEERING WHEEL LOCK KNOB 1.5~3.3 ton, 35DF-7 35D/40D/45D-7E, 50D-7AE The angle of the steering shell can be adjusted forward and backward.
- Page 84 50D/60D/70D-7E, 80D-7E METHOD OF ADJUSTING STEERING WHEEL ANGLE Turn the lock knob down. Move the steering wheel forward or backward to select the most suitable position. Turn knob up to lock the steering wheel in the desired position. After adjusting, try to move the steering wheel backward and forward to check that it is locked in the selected Release Lock...
-
Page 85: Others
6. OTHERS AIR CONDITIONER AND HEATER Air conditioner and heater are equipped for pleasant operation against outside temperature and defrost on window glass. Front Radio & USB player Rear Temperature control switch Inlet air control switch Air position control switch Airconditioner select switch Fan speed control switch Air conditioner &... - Page 86 Outlet control switch There are three steps of air flow. Front Front & defrost Defrost 50DECD51 Temperature control switch This switch regulates the temperature of air. Right side (blue zone) : Cool down air temperature Blue Left side (red zone) : Heat up air temperature 50D7ECD53 nlet control switch This switch regulates the inlet air.
- Page 87 2) 2) RADIO AND USB PLAYER RADIO AND USB PLAYER BASIC FUNCTIONS BASIC FUNCTIONS 2209S3CD70 1 Power (PWR) button 4 Radio (FM/AM) selection button 2 Volume/Sound setting button 5 USB slot 3 Mode selection button 6 AUX terminal (1) (1) Power (PWR) button ower (PWR) button Press the PWR button to turn on the audio.
- Page 88 Sound setting Sound setting Press the SELECT button to conduct sound setting. SELECT PUSH Each press of the button will change the sound setting in the following order. BASS MIDDLE TREBLE BALANCE BEEP 2209S3CD70C After selecting the desired setting, turn the SELECT button clockwise/counter-clockwise to adjust the sound setting value.
- Page 89 (3) (3) MODE selection button MODE selection button Pres the MODE button to change to RADIO/USB/AUX/iPod modes. MODE However, the mode can be selected only when the respective media is connected. If iPod is connected to the audio, the mode will change in the following order.
- Page 90 RADIO RADIO 2209S3CD71 1 Radio (FM/AM) selection button 4 LCD display 2 TRACK/SEEK button 5 BSM (Best Station Memory) button 3 Broadcast manual search (FLDR) button 6 Saving broadcast frequencies to PRESET numbers (1) (1) Radio Radio (FM/AM) selection button (FM/AM) selection button Each press of the FM/AM button will change the radio mode in the FM/AM...
- Page 91 (2) (2) TRACK/SEEK button TRACK/SEEK button As buttons used to automatically search broadcasts, pressing the button will automatically search and stop at a frequency with TRACK superior reception. SEEK TRACK : Searches frequencies higher than current frequency SEEK : Searches frequencies lower than current frequency 2209S3CD71B When frequencies cannot be properly found due to weak When frequencies cannot be properly found due to weak...
- Page 92 (6) (6) Saving broadcast frequencies to PRESET numbers Saving broadcast frequencies to PRESET numbers Up to 18 FM broadcasts and 6 AM broadcasts can be saved. Use the auto/manual search buttons to find the desired frequency. Select the preset button (1REW~ 6INFO) to which you wish to save the selected frequency.
- Page 93 USB CONNECTION CONNECTION 2209S3CD72 1 USB selection button 7 Scroll (SCR) button 2 TRACK UP/SEEK DOWN button 8 View music info (INFO) button 3 FLDR UP/DOWN button 9 Scan button (BSM) 4 FF/REW button 10 Finding and playing file (SELECT) button 5 RPT/FOLDER RPT button 11 LCD display 6 RDM/FOLDER RDM button...
- Page 94 (3) (3) FLDR UP/DOWN button FLDR UP/DOWN button If there are more than 2 folders in the USB, pressing the FLDR UP/ DOWN button will move to the previous or next folder. FLDR If there are no folders in the USB, then pressing the button will move FLDR up/down within the folder in 10 file increments.
- Page 95 (8) (8) View music info iew music info (INFO) (INFO) button button Each time the INFO button is pressed, the info on the currently playing song will be displayed in the following order. FILE NAME TITLE ARTIST ALBUM 2209S3CD72E (9) (9) Scan button can button (BSM) (BSM)
- Page 96 iPOD CONNECTION POD CONNECTION 2209S3CD73 1 iPod selection button 5 Random play (RDM) button 2 TRACK UP/SEEK DOWN button 6 Scroll (SCR) button 3 FF/REW button 7 View music info (INFO) button 4 Repeat (RPT) button 8 Finding and playing file (SELECT) button Operates only when an iPod is connected.
- Page 97 (3) (3) FF/REW FF/REW button button While an iPod is operating, press and hold the FF button to fast- forward the song. When fast-forward is complete, the next song will properly play from the beginning even if you continue holding the button. Press and hold the REW button to rewind the song.
- Page 98 (8) (8) Finding and playing file (SELECT) button Finding and playing file (SELECT) button While iPod is playing, press and hold the SELECT button for over 3 SELECT PUSH seconds to enter CATEGORY mode and search for desired files. After entering CATEGORY mode, turn the SELECT button left/right to find the desired category.
- Page 99 AUX connection AUX connection 2209S3CD74 Operates only when an external device is connected to AUX. Connecting an AUX device to the audio using the AUX cable will automatically convert to AUX mode. When an external device is connected, only the PWR, FM/AM, MODE, and VOL buttons can be operated.
- Page 100 3) 3) REMOTE CONTROLLER REMOTE CONTROLLER Handsfree jack MIC Power/Volume switch SEEK Seek button MODE MUTE Mode button Mute button Call button Mode change button CALL 21093CD52 (1) (1) Power and volume switch Power and volume switch ① This switch is used to turn the audio or handsfree ON or OFF. ②...
- Page 101 (4) (4) Handsfree MIC Handsfree MIC ① This MIC transfers user voice to receiver of the call when making a call by handsfree. SEEK MODE MUTE 21093CD52D (5) (5) Seek button Seek button ① If this button pressed, the radio automatically stops at the next frequency of broadcasting for your listening.
-
Page 102: Operator Maintenance And Care
Do not make repairs yourself unless you are trained in lift truck repair procedures and authorized by your employer. Have a qualified mechanic make repairs using genuine HYUNDAI or HYUNDAI- approved parts. Do not operate a truck if it is in need of repair. If it is in an unsafe condition, remove the key and report the condition to the proper authority. - Page 103 FUNCTIONAL CHECKS Check the operation of the truck as follows. Before performing these checks, familiarize yourself with the starting, operating, and shutdown procedures in Section 5 of this manual. Also, know the safety rules given in Section 1 of this manual. Test warning devices, horn, light, and other safety equipment and accessories.
-
Page 104: Fuel Safety Practices
2. FUEL SAFETY PRACTICES REFUELING DIESEL TRUCKS 1.5~3.3 ton 3.5~8.0 ton 1.5~3.3 ton, 35DF-7 80D7OM106 Stop the engine when refueling. All lights and flames shall be kept at a safe distance while refueling. D35AOM106 Make sure that the fuel oil cans are kept cleaned and attached safety indication or letters on the can. -
Page 105: Starting And Operating Procedures
5. STARTING AND OPERATING PROCEDURES 1. BEFORE OPERATING THE TRUCK Be sure that you have read and understand the information in this Operator's Manual and are trained and authorized before operating the lift truck. A lift truck can be dangerous if not used properly. Safe operation is the responsibility of the operator. -
Page 106: Check Before Starting
2 2 . CHECK BEFORE STARTING The Occupational Safety and Health Act(OSHA) required that truck users examine their trucks before each shifts to be sure they are in safe working order. Defects when found shall be immediately reported and corrected. The truck shall be taken out of service until it has been restored to safe operating condition. -
Page 107: Check Before Starting Engine
3. CHECK BEFORE STARTING ENGINE CHECK FOR WATER OR OIL LEAKAGE Walk around your HYUNDAI truck and check for water, oil or hydraulic leakage. Examine truck for obvious damage. Check overhead guard, backrest and forks for crack or obvious damage. - Page 108 CHECK BRAKE FLUID Remove reservoir cap, and check level. If necessary, add brake fluid. 35-75 mm (1.4-3.0 in) Type Brake fluid Dry type DOT III 35DFOM110 Wet type Azola ZS10 or hyd oil SAE 10W CHECK COOLANT LEVEL If the cooling water in the radiator sub-tank is not within normal range when cool, add water to the MAX line.
- Page 109 CHECK FAN BELT TENSION The fan belt must depress the specified value when the midpoint between the generator and fan pulley is depressed. If the belt is stretched beyond the adjustment allowance, or there are cuts or cracks, replace the V-belt. 15D/18D/20DA-7E : 7~9mm(0.28~0.35in) D35AOM113...
- Page 110 CHECK HYDRAULIC OIL LEVEL Rest fork on ground and stop engine. Pull out dipstick and check oil level. If insufficient, add oil. Hot oil and components can cause personal injury. Do not Upper limit allow hot oil or components to contact skin. Lower limit D507OM115 15D/18D/20DA-7E...
- Page 111 Check horn button and lamp switch if operate normally or not. 1.5 ~ 4.5 ton, 50DA-7E 50DF/60DF/70DF-7 1, 2 : Horn button 1', 2' : Lamp switch If horn and lamp are malfunctioning, contact your HYUNDAI forklift distributor. 5.0 ~ 8.0 ton 50DF7OM13 CHECK PEDALS Check for any catching or abnormal heaviness when depressing the pedals.
-
Page 112: Seat Adjustment
4. SEAT ADJUSTMENT SEAT ADJUSTMENT The seat adjustable to fit the contours of the operator's body. It will reduce operator fatigue due to long works hours and enhance work efficiency. Forward/Backward adjustment(A) Pull lever A to adjust seat forward or back ward. The seat can be moved forward and backward over 156mm in 12 steps. -
Page 113: Starting From A Safe Condition
5. STARTING FROM A SAFE CONDITION Always start from a safe condition. Before operating a lift truck, make sure that : You are safely seated in the truck. The parking brake is applied. The forks are fully lowered to the floor or ground. -
Page 114: General Starting And Operating Tips
6. GENERAL STARTING AND OPERATING TIPS Before you start the truck, make sure that you have taken all the above-mentioned precautions, you have read this manual, you are starting from a safe condition, with the directional control in NEUTRAL, the seat adjusted, and your seat belt buckled. INSPECT YOUR LIFT TRUCK BEFORE OPERATING at the start of each shift. -
Page 115: Starting The Engine
7 7 . STARTING THE ENGINE START FROM A SAFE CONDITION Before you start the truck, safely seat yourself on the truck, fasten seat belt, apply the parking brake, make sure all controls are in neutral or other correct position, lower the forks fully to floor or ground, put the direction control lever in NEUTRAL, and make sure you know how to operate the truck and all its controls. -
Page 116: Check After Starting Engine
8. CHECK AFTER STARTING ENGINE CHECK FOR ABNORMAL NOISE OR VIBRATION CHECK ENGINE EXHAUST GAS COLOR Exhaust gas color Criteria Colorless, light blue Black Check for incomplete combustion White Check for oil leakage CHECK FUEL TANK LEVEL If the indicator points to F, the tank is full. If the indicator enters the E range, refill the fuel tank immediately. - Page 117 HECK MONITOR 1.5~5.0 ton ENGINE OIL T/M OIL ENGINE WATER BATTERY AIR CLEANER FUEL LEVEL PRESSURE TEMPERATURE WARNING LAMP CHARGE ELEMENT SEPARATOR WARNING LAMP WARNING LAMP WARNING LAMP WARNING LAMP WARNING LAMP WARNING LAMP 35D7EOM126 50D/60D/70D-7E, 80D-7E FUEL LEVEL SEAT BELT BRAKE FAIL ENGINE OIL T/M ERROR...
-
Page 118: Levers And Pedals
9. LEVERS AND PEDALS POSITIONING FORKS AND MAST When driving, with or without a load, it is a good practice to always raise the forks slightly and tilt the mast (forks) backward. Raising the forks and tilting them back prevents the fork tips from catching on possible obstructions and reduce the wear on the fork blades from striking or dragging on the floor or ground. - Page 119 USING THE ACCELERATOR PEDAL With the parking brake released and the direction control in FORWARD or REVERSE, put your foot on the accelerator pedal and push down smoothly until the truck is moving at the desired speed. D35AOM131 50D/60D/70D-7E, 80D-7E 160D7OM131 BRAKING PEDAL To stop the truck, lift your foot from the accelerator pedal and...
-
Page 120: Operating Safely
10. OPERATING SAFELY Safe operation is the responsibility of the operator. WATCH WHERE YOU ARE GOING. DON’T GO IF YOU CAN’T SEE... Before driving, check all around to be sure that your intended path of travel is clear of obstructions and pedestrians. - Page 121 Travel with the fork carriage tilted back and raised only enough to fully clear the ground or obstacles. When the carriage(load) is in an elevated position the stability of the truck is reduced. Do not elevate the load except during stacking. GRADES, RAMPS, AND INCLINES...
-
Page 122: Load Handling
11. LOAD HANDLING GENERAL Handle only loads that are within the truck rated capacity as shown on the nameplate. This rating specifies the maximum load that should be lifted. However, other factors such as special load handling attachments, load having a high center of gravity, or uneven terrain may dictate that the safe working load be less than the rated capacity. - Page 123 ADJUSTING THE LOAD FORKS The load forks are adjustable on the hanger, carriage. Forks should be spaced as far apart as the load will allow. Both forks should always be the same distance from the center of the fork carriage. To adjust the forks, raise the carriage slightly. Tilt the mast fully forward to reduce friction and make the fork slide easier.
- Page 124 TRAVELING WITH LOAD Travel with load or carriage as low as possible and tilted back. Never travel with the load or carriage raised(elevated) in a high position. Do not elevate the load except during stacking. Observe all traffic regulations and watch for other traffic, pedestrians, and safe clearances. Always look in the direction of travel.
- Page 125 PICKING UP AND MOVING LOADS When picking up a load from the ground, approach the load slowly and carefully align the truck square with the load. The forks should be adjusted to fit the load or pallet being handle and spread as wide as possible to provide good stability and balance.
- Page 126 STACKING To put a load on a stack Approach slowly and align the lift truck and load squarely with the stack. D35AOM137 Raise the load as the lift truck nears the stack. D35AOM138 Move forward slowly until the load almost touches the stack. The leading edge and sides of the load pallet should line up exactly with the near edge and side of the load or rack on which you are stacking.
- Page 127 To move a load from a stack Approach the stack carefully, truck lined up squarely with the load. With mast vertical, raise the forks to the correct height for freely engaging the load pallet. Adjust fork angle as necessary to fit squarely under the load.
-
Page 128: Shut Down Procedure
1 1 2. SHUT DOWN PROCEDURE Always leave your lift truck in a safe condition. WHEN YOU LEAVE YOUR TRUCK, OR PARK IT, FOLLOW THESE SAFETY RULES Park in a safe area away from normal traffic. Never park on a grade. Never park in areas that block emergency routes or equipment, access to fire aisles, or stairways and fire equipment. -
Page 129: Emergency Starting And Towing
Check that the counterweight bolts are in place and properly torqued.(This bolt is made of a special high tensile steel and is not commercially available. Replace it, when necessary, only with a genuine HYUNDAI replacement part). Use an approved, solid metal tow bar with towing couplers that connect to the towing pins in the counterweights. - Page 130 Park the disabled truck in authorized areas only. Fully lower the forks to the floor, put the directional control lever in the NEUTRAL position and turn the starting switch to the OFF position. Engage the parking brake. Remove the key and, when necessary, block the wheels to prevent the truck from rolling.
-
Page 131: How To Use Battery Jumper Cables
2. HOW TO USE BATTERY JUMPER CABLES If your lift truck battery is discharged(dead), you can start your lift truck by jumping it from another lift truck that has a 12V(1.5~3.3Ton, 35DF-7) or 24V(3.5~8.0Ton), negative-ground electrical system. The "Booster" battery must be fully charged and in good condition. This section explains how to perform this procedure safely. - Page 132 Connect the jumper cables in the following To ground To start switch sequence: Connect a jumper cable from the Charged battery positive(+; red) terminal on one battery to the positive(+; red) terminal on the other battery. Never connect positive(+; red) to negative(-;...
-
Page 133: Planned Maintenance And Lubrication
In addition to the operator's daily inspection, HYUNDAI recommends that the owner set up and follow a periodic planned maintenance(PM) and inspection program. Performed on a regular basis by trained personnel, the program provides through truck. -
Page 134: Safe Maintenance Practices
Carefully read and understand these instructions and the specific maintenance procedures before attempting to do any repair work. When in doubt of any maintenance procedure, please contact your local HYUNDAI dealer. Powered industrial trucks can become hazardous if maintenance is neglected. Therefore, suitable maintenance facilities and trained personnel and procedures shall be provided. - Page 135 Before leaving the truck. Stop the truck. Fully lower the load-engaging means: mast, carriage, forks or attachments. Put the directional control in NEUTRAL. Apply the parking brake. Stop the engine. Turn the key switch to the OFF position. Put blocks at the wheels if the truck must be left on an incline. Brakes, steering mechanisms, control mechanisms, warning devices, lights, governors, lift overload devices, lift and tilt mechanisms, articulating axle stops, load backrest, overhead guard and frame members must be carefully and regularly inspected and maintained in a safe operating condition.
- Page 136 Parts, including tires, are to be installed per the manufacturer's procedures. Always use genuine HYUNDAI or HYUNDAI-approved parts. When removing tires follow industry safety practices. Most importantly, deflate pneumatic tires completely prior to removal.
-
Page 137: Instructions Before Maintenance
3. INSTRUCTIONS BEFORE MAINTENANCE INTERVAL OF MAINTENANCE You may inspect and service the machine by the period as described at based on service meter of LCD. Shorten the interval of inspect and service HOUR METER depending on site condition.(Such as dusty area, quarry, sea shore and etc.) Practice the entire related details at the same time when the service interval is doubled. - Page 138 Engine and hydraulic components have been preset in the factory. Do not allow unauthorized personnel to reset them. Ask to your local dealer or Hyundai for maintenance advise it unknown. Drain the used oil and coolant in a container and handle according to the method of handling for industrial waste to meet with regulations of each province or country.
- Page 139 PERIODICAL REPLACEMENT OF SAFETY PARTS These are the parts which the operator cannot judge the remained lifetime of them by visual inspection. Repair or replace if an abnormality of these parts is found even before the recommend replacement interval. Replacement of consumable service parts is not covered under warranty. Periodical replacement of safety parts Interval Every 2 to 4 years...
-
Page 140: Planned Maintenance Intervals
4. PLANNED MAINTENANCE INTERVALS MAJOR COMPONENT LOCATIONS 15D/18D/20DA-7E 15D7EOM21 Mast Transmission 15 Muffler Lift cylinder Torque converter 16 Counterweight Tilt cylinder 10 Engine 17 Radiator Control valve 11 Steering cylinder 18 Operator's seat Fork 12 Hydraulic pump 19 Overhead guard Front wheel 13 Steering axle(Rear) 20 Steering wheel... - Page 141 20D/25D/30D/33D-7E, 20DF/25DF/30DF/33DF-7, 35DF-7 9 10 20D7OM21 Mast Transmission 15 Muffler Lift cylinder Torque converter 16 Counterweight Tilt cylinder 10 Engine 17 Radiator Control valve 11 Steering cylinder 18 Operator's seat Fork 12 Hydraulic pump 19 Overhead guard Front wheel 13 Steering axle(Rear) 20 Steering wheel Drive axle 14 Rear wheel...
- Page 142 35D/40D/45D-7E, 50D-7AE 9 10 11 12 13 15 16 17 35DEOM21 Mast 10 Transmission 19 Muffler Lift cylinder 11 Torque converter 20 Silencer Steering unit 12 Engine 21 Overhead guard Tilt cylinder 13 Exhaust pipe 22 Seat Control valve 14 Air cleaner 23 Control lever Fork 15 Steering axle...
- Page 143 35DS/40DS/45DS/50DA-7E 10 11 12 13 15 16 17 D357OM21 Mast Hydraulic pump 17 Rear wheel Lift cylinder 10 Transmission 18 Radiator Steering unit 11 Torque converter 19 Muffler Tilt cylinder 12 Engine 20 Silencer Control valve 13 Exhaust pipe 21 Overhead guard Fork 14 Air cleaner 22 Seat...
- Page 144 50D/60D/70D-7E, 80D-7E 8 9 10 11 12 13 14 15 16 17 50DEOM21 Mast 10 Priority valve 19 Muffler Lift cylinder 11 Transmission 20 Silencer Tilt cylinder 12 Torque converter 21 Air cleaner Control valve 13 Engine 22 Overhead guard Fork 14 Exhaust pipe 23 Seat...
- Page 145 50DS/60DS/70DS-7E 8 9 10 11 12 13 14 15 16 17 50DS7EOM21 Mast 10 Priority valve 19 Muffler Lift cylinder 11 Transmission 20 Silencer Tilt cylinder 12 Torque converter 21 Air cleaner Control valve 13 Engine 22 Overhead guard Fork 14 Exhaust pipe 23 Seat Front wheel...
- Page 146 50DF/60DF/70DF-7 8 9 10 11 12 13 14 15 16 17 60DF7OM21 Mast 10 Priority valve 19 Muffler Lift cylinder 11 Transmission 20 Silencer Tilt cylinder 12 Torque converter 21 Air cleaner Control valve 13 Engine 22 Overhead guard Fork 14 Exhaust pipe 23 Seat Front wheel...
- Page 147 MAINTENANCE CHECK LIST EVERY 10 HOURS SERVICE Check items Service Remarks Visual inspection Brake oil. Check, Add 7-31 Check, Clean Air cleaner element. Truck for obvious damage and leaks. Check, Repair or Replace 0-5, 3-6, 3-7 Warning plates and decals. Check, Replace 5-3, 7-26 Check, Add or Replace...
- Page 148 INITIAL 50 HOURS SERVICE Check items Service Remarks Differential gear oil Change 7-33 INITIAL 100 HOURS SERVICE Check items Service Remarks Differential gear oil Change 7-33 Transmission oil Change 7-33 Transmission oil filter Replace EVERY 250 HOURS SERVICE Check items Service Remarks Engine oil and oil filter *...
- Page 149 7-34 Hydraulic oil* Conventional hydraulic oil VERY 5000 HOURS SERVICE Check items Service Remarks Replace 7-34 Hydraulic oil* Hyundai genuine long life hydraulic oil (10) WHEN REQUIRED Check items Service Remarks Fuel system 5-12 Fuel tank Drain, Clean Water separator...
-
Page 150: Maintenance Chart
5. MAINTENANCE CHART .5~3.3ton, 35DF-7 15D7EOM31 Service intervals are based on the hourmeter reading. Stop the engine when servicing. Do not open the cap or drain plug to avoid injury by unexpected spouting of high temperature fluid or gas. Open the cap slowly to relieve pressure. Always keep the surface of control &... - Page 151 Hydraulic strainer Replace 5000 Hours Hydraulic oil* Change Conventional hydraulic oil Hyundai genuine long life hydraulic oil Oil symbol Refer to the recommended lubricants for specification. DF : Diesel fuel HO : Hydraulic oil EO : Engine oil GO : Gear oil...
- Page 152 Hydraulic oil* Change 5000 Hours Hydraulic oil* Change Conventional hydraulic oil Hyundai genuine long life hydraulic oil Oil symbol Refer to the recommended lubricants for specification. DF : Diesel fuel HO : Hydraulic oil EO : Engine oil GO : Gear oil...
- Page 153 .5~8.0ton D357MA01 Service intervals are based on the hourmeter reading. Stop the engine when servicing. Do not open the cap or drain plug to avoid injury by unexpected spouting of high temperature fluid or gas. Open the cap slowly to relieve pressure. Always keep the surface of control &...
- Page 154 21.5 21.5 Radiator coolant Change 5000 Hours Hydraulic oil* Conventional hydraulic oil Hyundai genuine long life hydraulic oil 35D/40D/45D-7E, 50D-7AE 35DS/40DS/45DS/50DA-7E Oil symbol Refer to the recommended lubricants for specification. DF : Diesel fuel HO : Hydraulic oil EO : Engine oil...
- Page 155 21.5 21.5 Radiator coolant Hydraulic oil* Change 5000 Hours Conventional hydraulic oil Hyundai genuine long life hydraulic oil 50DS/60DS/70DS-7E Oil symbol Refer to the recommended lubricants for specification. DF : Diesel fuel HO : Hydraulic oil EO : Engine oil...
- Page 156 Replace 21.5 5000 Hours Hydraulic oil* Change Conventional hydraulic oil Hyundai genuine long life hydraulic oil Oil symbol Refer to the recommended lubricants for specification. DF : Diesel fuel HO : Hydraulic oil EO : Engine oil GO : Gear oil...
-
Page 157: How To Perform Planned Maintenance
6. HOW TO PERFORM PLANNED MAINTENANCE VISUAL INSPECTION First, perform a visual inspection of the lift truck and its components. Walk around the truck and take note of any obvious damage or maintenance problems. Check to be sure all capacity, safety, and warning plates are attached and legible. - Page 158 FORKS Inspect the load forks for cracks, breaks, bending, and wear. The fork top surfaces should be level 10% of "A" is and even with each other. The height difference max. wear allowed between both fork tips refer to below table. Height Model Fork length...
- Page 159 WHEEL AND TIRES Check the condition of the drive and steering wheels and tires. Remove objects that are embedded in the tread. Inspect the tires for excessive wear and breaks or chunking out. Check all wheel lug nuts or bolts to be sure none are loose or missing.
- Page 160 TILTING CABIN (50D/60D/70D-7E, 80D-7E) Keep clearance of people except the operator before tilting the cabin. Before tilting the cabin, make sure that the mast is vertical or tilted forward. Otherwise, the operation could be blocked by mast tilt cylinders. By tilting the cabin, service of hydraulic and electric system such as hydraulic components, hydraulic pipings, electric components, and electric wirings can be easily performed.
- Page 161 Do not operate cabin tilting function while the power is ON or engine is running. It can cause severe injury or death. START 160D7MI65 Do not operate the tilt control switch or any control parts while servicing under the tilted cabin.
- Page 162 AIR CONDITIONER AND HEATER (50D/60D/70D-7E, 80D-7E) CLEANING AND REPLACING FILTER Always stop the engine before servicing. Recircular plenum assy Open the door, loosen the wing bolt and remove the recircular plenum assembly. 160D7EMI58 Clean the recircular plenum using a pressurized air(Below 2kgf/cm , 28psi).
-
Page 163: Replacement And Check
7. REPLACEMENT AND CHECK Check the battery condition per the table below. Add water, or recharge as shown by the indicator. Battery indicator Battery condition Mark Color Normal Green Insufficient distilled water White Insufficient charge BATTERIES EMIT EXPLOSIVE GAS. Do not smoke or have open flames or sparks in Indicator : Except 2.0 ~ 3.3 ton, 35DF-7 battery charging areas or near batteries. - Page 164 When remounting, connect the ground Connect (-) lead last connection last. Do not allow tools to touch the (+) terminal Neg(-) and the body of the truck at the same time. This can cause sparking and explosion. Pos(+) Dispose of old battery in locally approved manner.
- Page 165 OSHA approved eye protection rated for 200kPa(30psi) is required for air cleaning operation. Replace element if exhaust is black, or if lack of engine power is noted even after cleaning or element. When cleaning the element or element housing, cover the air flow outlet port of the housing with a clean cloth or tape to prevent dirt or dust from entering.
- Page 166 TRANSMISSION OIL 1.5~3.3 ton, 35DF-7 Do not touch hot components or allow hot oil to Dipstick contact your skin. Drain plug Normal Transmission oil Cold Park the truck in a level place and lower the forks. Then stop the engine and apply the Filter parking brake.
- Page 167 HYDRAULIC TANK Hydraulic oil change Park the truck in a level place and lower the forks. Then stop the engine and apply the parking brake. Change oil after removing drain plug on tank bottom. 15D/18D/20DA-7E, 35DF-7 20D/25D/30D/33D-7E 20D/25D/30D/33D-7E 20DF/25DF/30DF/33DF-7 Oil dipstick Oil dipstick Drain plug Drain plug...
- Page 168 Strainer Cleaning OSHA-approved eye protection rated for 200kPa(30psi) is required for air cleaning operation. When changing oil, remove strainer and clean it with flushing oil. Blow dry compressed air from inside of strainer to outside and install when completely dry. Dispose of oil in locally approved manner.
- Page 169 The tires and rims should always be serviced or changed by trained personal using the correct tools and procedures. For details of procedures, contact your HYUNDAI dealer. Wear safety glasses and a face shield when using compressed air. Block the tire at the opposite corner from the tire to be replaced.
- Page 170 FUSES REPLACEMENT 15D/18D/20DA-7E No. Capacity Color Related electrical component ILL/ HORN/ STOP START OPSS TURN SOL/ TRAVEL HEAD BRAKE Stop solenoid/Alt(IG) RELAY UNIT LAMP ALT(IG) LAMP LAMP Travel Blue Illumination/Head lamp SPARE (5A) SPARE (10A) SPARE (15A) Start relay WORK/ OPSS PRE- BEACON...
- Page 171 5D/40D/45D-7E, 50D-7AE No. Capacity Color Related electrical component TURN/ GLOW ILLUM/ HORN ECU/ CABIN ECU B + STOP RELAY/ HEAD OPTION CLUSTER Blue F-R solenoid/Glow relay LAMP F-R SOL LAMP Illumination/Head lamp Blue ECU/Cluster SPARE(10A) SPARE(15A) SPARE (20A) Blue Cabin WORK START ACCEL...
- Page 172 50D/60D/70D-7E, 80D-7E use box A No. Capacity Color Related electrical component STOP HORN/ OPSS CLUSTER/ RADIO LAMP CAB TILT OPSS B + Green ECU B + TCU B + SPARE(5A) SPARE(10A) SPARE (15A) Brown OPSS CLUSTE FUEL White Cluster/Radio R/RADIO FUSE HEATER HOLDER...
- Page 173 50DS/60DS/70DS-7E No. Capacity Color Related electrical component TAIL TURN CLUST- HORN HEAD BACK STOP LAMP Tail back lamp LAMP LAMP /OPSS Blue Head lamp SPARE (10A) SPARE (10A) SPARE (15A) Cluster/OPSS ALT./ WORK AIR- CABIN START FUSE LAMP FUEL /GLOW RELAY HOLDER /TILT...
- Page 174 LAMP BULBS REPLACEMENT Lamp Spec(for 12V) Spec(for 24V) Head lamp Turn signal lamp Clearance lamp Stop lamp Backup lamp Warning lamp 1.4W Meter lighting lamp 3.4W D507OM14 License lamp (option) 3.4W Beacon lamp (option) Strobe type Rear work lamp After checking that the fuse is not blown and that there is no disconnection in the wiring harness, replace the lamp bulb.
- Page 175 Indicator lights Check that all lights are functioning and indicate normal truck operation as described in section 3, Know your truck, in this manual. Service brakes and inching pedal With the direction control in NEUTRAL and the engine running, push the service brake pedal fully down and hold.
- Page 176 Steering system The steering system, steering axle, and steering linkage on your truck should be inspected periodically for abnormal looseness and damage, leaking seals, etc.. Also, be alert for any changes in steering action. Hard steering, excessive freeplay(looseness), or unusual sound when turning or maneuvering indicates a need for inspection or servicing.
- Page 177 Inspect the battery for damage, cracks, leaking condition, etc.. If the terminals are corroded, clean and protect them with HYUNDAI battery saver(Available from your HYUNDAI dealer). If your battery has removable cell caps, check to be sure the cells are all filled. Refill them with distilled water.
- Page 178 OIL PERFORMANCE DESIGNATION: To help achieve proper engine performance and durability, use only engine lubricating oils of the proper quality. For LPG and diesel engines, HYUNDAI recommends that you use motor oil that meets API service classification CD, CC/SG, SF and API CH4 SAE 15W-40 for diesel engines, gas engines use API SG, SAE 10W-30 oil or better.
- Page 179 Clean the fittings and lubricate the tilt cylinder rod end bushings(forward end) and both the base rod-end bushings(rear end). Clean and lubricate the mast trunnion bushings. Lift chains Lubricate the entire length of the mast rail lift and carriage chains with HYUNDAI chain and cable lube. 7-46...
- Page 180 AIR CLEANING Always maintain a lift truck in a clean condition. Do not allow dirt, dust, lint, or other contaminants to accumulate on the truck. Keep the truck free from leaking oil and grease. Wipe up all oil spills. Keep the controls and floorboards clean, dry, and safe. A clean truck makes it easier to see leakage and loose, missing, or damaged parts, and helps prevent fires.
- Page 181 HYUNDAI chain lubricant is recommended; it is easily sprayed on and provides superior lubrication. Heavy motor oil may also be used as a lubricant and corrosion inhibitor.
-
Page 182: Lubrication Chart
8. LUBRICATION CHART 5D/18D/20DA-7E, 20D/25D/30D/33D-7E, 20DF/25DF/30DF/33DF-7, 35DF-7 LIFT CHAIN GEAR OIL LIFT TRANSMISSION SUPPORT BRAKE FLUID HYDRAULIC RESERVOIR OIL TANK ENGINE OIL PAN LINKAGE KING PIN Check everyday Every week(50 hours) Every month(250 hours) Every 3 month(500 hours) Every 6 month(1000 hours) D255LUB01 NOTES : Check, add oil when needed. - Page 183 35D/40D/45D-7E, 50D-7AE, 35DS/40DS/45DS/50DA-7E LIFT CHAIN GEAR OIL TRANSMISSION LIFT SUPPORT BRAKE FLUID ENGINE RESERVOIR OIL PAN LINKAGE HYDRAULIC KING PIN OIL TANK Check everyday Every week(50 hours) Every month(250 hours) Every 3 month(500 hours) Every 6 month(1000 hours) 35DS7ELUB01 NOTES : Check, add oil when needed.
- Page 184 50D/60D/70D-7E, 50DS/60DS/70DS-7E, 50DF/60DF/70DF-7, 80D-7E LIFT CHAIN GEAR OIL TRANSMISSION LIFT SUPPORT BRAKE FLUID ENGINE RESERVOIR OIL PAN LINKAGE HYDRAULIC KING PIN OIL TANK Check everyday Every week(50 hours) Every month(250 hours) Every 3 month(500 hours) Every 6 month(1000 hours) 80D7LUB01 NOTES : Check, add oil when needed.
-
Page 185: Greasing Point
9. GREASING POINT 15D/18D/20DA-7E Lift chain(coated with engine oil) Steering axle Tilt cylinder Fork stopper Pedal pin Mast support 15D7EOM172 20D/25D/30D/33D-7E Lift chain(coated with engine oil) Steering axle Tilt cylinder Fork stopper Pedal pin Mast support 20D7OM32 7-52... - Page 186 20DF/25DF/30DF/33DF-7, 35DF-7 Lift chain(coated with engine oil) Steering axle Tilt cylinder Fork stopper Pedal pin Mast support 20D7OM32 35D/40D/45D-7E, 50D-7AE, 35DS/40DS/45DS/50DA-7E Lift chain(coated with engine oil) Steering axle Tilt cylinder Fork stopper Pedal pin Mast support D357OM172 7-53...
- Page 187 50D/60D/70D-7E, 80D-7E Steering axle Lift chain (coated with engine oil) Pedal pin Fork stopper Adjust bolt Tilt cylinder Mast support 50D7EOM172 50DS/60DS/70DS-7E, 50DF/60DF/70DF-7 Lift chain(coated with engine oil) Steering axle Tilt cylinder Fork stopper Adjust bolt Pedal pin Mast support 50DS7EOM173 7-54...
-
Page 188: Handling Machine In Extremely Hot Places
10. HANDLING MACHINE IN EXTREMELY HOT PLACES Pay careful attention particularly to the following points when handling the machine in extremely hot places. Cooling system Scale and rust form more easily in the cooling system, so wash with anticorrosion liquid. Always try to have clean and soft water circulating in the system. -
Page 189: Cold Weather Operation
11. COLD WEATHER OPERATION PREPARATION FOR LOW TEMPERATURE Replace lubrication oil with oil of the prescribed Min ambient temperature viscosity. ( C) Fuel of low pour point must be used. ASTM Amount of D975 No.1 diesel fuel should be used at ambient antifreeze(%) temperature lower than -5 Amount of... -
Page 190: Storage
12. STORAGE BEFORE STORAGE When you keep your forklift truck in storage for an extended period of time, observe the following safeguard instruction: Wash and tidy the truck and house it in a dry building. When the truck has to be placed outdoors, park it on a even ground and cover it securely with canvas. -
Page 191: Transport
13. TRANSPORT PRECAUTIONS FOR LOADING AND UNLOADING Contact your HYUNDAI forklift distributor for advice regarding transportation of the machine. When loading or unloading the machine on or from a transporter, using loading ramp, the following precautions must always be observed. -
Page 192: Loading And Unloading By Crane
14. LOADING AND UNLOADING BY CRANE Check the weight, length, width and height of the 1.5~7 ton 20D/25D/30D/33D-7E ONLY truck referring to the chapter 8, specifications when you are going to hoist the truck. Wire rope Stay Use long wire rope and stay to keep the distance with the machine as it should avoid touching with Mast the truck body. -
Page 193: Recommendation Table For Lubricants
15. RECOMMENDATION TABLE FOR LUBRICANTS NEW MACHINE New machine uses following fuel, coolant and lubricant. 5D/18D/20DA-7E, 20D/25D/30D/33D-7E, 20DF/25DF/30DF/33DF-7, 35DF-7 Description Specification Engine oil SAE 10W-30(API CH4 class or better) T/M oil ATF DEXRON III Gear oil MOBILFLUID 424 Hydraulic oil ISO VG32/VG46/VG68 Brake oil AZOLA ZS10(Hydraulic oil, SAE 10W) -
Page 194: Fuel And Lubricants
16. FUEL AND LUBRICANTS 15D/18D/20DA-7E, 20D/25D/30D/33D-7E, 20DF/25DF/30DF/33DF-7, 35DF-7 Capacity (U.S.gal) Ambient temperature Service Kind of 2.0~3.3ton, 15D/18D/ point fluid 35DF-7 20DA-7E (-4) (14) (32) (50) (68) (86) (104) 20~33DF-7 SAE 30 13.2 (3.49) SAE 10W Engine oil Engine oil (2.5) SAE 10W-30 (1.45) SAE 15W-40... - Page 195 35D/40D/45D-7E, 50D-7AE, 35DS/40DS/45DS/50DA-7E Ambient temperature Service Kind of Capacity (U.S.gal) point fluid (-4) (14) (32) (50) (68) (86) (104) SAE 30 SAE 10W HMC : 8.5 (2.2) Engine oil Engine oil MHI : 16.5 (4.3) SAE 10W-30 SAE 15W-40 Torque converter T/M oil ATF DEXRON III...
- Page 196 50D/60D/70D-7E, 50DS/60DS/70DS-7E, 80D-7E Ambient temperature Service Kind of Capacity point fluid (U.S.gal) (-4) (14) (32) (50) (68) (86) (104) SAE 30 SAE 10W Engine oil HMC : 8.5 (2.2) Engine oil MHI : 16.5 (4.3) SAE 10W-30 SAE 15W-40 Torque T/M oil converter 18(4.8)
- Page 197 50DF/60DF/70DF-7 Ambient temperature Service Kind of Capacity point fluid (U.S.gal) (-4) (14) (32) (50) (68) (86) (104) SAE 30 SAE 10W Engine oil Engine oil HMC : 8.5 (2.2) SAE 10W-30 SAE 15W-40 Torque converter T/M oil 13(3.4) ATF DEXRON III transmission 12.5 Axle...
-
Page 198: Specifications
8. SPECIFICATIONS 1. SPECIFICATION TABLE 15D/18D/20DA-7E C' C 15D7ESP01 Model Unit 15D-7E 18D-7E 20DA-7E Capacity 1500 1750 2000 Load center Weight(Unloaded) 2850 3020 3166 Lifting height 3300 Free lift Lifting speed(Unload/Load) Fork 650/620 650/620 650/620 mm/sec Lowering speed(Unload/Load) mm/sec 450/500... - Page 199 20D/25D/30D/33D-7E C' C D255SP01 Model Unit 20D-7E 25D-7E 30D-7E 33D-7E Capacity 2000 2500 3000 3300 Load center Weight(Unloaded) 3604 3894 4411 4823 Lifting height 3300 3200 Free lift Lifting speed(Unload/Load) 590/560 590/540 500/480 500/470 Fork mm/sec Lowering speed(Unload/Load) 450/500 mm/sec L W T L,W,T 1050 100 45...
- Page 200 20DF/25DF/30DF/33DF-7, 35DF-7 C' C D255SP01 Model Unit 20DF-7 25DF-7 30DF-7 33DF-7 35DF-7 Capacity 2000 2500 3000 3300 3500 Load center Weight(Unloaded) 3430 3720 4237 4648 4761 Lifting height 3005 3205 3005 Free lift Lifting speed(Unload/Load) Fork 590/570 590/550 480/460 480/450 460/420 mm/sec Lowering speed(Unload/Load)
- Page 201 35D/40D/45D-7E, 50D-7AE (HMC ENGINE) ENGINE AIR INTAKE KEEP WATER AND OTHER FOREIGN MATERIALS OUT. KEEP WATER AND OTHER FOREIGN MATERIALS OUT. 35DS7ESP01 Model Unit 35D-7E 40D-7E 45D-7E 50D-7AE Capacity 3500 4000 4500 5000 Load center Weight(Unloaded) 5832 6392 6807 7302 Lifting height 3020 2930...
- Page 202 35DS/40DS/45DS/50DA-7E (MHI ENGINE) ENGINE AIR INTAKE KEEP WATER AND OTHER FOREIGN MATERIALS OUT. KEEP WATER AND OTHER FOREIGN MATERIALS OUT. 35DS7ESP01 Model Unit 35DS-7E 40DS-7E 45DS-7E 50DA-7E Capacity 3500 4000 4500 5000 Load center Weight(Unloaded) 5894 6464 6880 7302 Lifting height 3000 2900 Free lift...
- Page 203 50D/60D/70D-7E, 80D-7E (HMC ENGINE) 50DESP01 Model Unit 50D-7E 60D-7E 70D-7E 80D-7E Capacity 5000 6000 7000 8000 Load center Weight(Unloaded) 8440 9218 9885 11006 Lifting height 3030 3030 3030 Free lift Lifting speed(Unload/Load) 460/440 460/430 460/420 480/410 Fork mm/sec Lowering speed(Unload/Load) 450/500 mm/sec L W T...
- Page 204 50DS/60DS/70DS-7E 50DS7ESP01 Model Unit 50DS-7E 60DS-7E 70DS-7E Capacity 5000 6000 7000 Load center Weight(Unloaded) 8602 9245 9871 Lifting height 3030 Free lift Lifting speed(Unload/Load) 480/450 480/440 480/430 Fork mm/sec Lowering speed(Unload/Load) 450/500 mm/sec L W T L,W,T 1200 150 60 1200 150 65 Tilt angle (forward/backward) 15/10...
- Page 205 50DF/60DF/70DF-7 60DF7ESP01 Model Unit 50DF-7 60DF-7 70DF-7 Capacity 5000 6000 7000 Load center Weight(Unloaded) 8382 9245 9871 3030 Lifting height Free lift Fork 460/440 460/430 460/420 Lifting speed(Unload/Load) mm/sec 450/500 Lowering speed(Unload/Load) mm/sec L,W,T L W T 1200 150 60 1200 180 65 C/C’...
-
Page 206: Specification For Major Components
2 2 . SPECIFICATION FOR MAJOR COMPONENTS 15D/18D/20DA-7E ENGINE Item Specification Unit Model KUBOTA V2203-M-E3B Type 4-cycle, in-line overhead valve Cooling Method Water cooling Number of cylinders and arrangement 4 cylinders, in line Firing order 1-3-4-2 Combustion chamber type In direct injection Cylinder bore X stroke mm(in) 87 92.4(3.4... - Page 207 POWER TRAIN DEVICES Item Specification Model KAPEC 280 DK Torque converter Type 3 Element, 1 stage, 2 phase Stall ratio 2.9 : 1 Type Full auto, power shift Gear shift(FWD/REV) Transmission Control Electrical single lever type, kick-down system 2.137 Overhaul ratio 2.214 Type Front-wheel drive type, fixed location...
- Page 208 20D/25D/30D/33D-7E ENGINE Item Specification Unit Model KUBOTA V3600 Type Vertical, water-cooled, 4-cycle diesel Cooling Method Water cooling Number of cylinders and arrangement 4 cylinders, in-line Firing order 1-3-4-2 Combustion type Spherical type(E-TVCS) mm(in) Cylinder bore X stroke 98 120(3.9 4.7 Piston displacement cc(cu in) 3620(221)
- Page 209 POWER TRAIN DEVICES Item Specification Model KAPEC 280 DJ Torque converter Type 3 Element, 1 stage, 2 phase Stall ratio 2.87 Type Power shift Gear shift(FWD/REV) Transmission Control Electrical single lever type, kick-down system 2.444 Overhaul ratio 2.536 Type Front-wheel drive type, fixed location Gear ratio Axle Gear...
- Page 210 20DF/25DF/30DF/33DF-7 ENGINE Item Specification Unit Model HMC D4BB Type Vertical, water-cooled, 4-cycle diesel Cooling Method Water cooling Number of cylinders and arrangement 4 cylinders, in-line Firing order 1-3-4-2 Combustion type Swirl mm(in) Cylinder bore X stroke 91.1 100(3.6 3.9 Piston displacement cc(cu in) 2607(159) Compression ratio...
- Page 211 POWER TRAIN DEVICES Item Specification Model KAPEC 280 DJ Torque converter Type 3 Element, 1 stage, 2 phase Stall ratio 2.87 Type Power shift Gear shift(FWD/REV) Transmission Control Electrical single lever type, kick-down system 2.444 Overhaul ratio 2.536 Type Front-wheel drive type, fixed location Gear ratio Axle Gear...
- Page 212 35DF-7 ENGINE Item Specification Unit Model KUBOTA V3600 Type Vertical, water-cooled, 4-cycle diesel Cooling Method Water cooling Number of cylinders and arrangement 4 cylinders, in-line Firing order 1-3-4-2 Combustion type Spherical type(E-TVCS) mm(in) Cylinder bore X stroke 98 120(3.9 4.7 Piston displacement cc(cu in) 3620(221)
- Page 213 POWER TRAIN DEVICES Item Specification Model KAPEC 280 DJ Torque converter Type 3 Element, 1 stage, 2 phase Stall ratio 2.87 Type Power shift Gear shift(FWD/REV) Transmission Control Electrical single lever type 1.143 : 1 Overhaul ratio 1.143 : 1 Type Front-wheel drive type, fixed location Gear ratio...
- Page 214 35D/40D/45D-7E, 50D-7AE ENGINE Item Specification Unit Model HYUNDAI D4DD Type 4 cycle turbocharged diesel type Cooling Method Water cooling Number of cylinders and arrangement 4 cylinders, In-line Firing order 1-3-4-2 Combustion chamber type Direct injection mm(in) Cylinder bore X stroke 104 115(4.1 4.5)
- Page 215 POWER TRAIN DEVICES Item Specification Model DE 280 (KAPEC) Torque converter Type 3 Element, 1 stage, 2 phase Stall ratio 2.25 : 1 Type Power shift Gear shift(FWD/REV) Transmission Control Electrical single lever type 1st : 2.550 2nd : 1.218 Overhaul ratio 1st : 2.550 2nd : 1.218...
- Page 216 35DS/40DS/45DS/50DA-7E ENGINE Item Specification Unit Model MITSUBISHI S6S-T Type 4-cycle, in-line, Vertical OHV Cooling Method Water cooling Number of cylinders and arrangement 6 cylinders, in line Firing order 1-5-3-6-2-4 Combustion chamber type Indirect injection mm(in) Cylinder bore X stroke 94 120(3.7 4.7) Piston displacement cc(cu in) 4996(305)
- Page 217 POWER TRAIN DEVICES Item Specification Model DE 280 (KAPEC) Torque converter Type 3 Element, 1 stage, 2 phase Stall ratio 2.25 : 1 Type Power shift Gear shift(FWD/REV) Transmission Control Electrical single lever type 1st : 2.550 2nd : 1.151 Overhaul ratio 1st : 2.550 2nd : 1.151...
- Page 218 50D/60D/70D-7E ENGINE Item Specification Unit Model HYUNDAI D4DD Type 4 cycle turbocharged diesel type Cooling Method Water cooling Number of cylinders and arrangement 4 cylinders, In-line Firing order 1-3-4-2 Combustion chamber type Direct injection mm(in) Cylinder bore X stroke 104 115(4.1 4.5)
- Page 219 POWER TRAIN DEVICES Item Specification Model W280, 2.526/248 Torque converter Type 3 Element, 1 stage, 2 phase Stall ratio 2.526 : 1 Type Full auto, Power shift Gear shift(FWD/REV) Transmission Control Electrical single lever type 1st : 4.446 2nd : 2.341 3rd : 0.974 Overhaul ratio 1st : 4.443...
- Page 220 50DS/60DS/70DS-7E ENGINE Item Specification Unit Model MITSUBISHI S6S-T Type 4-cycle, in-line, Vertical OHV Cooling Method Water cooling Number of cylinders and arrangement 6 cylinders, in line Firing order 1-5-3-6-2-4 Combustion chamber type Indirect injection mm(in) Cylinder bore X stroke 94 120(3.7 4.7) Piston displacement cc(cu in) 4996(305)
- Page 221 POWER TRAIN DEVICES Item Specification Model W280, 2.526/248 Torque converter Type 3 Element, 1 stage, 2 phase Stall ratio 2.526 Type Full auto, Power shift Gear shift(FWD/REV) Transmission Control Electrical single lever type 1st : 4.446 2nd : 2.341 3rd : 0.974 Overhaul ratio 1st : 4.443 2nd : 2.340...
- Page 222 50DF/60DF/70DF-7 ENGINE Item Specification Unit Model HYUNDAI D4DD Type 4 cycle turbocharged diesel type Cooling Method Water cooling Number of cylinders and arrangement 4 cylinders, In-line Firing order 1-3-4-2 Combustion chamber type Direct injection mm(in) Cylinder bore X stroke 104 115(4.1 4.5)
- Page 223 POWER TRAIN DEVICES Item Specification Type 3 Element, 1 stage, 2 phase Torque converter Stall ratio 2.526 Type Full auto, Power shift Gear shift(FWD/REV) Transmission Control Electrical single lever type 1st : 4.97 2nd : 1.55 Overhaul ratio 1st : 4.97 2nd : 1.55 Type Front-wheel drive type, fixed location...
- Page 224 80D-7E ENGINE Item Specification Unit Model HYUNDAI D4DD Type 4 cycle turbocharged diesel type Cooling Method Water cooling Number of cylinders and arrangement 4 cylinders, In-line Firing order 1-3-4-2 Combustion chamber type Direct injection mm(in) Cylinder bore X stroke 104 115(4.1 4.5)
- Page 225 POWER TRAIN DEVICES Item Specification Model W280, 2.526/248 Torque converter Type 3 Element, 1 stage, 2 phase Stall ratio 2.526 : 1 Type Full auto, Power shift Gear shift(FWD/REV) Transmission Control Electrical single lever type 1st : 4.446 2nd : 2.341 3rd : 0.974 Overhaul ratio 1st : 4.443...
-
Page 226: Tightening Torque
3. TIGHTENING TORQUE 15D/18D/20DA-7E kgf m lbf ft Item Size Engine mounting bolt, nut 1.25 12.3 2.4 89 17.4 Engine Radiator mounting bolt, nut M 8 1.25 2.5 0.5 18.1 3.6 Torque converter mounting bolt M10 1.25 6.9 1.4 50 10 MCV mounting bolt, nut M10 1.5 6.9 1.4... - Page 227 20DF/25DF/30DF/33DF-7, 35DF-7 lbf ft Item Size kgf m Engine mounting nut (bracket-frame) M12 1.25 9.7 1.9 70 13 Engine mounting bolt (engine-bracket) M10 1.25 7.4 1.5 53.5 10 Engine Radiator mounting bolt, nut M 8 1.25 2.5 0.5 18 3.6 Torque converter mounting bolt(8EA) M10 1.25 7.4 1.5...
- Page 228 35DS/40DS/45DS/50DA-7E Item Size kgf m lbf ft Engine mounting bolt, nut M16 2.0 Engine Radiator mounting bolt, nut 6.9 1.4 50 10 M10 1.5 MCV mounting bolt, nut 19.6 2.9 142 21 M14 2.0 Hydraulic system Steering unit mounting bolt 6.9 1.4 50 10 M10 1.5...
- Page 229 50DS/60DS/70DS-7E kgf m lbf ft Item Size Engine mounting bolt, nut M16 2.0 Engine Radiator mounting bolt, nut 6.9 1.4 50 10 M10 1.5 MCV mounting bolt, nut 12.8 3.0 93 22 M12 1.75 Hydraulic system Steering unit mounting bolt 6.9 1.4 50 10 M10 1.5...
-
Page 230: Troubleshooting
9 . TROUBLESHOOTING 1. ENGINE SYSTEM Trouble symptom robable cause Remedy Oil pressure caution lamp fails Low oil level in oil pan. Add oil. to go out. Oil filter element clogged. Replace element. Loose or worn oil pipe joint leaks oil. Check and repair. -
Page 231: Electrical System
2. ELECTRICAL SYSTEM Trouble symptom robable cause Remedy Lamps dimming even at maxi- Faulty wiring. Check for loose terminal and discon- mum engine speed. nected wire. Lamps flicker during engine Improper belt tension. Adjust belt tension. operation. Charge lamp does not light du Charge lamp defective. -
Page 232: Torque Flow System
3 3 . TORQUE FLOW SYSTEM Trouble symptom robable cause Remedy 1. Excessive oil temperature rise Improper oil level. Check oil level. Add or drain oil as 1) Torque converter necessary. Impeller interfering with surroundings. After draining oil from oil tank and tra- nsmission, check and replace interfe- ring parts. - Page 233 Trouble symptom robable cause Remedy 3.Low output power 1) Torque converter Insufficient hydraulic pressure : Low oil level. Check oil level and add oil Air sucked in. Check joints and pipes. If necessary, retighten joint or repla- ce packing. Oil filter clogging. Check and replace Oil pump worn.
- Page 234 Trouble symptom robable cause Remedy 4.Unusual oil pressure 1) Oil pressure is high Control valve malfunctioning. (1)Check for spool operation. If necessary, replace valve. (2)Check for clogging of small hole in valve body. If necessary, clean or repair. Cold weather. (high oil viscosity) When atmospheric temp is below fr- eezing point (when normal oil pressure is recover-...
- Page 235 Trouble symptom robable cause Remedy 5. Power is not transmitted Foreign matter intruding into oil pass- Disassemble, check and repair or (Continue) age to clutch. replace. Shaft spline worn. Disassemble, check and replace. 6. Oil leakage Oil leaks from oil seal. Disassemble and check for wear of (Transmission and torque seal lips and mating sliding surfaces...
-
Page 236: Steering System
4. STEERING SYSTEM Trouble symptom robable cause Remedy 1. Steering wheel drags. Low oil pressure. Check locknut. Repair. Bearing faulty. Clean or replace. Spring spool faulty. Clean or replace. Reaction plunger faulty. Replace. Ball-and-screw assembly faulty. Clean or replace. Sector shaft adjusting screw excessi- Adjust. -
Page 237: Brake System
5. BRAKE SYSTEM Trouble symptom robable cause Remedy 1. Insufficient braking force Hydraulic system leaks oil. Repair and add oil. Hydraulic system leaks air. Bleed air. Lining surface soiled with water or oil. Clean or replace. Lining surface roughened or in poor Repair by polishing or replace. - Page 238 Trouble symptom robable cause Remedy 5. Brake squeaks Lining poor contact with drum. Repair or replace. (continue) Anti-rattle spring poorly installed. Repair or replace. 6. Brake rapping Drum sliding surface roughened. Repair by polishing or replace. Drum eccentric or excessively distort- Replace.
-
Page 239: Hydraulic System
6. HYDRAULIC SYSTEM Trouble symptom robable cause Remedy 1. Large fork lowering speed. Seal inside control valve defective. Replace spool or valve body. Oil leaks from joint or hose. Replace. Seal inside cylinder defective. Replace packing. 2. Large spontaneous tilt of Tilting backward : Check valve defec- Clean or replace. -
Page 240: Testing And Adjusting
10. TESTING AND ADJUSTING 1. ENGINE SYSTEM EASE OF STARTING, NOISE Set gear shift lever at N, and pull parking brake. Turn start switch to HEAT(only 20~33DF-7). Turn start switch ON. When heater signal lamp goes out, turn key to START, and start engine. When engine starts, check if it starts smoothly, and if it makes any abnormal D255OM10... - Page 241 WHEN ACCELERATOR PEDAL IS DEPRESSED Check that accelerator pedal does not catch when depressed. Check that engine speed increases in accordance with amount pedal is depressed. When doing this, check that engine speed changes without gasping, abnormal noise, abnormal explosions, or irregular vibration. Check that exhaust gas is colorless when the engine is idling, and a thin black color when accelerator pedal is depressed.
- Page 242 The fuel filter element cannot be inspected from the outside, so replace it periodically. (Refer to 7.PLANNED MAINTENANCE AND LUBRICATION) Always use HYUNDAI Forklift genuine parts when replacing the element. After replacing the element, run the engine and check for oil leakage from the filter mount.
- Page 243 FAN BELT Check that fan belt is not damaged. Alt. Check inside of belt also. If bottom of pulley pulley pulley groove is shining, belt will slip so replace. Check deflection when fan belt is pushed with a finger pressure at a point midway between fan pulley and alternator pulley.
-
Page 244: Drive System
2. DRIVE SYSTEM GEAR SHIFT LEVER Neutral starting Engine can be started only when the shifting lever is in neutral position. Shifting FWD/REV lever Forward Push the lever forward then forward solenoid valve operates and oil comes to forward clutch thus the truck will run forward. - Page 245 Electric accelerator pedal (35D/40D/45D-7E, 50D-7AE, 50D/60D/70D-7E, 50DF/60DF/70DF-7, 80D-7E) Pedal operation range is "A ". Model Operation range(A ) 3.5~8.0 ton 17.5 2 160D7TA01 rake pedal Adjust stopper bolt(1) so that pedal height is "H". Adjust push rod(2) so that pedal play is idle stroke.
- Page 246 Inching pedal Adjust stopper bolt(1) so that pedal height is "H". Adjust rod(2) so that length of inching spool is "A" when pedal height is "H". Adjust bolt(3) so that brake pedal interconnects with inching pedal at inching pedal stroke "P". Unit:mm Model IDLE...
- Page 247 Differential case 1.5~3.3 ton Air breather 35DF-7 Remove the dipstick at front face of the Dipstick differential case. The oil should be leveled with the marking on the dipstick. If the oil level is too low, add oil through the dipstick hole at the top of the differential case.
-
Page 248: Travel System
3. TRAVEL SYSTEM TIRES Check tire pressure using tire gauge : SEE 5-3 CHECK BEFORE STARTING ENGINE Check visually for cracks and damage to tread and side wall. If crack or damage is serious, replace tire. Wear Measure tread of pneumatic tires(tires with air). -
Page 249: Steering System
4. STEERING SYSTEM STEERING WHEEL Set rear wheels facing straight forward, 30-60mm then turn steering wheel to left and right. (1.2-2.4 in) Measure range of steering wheel movement before rear wheel starts to move. Range should be 30 - 60mm at rim of steering wheel. -
Page 250: Adjustment Of Parking Brake Lever
5. ADJUSTMENT OF PARKING BRAKE LEVER 1. RATCHET TYPE PARKING LEVER 15D/18D/20DA-7E, 20D/25D/30D/33D-7E, 20DF/25DF/30DF/33DF-7, 35DF-7 Put the lever in the brake released position. Tighten it with a adjust screw so that lever Lever stroke stroke is 12.1 Pawl Cowl t should be maintained at least 4 mm of the latching depth that the pawl of the parking lever is hasped on the latch of Ratchet... - Page 251 35DS/40DS/45DS-7E, 50DA-7E, 50DS/60DS/70DS-7E Put the lever in the brake released position. 3.5~8.0ton Turn knob in order that the adjuster(2) may be operated. The stroke of the parking lever is as follows. Knob 35DS/40DS/45DS-7E, 50DA-7E : 87.6 50DS/60DS/70DS-7E : 97.7 Adjust nut When the parking lever is located to unlock position, it should be adjusted the parking switch in order that the sensor of...
Need help?
Do you have a question about the 15D-7E and is the answer not in the manual?
Questions and answers
How do change the KG TO LBS
To convert kilograms to pounds, multiply the weight in kilograms by 2.20462. For example, if the weight of a Hyundai part with part number 15D-7E is 2850 kg (unloaded weight), the conversion would be:
2850 kg × 2.20462 = 6283.49 pounds.
This answer is automatically generated