Table of Contents
Advertisement
Quick Links
Advertisement
Table of Contents

Related Manuals for GOLDENSEA UV UVAIR300-F


Summary of Contents for GOLDENSEA UV UVAIR300-F
- Page 1 UVAIR300-F USER MANUAL KEEP THIS MANUAL FOR FUTURE NEEDS...
- Page 2 www.goldenseauv.com Voltage Input: AC220-240V~, 50/60Hz; Power: 450W; Product Size: 1245xØ330mm IMPORTANT SAFEGUARDS When using electrical equipment, basic safety precautions should always be followed including the following: READ AND FOLLOW ALL SAFETY INSTRUCTIONS a) This equipment is designed for use with germicidal UV radiation sources and UV radiation can pose a risk of personal injury.
- Page 3 www.goldenseauv.com The UV-C wavelength is 253.7nm. Avertissement – RISQUE DE BLESSURES WARNING – RISK OF PERSONAL INJURY CORPORELLES THIS EQUIPMENT IS DESIGNED FOR CET ÉQUIPEMENT EST CONÇU POUR ÊTRE USE WITH GERMICIDAL LAMPS OR UV UTILISÉ AVEC DES LAMPES GERMICIDALES OU SOURCES AND MUST BE INSTALLED DES SOURCES UV ET DOIT ÊTRE INSTALLÉ...
-
Page 4: Table Of Contents
Thank you for purchasing a GOLDENSEA UV product. You have acquired a powerful and versatile device. We are confident that you will be satisfied with our excellent products and service. For your own safety, please read this user manual carefully before installing and operating the device. -
Page 5: Manual Operation (Remote Control)
www.goldenseauv.com 1. Manual Operation (Remote Control) 1) Plug-in and power on:the power indicator light turns on. 2) Press the Start button on the remote control to turn on. 3) Choose the fan speed(Silent、Low、Mid、Max), the indicator light of fan level will turn 4) Press the Start button on the remote control to turn off. -
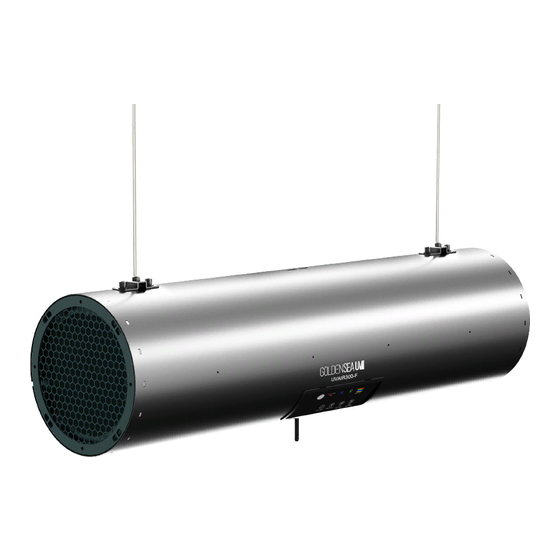
Page 6: Product Overview
www.goldenseauv.com 3. Product Overview 1) Power Cable 5) Wireless 9) WIFI Indicator 2) Infrared Inductor 6) WIFI Reset 10) Filter Indicator 3) Power/Tube Indicator 7) Left Filter Reset 11) Fan Level Indicator 4) Lamp Reset 8) Right Filter Reset 12) Filter 4. -
Page 7: Installation Instructions
www.goldenseauv.com 5. Installation Instructions 5.1 Wall Mounting Steps: 1. Fix the Triangular Brackets to the screw holes on the side of the device with 4 inner hexagonal cylindrical screws (M10x30mm) provided. 2. Mount the 2 Breckets on the wall with a distance of 1020mm with 4 outer hexagonal screws (M8x50mm). -
Page 8: Replacing The Part
www.goldenseauv.com Steps: 1. Fix the rigging brackets to the screw holes on top of the device with 4 inner hexagonal cylindrical screws (M10x22mm) provided. 2. Fix the rigging brackets to the hanging rods on the ceiling as shown. 3. Attach a safety cable (not included) between the handle of device and a fixing point on the ceiling or wall. - Page 9 www.goldenseauv.com 6.2. Replacement or removal of iron filter The fixing method of iron filter on both sides is magnet adsorption. When dismantling, after removing the safety rope buckle, the iron filter components can be directly removed. 6.3. Replacement or removal of activated carbon filter The fixation method of activated carbon filter is magnet adsorption.
-
Page 10: Troubleshooting Tips
www.goldenseauv.com 7. Troubleshooting Tips .1 What to do if the device doesn’t work? 1. Ensure the device is plugged into a working wall socket. 2. Ensure the plug is wired correctly and terminal well-connected. 3. If you still have issues with the device, please contact your local dealer or our customer service for assistance. -
Page 11: Cleaning And Maintenance
www.goldenseauv.com 9. Cleaning and Maintenance 1. To ensure the device remains in good condition and does not fail prematurely, regular maintenance, cleaning and checks are required. 2. For cleaning of the device, please use a lint-free cloth. 3. To avoid damage to the device, never use detergent or solvents. 4.
Need help?
Do you have a question about the UVAIR300-F and is the answer not in the manual?
Questions and answers