CAME RIOED8WS Manual
Hide thumbs
Also See for RIOED8WS:
- Manual (21 pages) ,
- Manual (21 pages) ,
- Instructions manual (8 pages)
Table of Contents
Advertisement
Available languages
Available languages
Advertisement
Table of Contents

Related Manuals for CAME RIOED8WS


Summary of Contents for CAME RIOED8WS
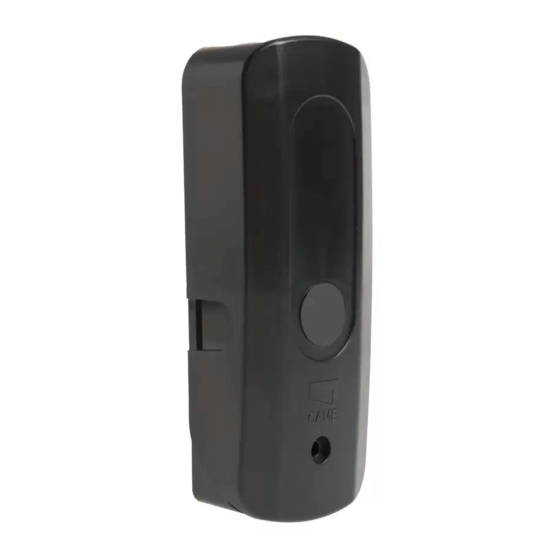
- Page 1 IP54 FA00947M4A ① ② IT Italiano ③ EN English FR Français RU Pусский ④ CAME S.p.A. Via Martiri Della Libertà, 15 31030 - Dosson di Casier Treviso - Italy 55°C -20°C FA00947M4A - 11/2017 FA00947M4A - 11/2017...
- Page 2 FA00947M4A - 11/2017 FA00947M4A - 11/2017...
- Page 3 ⑤ ⑩ ⑥ ⑦ ⑧ FA00947M4A - 11/2017 FA00947M4A - 11/2017...
- Page 4 ⑪ ⑫ CH 1 CH 1 CH 2 CH 2 IN 1 IN 1 IN 2 IN 2 8,2 kΩ C NO NC DFWN DFWN FA00947M4A - 11/2017 FA00947M4A - 11/2017...
- Page 5 ⚠ NON COMPATIBILE CON IL SISTEMA RIO VERSIONE 1.0 Per accedere al video di installazione usare il QR code. Avvertenze generali Came S.p.A. non può considerarsi respon- Prima di iniziare l’installazione, leggere sabile per eventuali danni causati da un attentamente le istruzioni ed eseguire gli uso improprio, erroneo o irragionevole del interventi come specifi...
-
Page 6: Dati Tecnici
⑧ Vite di fi ssaggio del coperchio potrebbero disturbare la comunicazione radio. ⑩ Scheda Installazione e collegamenti Dati tecnici ⚠ Fissare il modulo wireless RIOED8WS in prossimità della scheda RIOCN8WS o RIOCT8WS, in modo da non avere Tipo RIOED8WS ostacoli in metallo o in cemento. - Page 7 RESET (vedi PROCEDURA - Tenere premuto il pulsante T2 per circa 10 secondi sulla DI RESET). scheda RIOED8WS, fi no a quando i LED CH1 e CH2 lampeg- FA00947M4A - 11/2017 FA00947M4A - 11/2017...
-
Page 8: Soluzione Dei Problemi
2 (EN 954-1). to della memorizzazione. Dismissione e smaltimento. Non disperdere nell’am- ⚠ Quando il dispositivo RIOED8WS ha le batterie quasi biente l’imballaggio e il dispositivo alla fi ne del ciclo di scariche, emette un segnale acustico ogni 10 secondi. - Page 9 ⚠ INCOMPATIBLE WITH RIO SYSTEM VERSION 1.0 To access the installation video, use the QR code. General Precautions Came S.p.A. is not liable for any damage Before installing, carefully read the instruc- caused if the product is used improperly, tions and follow the process explained by wrongfully or unreasonably.
-
Page 10: Technical Data
⑧ Cover fastening screw could interfere with radio communications. ⑩ Board Installation and connections Technical data ⚠ Fit the RIOED8WS photocells near the RIOCN8WS or Type RIOED8WS the RIOCT8WS card, so as not to have any metal or cement obstructions. Power supply (V DC) -
Page 11: Resetting Procedure
RIOCN8WS or the RIOCT8WS card, will switch from fl ashing - NON-resistive, sensitive-safety edges: connect the to off , and the CH1 LED on the RIOED8WS card will fl ash DF-series edges to the IN2 terminals, and add the sup- blue once and then switch off . -
Page 12: Troubleshooting
- Keep pressed the T2 button on for about 10 seconds on CAME S.p.A. declares that the RIOED8WS photocells the RIOED8WS card, until the CH1 and CH2 LEDs fl ash red. conform to the provisions of directive 2014/53/EU. ☞ If you replace any device on the system, you will have The complete wording of the EU declaration of con- to RESET and then again save all of the system devices. - Page 13 L’installation doit être réalisée selon les représentant autorisé peut donner lieu à règles de l’art de manière à ce que le boî- des situations dangereuses. Came S.p.A. décline toute responsabilité tier reste propre et bien fermé. FA00947M4A - 11/2017 FA00947M4A - 11/2017...
-
Page 14: Données Techniques
⑦ Vis de fi xation de la carte ⑧ Vis de fi xation du couvercle Installation et connexions ⑩ Carte ⚠ Fixer le module sans fi l RIOED8WS près de la carte Données techniques RIOCN8WS ou RIOCT8WS, de manière à éliminer tout obstacle en métal ou en ciment. - Page 15 DF aux bornes IN2 en ajoutant la résistance de 8,2 kΩ fournie ⑫. Mémorisation T2 - Mémoriser le module sans fi l RIOED8WS dans la carte Appuyer sur la touche T2 pendant une seconde sur la carte RIOCT8WS ou RIOCN8WS (voir le chapitre MÉMORISATION).
-
Page 16: Résolution Des Problèmes
Piles CAME S.p.A. déclare que le module sans fi l RIOED8WS ⚠ Les remplacer uniquement par des piles identiques est conforme à la directive 2014/53/UE. Le texte intégral ou équivalentes. de la déclaration de conformité UE est disponible sur In- ⚠... - Page 17 Для доступа к видеоролику о монтаже используйте QR-код. Общие предупреждения циям. Перед началом работ по монтажу вни- CAME S.p.А. не несет никакой ответ- мательно ознакомьтесь с инструкциями ственности за ущерб, нанесенный не- и выполните установку согласно реко- правильным, ошибочным или небреж- мендациям...
- Page 18 гими препятствиями, которые могут создавать помехи при передаче радиосигнала. Модель RIOED8WS Монтаж и подключения Напряжение электропитания (=В) Потребление в режиме ожидания (мкА) ⚠ Зафиксируйте беспроводной модуль RIOED8WS вблизи платы RIOCN8WS или RIOCT8WS, чтобы между Потребление при передаче сигнала (мA) FA00947M4A - 11/2017 FA00947M4A - 11/2017...
- Page 19 случае выполните RESET (см. ПРОЦЕДУРУ СБРОСА). - Прикрепите основание ⑤ к выбранной монтажной по- Запоминание Т1 верхности подходящими креплениями. Нажмите на одну секунду кнопку T1 на плате RIOED8WS: - Вставьте плату ⑩ в корпус ⑨. светодиодные индикаторы CH1 и CH2 попеременно за- - Зафиксируйте...
- Page 20 МИНАНИЕ всех устройств системы. о соответствии доступен по следующему адресу: Аккумуляторы www.came.com. RIOED8WS в сочетании с RIOCT8WS и автоматикой ⚠ Для замены должны использоваться только такие же или равноценные батарейки. (или блоком управления) с активированной функ- ⚠ Держите батарейки вне досягаемости детей. При...
Need help?
Do you have a question about the RIOED8WS and is the answer not in the manual?
Questions and answers